| Delphi Clinic | C++Builder Gate | Training & Consultancy | Delphi Notes Weblog | Dr.Bob's Webshop |
| Delphi Clinic | C++Builder Gate | Training & Consultancy | Delphi Notes Weblog | Dr.Bob's Webshop |
| ||||||

Enterprise Core Objects with Delphi 8 for .NET
In this paper, we'll explore the Enterprise Core Objects (ECO) of the Architect edition of Delphi 8 for .NET, covering the EcoSpace Object Model, UML (Unified Modeling Language), Classes, Attributes, Operations, Associations, Generalizations and Implementations, the PersistenceMapperXML, PersistenceMapperBdp, and Database Scripts.
Delphi 8 for .NET and ECO
Delphi 8 for .NET Architect contains support for ECO - the Enterprise Core Objects, which is the place to find support for MDA (Model Driven Architecture) and UML.
ECO is a persistence engine with code generator using a model-driven architecture and provides a run-time OCL (Object Constraint Language) evaluator and a complete run-time UML meta-model.
In this paper, we will learn how we can use the Architect edition Delphi 8 for .NET, and specifically the functionality found in Enterprise Core Objects (ECO) to design an Object Model (EcoSpace) which is made persistent inside a database, such as SQL Server or InterBase in this case.
Starting with ECO
Note that the Enterprise Core Objects (ECO) functionality is only available in the Architect edition of Delphi 8 for .NET.
If you don't have the Architect edition, you can work with the trial edition (once it's available for download).
Do File | New - Other, and select the ECO Windows Forms Application icon from the Delphi 8 for .NET Projects page of the Object Repository.
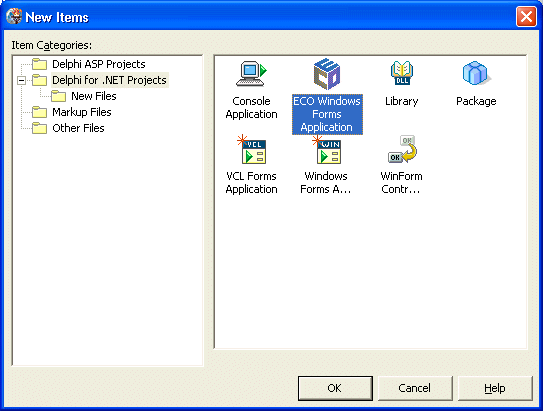
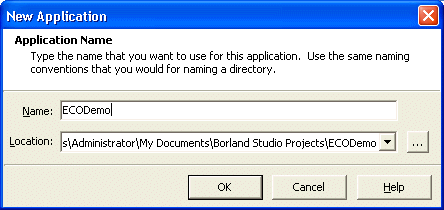
This presents you with a dialog where you can specify the name and location of the new ECO project, which is ECODemo in the following screenshot.
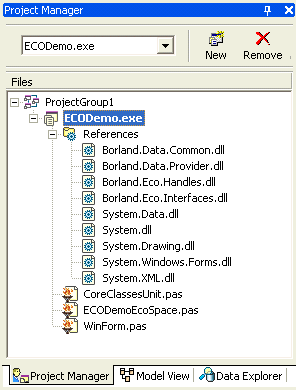
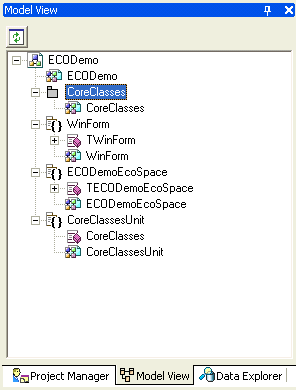
The ECODemo project consists of three units, namely: CoreClassesUnit.pas, ECODemoEcoSpace.pas, and WinForm.pas, as can be seen in the Project Manager. As you know by now, the Project Manager pane has three tabs: the other two are for the Model View, and the Data Explorer. The Model View is especially useful for ECO projects. Below are the Project Manager and Model View on the ECODemo project.
| 
|
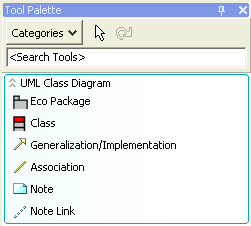
The CoreClasses package node (with the gray folder icon) contains a CoreClasses diagram node. Double-click on the CoreClasses diagram node to start the UML Designer in the Delphi 8 for .NET IDE. This is the place were you can design your objects using the UML techniques. For example by right-clicking on the UML Designer, you can create new classes, and inside classes you can add attributes, operations or constructors. Furthermore, you can use the drawing components from the special UML Class Diagram category of the Tools Palette, which is shown in the following screenshot.
Building the EcoSpace Object Model
With these building blocks, we can build an EcoSpace object model.
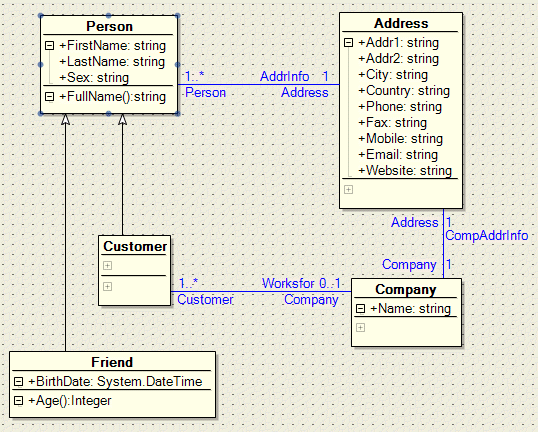
As an example, right-click on the UML Designer and create a new class.
Call it Person.
Right-click on Person and add three attributes: FirstName, LastName and Sex, all of type string.
Note that once you have added one attribute, you can add more by pressing the insert key.
But unfortunately, you still need to click on the new attribute to edit it in the diagram (alternately, you can use the Object Inspector to set the Name, Type and Visibility properties of the new attributes).
After having added these three attributes, right-click again on the class Person and add an operation called FullName: string.
Note that the UML Designer will automatically add a () to FullName, but make sure you specify the result type (the Returns property in the Object Inspector), otherwise you're defining a procedure FullName instead.
To implement the FullName operation, you can right-click on the operation and select "Open Source", which will bring you to the CoreClassesUnit inside the class definition of the Person class, just on top of the line for the FullName method:
  [UmlElement]
  function FullName(): string;
In order to find the implementation of this method, press Ctrl+Shift+Down, which will bring you to the empty implementation of the Person's FullName method. Obviously, the FullName is the concatenation of the FirstName and LastName fields (with a space in between), and the values of the FirstName and LastName fields are stored in private fields with an _ prefix.
  procedure Person.FullName();
  begin
    Result := _FirstName + ' ' + _LastName
  end;
Associations
A person can have an address.
And since sometimes more than one persons can be reached at that address, we cannot just add the address information to the person - that would lead to redundant information in the database.
So, right-click on the UML Designer and add a new class called Address.
Add 9 new attributes to it, all of type string, called Addr1, Addr2, City, Country, Phone, Fax, Mobile, Email, and Website (since there is no international standard for a postcode, we can put that data in the Addr2 field).
Now, in order to model the relation between a Person and an Address, we need to add an association object between them.
So, click on the Association object in the Tools Palette, and then click on Address and Person to connect them using a new association.
Use the Object Inspector to set the name to something meaningful, like AddrInfo.
By default, the associations created have a 0..1 multiplicity at both ends.
This means that the default association is expected to mean that a Person can have (live at) 0 or 1 Addresses, and an Address can have (host) 0 or 1 Persons.
Technically, that may be right - a person can be homeless, and an house can be empty, but a house can also hold more than one person.
And even a homeless person may have a mobile number.
So we can change the multiplicity of the association to be 1 at the Address end (a Person can have one Address), and 1..* at the Person end (an Address can have 1 or more Persons).
Derived Classes
The Person class is still very generic.
In fact, it may be too generic, so let's add some derived classes.
Right-click on the UML Designer again and add a new class called Customer.
This class is derived from Person, and the way to model that is to use a special Generalization/Implementation object from the Tool Palette.
Click on this particular icon, and then first on Customer and then on Person to indicate the fact that the Customer class is derived from the Person class.
Although we can now add attributes and operations to the new Customer class, there's a special case of most of my customers that we can model: they usually work at a company.
And a company can have more than one employee (i.e. potential customers), so we first need to model another class called Company.
This class gets one new attribute of type string called Name.
Coincidentally, a Company also has an Address, so we should use the association object to create an association between the Company class and the Address class, calling it CompAddrInfo, giving it a multiplicity of 1 at both ends (I am not interested in the fact that a company can have multiple offices, but if you are, then that's easy to change in the model of course).
Now, to complete the square, we can now add the association between the Customer class and the Company class - with a multiplicity of 0..1 at the Company end (a Customer in general works for 0 or 1 companies), and a multiplicity of 1..* at the Customer end (a Company has at least 1 persons who works for that company).
Note that this model represents the fact that apparently we're not even interested in Companies that are not related to at least one of our Customers.
As last example, let's add a more personal touch to the model, and add a new class called Friend.
This class is derived from Person - just like Customer - and has a new attribute called BirthDate of type DateTime.
Note that this type is automatically changed to System.DateTime by Delphi.
Apart from the BirthDate attribute, we also may want to add an operation called Age to calculate the Age of the Friend, returning an integer.
The implementation of function Age is as follows:
  function Friend.Age(): integer;
  var
    Year,Month: Integer;
  begin
    Year := DateTime.Now.Year - Self._BirthDate.Year;
    Month := DateTime.Now.Month - Self._BirthDate.Month;
    if Month = 0 then // birthday month...
      if (DateTime.Now.Day - Self._BirthDate.Day) < 0 then
        Month := -1;
    if Month < 0 then Dec(Year); // Birthday not yet this year
    Result := Year
  end;
As final step, we can express the fact that we're only interested in Customers or Friends (and not potential Customers), so we should only create instances of Customer or Friends.
This can be enforced by setting the Abstract property of the Person class to True.
All this designing leads to the UML Diagram that can be seen in the following screenshot:
 ]
]
Persisting the EcoSpace
Apart from offering a UML Designer, the Enterprise Core Objects of Delphi 8 for .NET also offer the ability to make this EcoSpace object model persistent.
This can be done inside a simple XML file, or in a real DBMS, connected by the Borland Data Providers for .NET.
For the persistent capabilities, you need to switch over to the ECODemoEcoSpace.pas unit in the Object Manager.
This unit defines your EcoSpace, and can be customised with components from the Enterprise Core Objects category from the Tools Palette.
Specifically, you may want to look at the three PersistenceMapper components: PersistenceMapperXml, PersistenceMapperSqlServer and PersistenceMapperBdp.
The PersistenceMapperXml component can save the EcoSpace inside an XML file, while the other two save the EcoSpace inside a DBMS.
PersistenceMapperXML
We will start by making the EcoSpace object model persistent in an XML file, so from the Enterprise Core Objects category, drop a PersistenceMapperXml control on the ECODemoEcoSpace designer, and point the Filename property to a useful location that can hold the XML file.
We can place it in c:\model.xml just to make it easy to find.
Now, click on the ECODemoEcoSpace designer again, and point the PersistenceMapper property to the PersistenceMapperXml control.
This will not automatically save the EcoSpace object model, however, we still need to write one line of code (which we get to in a moment - first, let's start to work with the objects).
Working with the EcoSpace Object Model
We've seen how to define an EcoSpace object model using the UML Designer, but we haven't seen how to actually use the objects in the EcoSpace.
For that, let's move to the WinForm.pas unit, which already contains five ECO components in the non-visual component area (from left to right these are EcoListActions, EcoModelAwareDragDrop, EcoAutoForms, rhRoot, and EcoGlobalActions.
The rhRoot component is a ReferenceHandle between the WinForm and the EcoSpace (and all objects inside it).
We need to add an additional component from the Enterprise Core Objects category, namely an ExpressionHandler.
An ExpressionHandle is linked to either a ReferenceHandle or another ExpressionHandle, and can be used to evaluate an OCL (Object Constraint Language) expression.
Point the RootHandle property of the ExpressionHandler to the rhRoot component.
Using the ExpressionHandle, we can build OCL expressions that can be displayed, for example the collection of all Customers or Friends inside a DataGrid.
To build OCL expressions, select the ExpressionHandle component and double-click on the Expression property, which will give you the OCL Expression Editor, showing the class types inside the EcoSpace (Address, Company, Customer, Friend, Person) as well as the ECOModelRoot node).
Ignore the warning that the code is not recently compiled, since that doesn't seem to disappear if you compile anyway.
Double-click on the Friend class, which shows you the properties and method for it, such as allInstances:
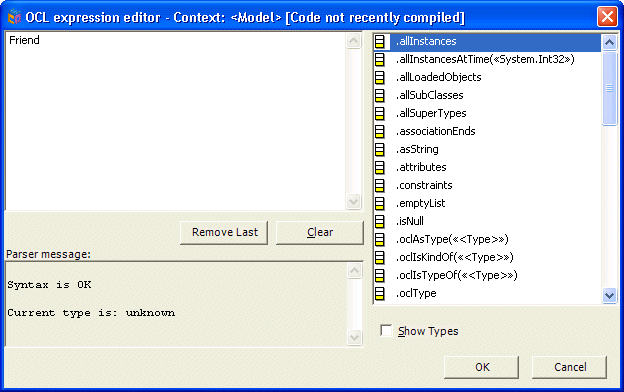
Complete the expression Friend.allInstances, and click on OK to close the dialog.
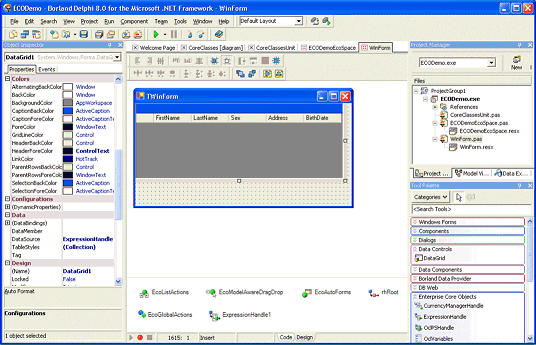
To actually display the result of this OCL expression, we can use a DataGrid control from the Data Controls category of the Tool Palette, with its DataSource property pointing to the ExpressionHandler component.
This will immediately show the meta data (the object fields) inside the grid at design-time.
Note that apart from the "normal" attributes, we also see the Address association.
As last field we get the BirthDate, since this was the only attribute that was added at the Friend class level - everything else was defined in the Person class already.
There's one more thing you may want to do: although the current application shows you all Friends inside a DataGrid, with the option to edit them and make them persistent, you still need a way to create a new Friend (so they are displayed in the DataGrid where you can edit them).
For this, drop a Button on the Windows Form, call it btnNewFriend, set its Text property to "New" and write a single line of code in the Click event handler:
  procedure TWinForm.btnNewFriend_Click(sender: System.Object; e: System.EventArgs);
  begin
    Friend.Create(EcoSpace)
  end;
At first this feels a bit strange, since you create something but you're not using it.
But if you look closely, you'll notice that you create a new Employee in the context of the EcoSpace - which means it will live on in the EcoSpace, and will be shown in the DataGrid (since this one is connected to the OCL expression Friend.allInstances).
  procedure TWinForm.btnClose_Click(sender: System.Object; e: System.EventArgs);
  begin
    EcoSpace.UpdateDatabase
  end;
This will make the EcoSpace object model persistent and streams it to an XML file for us.
If you compile and run the application, it starts with an empty DataGrid.
When you click on the New button, a new empty Friend object is added to the EcoSpace, and displayed in the DataGrid.
You can then edit the attributes (except for the Address, since there is no way to select an Address instance, yet).
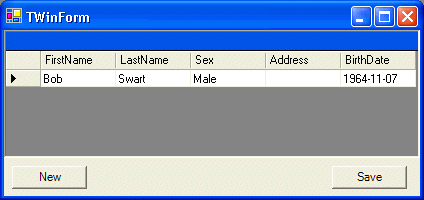
When you click on the Save button, the EcoSpace object model is saved inside the file specified by the PersistenceMapperXml. The contents of this XML file, for the single Friend object defined above, is as follows:
  <ValueSpace xmlns:xsi="http://www.w3.org/1999/XMLSchema-instance" space="preserve">
    <Friend>
      <id type="BoldDefaultObjectId">
        <ClassName>Friend</ClassName>
        <DbValue>1886516616</DbValue>
      </id>
      <persistencestate>0</persistencestate>
      <existencestate>1</existencestate>
      <timestamp>-1</timestamp>
      <members>
        <FirstName>
          <persistencestate>0</persistencestate>
          <content>Bob</content>
        </FirstName>
        <LastName>
          <persistencestate>0</persistencestate>
          <content>Swart</content>
        </LastName>
        <Sex>
          <persistencestate>0</persistencestate>
          <content>Male</content>
        </Sex>
        <Address>
          <persistencestate>0</persistencestate>
          <content>
            <id null="1" />
            <OrderNo>0</OrderNo>
          </content>
        </Address>
        <BirthDate>
          <persistencestate>0</persistencestate>
          <content>11/07/1964 00:00:00</content>
        </BirthDate>
      </members>
    </Friend>
  </ValueSpace>
When you restart the application, the EcoSpace object model is reloaded automatically.
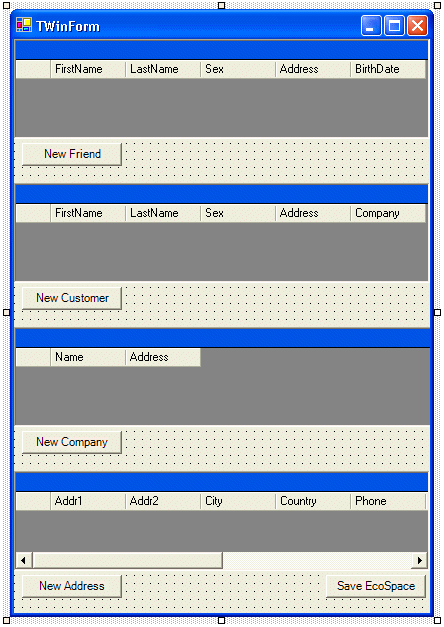
The implementation of the three new Click events of all buttons is as follows:
  procedure TWinForm.btnNewAddress_Click(sender: System.Object; e: System.EventArgs);
  begin
    Address.Create(EcoSpace)
  end;

  procedure TWinForm.btnNewCompany_Click(sender: System.Object; e: System.EventArgs);
  begin
    Company.Create(EcoSpace)
  end;

  procedure TWinForm.btnNewCustomer_Click(sender: System.Object; e: System.EventArgs);
  begin
    Customer.Create(EcoSpace)
  end;
CurrencyManagerHandles
Using this version of the application, we can add new Friends, Customers, Companies and Addresses, although nothing is related to each other.
In order to add the associations between the different objects, we need to perform a few more steps.
But before we can do that, we must first add the ability to know which class instance we're working with inside a DataGrid.
This is done by a CurrencyManagerHandle control, which maintains the current selected item in a list (like a Friend in the DataGrid).
First, let's add a CurrencyManagerHandle for the Friend classes - and the corresponding DataGrid - and then use this knowledge to add it to the other classes as well.
From the Enterprise Core Objects category of the Tool Palette, drop a CurrencyManagerHandle component.
Set the RootHandle property to ExpressionHandle1 - i.e. the ExpressionHandle that was used to get all instances of the Friend classes.
We also need to specify the list of items that the CurrencyManagerHandle should operate on, which is called the BindingContext.
If we point the BindingContext property to the DataGrid that displays the Friend classes, then the CurrencyManagerHandle knows the expression as well as the BindingContext and will maintain a handle to the current item for us.
We can use the Element property of the CurrencyManagerHandle, and use the AsObject to get the actual instance back of the current item in the list.
One thing where this can be useful, is to remove people from the list of Friends (if you can add friends to a list, then you should also be able to remove friends from that list again).
Drop a button on the WinForm, set it's name to btnDelFriend and the Text to "Del Friend" and implement the Click handler as follows:
  procedure TWinForm.btnDelFriend_Click(sender: System.Object; e: System.EventArgs);
  var
    OldFriend: Friend;
  begin
    OldFriend := CurrencyManagerHandle1.Element.AsObject as Friend;
    if Assigned(OldFriend) then
      OldFriend.AsIObject.Delete
  end;
The Element property of the CurrencyManagerHandle is of type IElement, and needs to return the actual object type using the AsObject method.
Adding Associations
Now that we know how to use CurrencyManagerHandlers to maintain the current item in the lists of objects, it's not that hard to add a button called btnFriendUseAddress to let the current selected Friend use the current selected Address, or in code:
  procedure TWinForm.btnFriendUseAddress_Click(sender: System.Object; e: System.EventArgs);
  var
    CurrFriend: Friend;
    CurrAddress: Address;
  begin
    CurrFriend := CurrencyManagerHandle1.Element.AsObject as Friend;
    CurrAddress := CurrencyManagerHandle4.Element.AsObject as Address;
    if Assigned(CurrFriend) and Assigned(CurrAddress) then
      CurrFriend.Address := CurrAddress
  end;
Similar code can be written for UseAddress buttons for the Customer and Company class, and finally we can give the Customer a LinkToCompany button to add the Company to the Customer's Company property.
The WinForm should now look as follows:
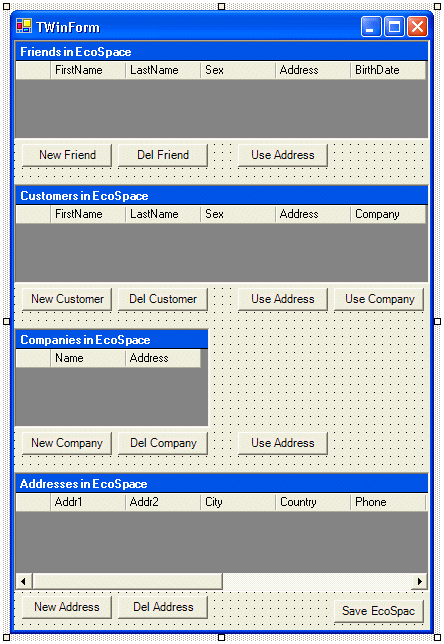
With the following implementation of the new event handlers:
  procedure TWinForm.btnCustomerUseCompany_Click(sender: System.Object; e: System.EventArgs);
  var
    CurrCustomer: Customer;
    CurrCompany: Company;
  begin
    CurrCustomer := CurrencyManagerHandle2.Element.AsObject as Customer;
    CurrCompany := CurrencyManagerHandle3.Element.AsObject as Company;
    if Assigned(CurrCustomer) and Assigned(CurrCompany) then
      CurrCustomer.Company := CurrCompany
  end;

  procedure TWinForm.btnCompanyUseAddress_Click(sender: System.Object; e: System.EventArgs);
  var
    CurrCompany: Company;
    CurrAddress: Address;
  begin
    CurrCompany := CurrencyManagerHandle3.Element.AsObject as Company;
    CurrAddress := CurrencyManagerHandle4.Element.AsObject as Address;
    if Assigned(CurrCompany) and Assigned(CurrAddress) then
      CurrCompany.Address := CurrAddress
  end;

  procedure TWinForm.btnCustomerUseAddress_Click(sender: System.Object; e: System.EventArgs);
  var
    CurrCustomer: Customer;
    CurrAddress: Address;
  begin
    CurrCustomer := CurrencyManagerHandle2.Element.AsObject as Customer;
    CurrAddress := CurrencyManagerHandle4.Element.AsObject as Address;
    if Assigned(CurrCustomer) and Assigned(CurrAddress) then
      CurrCustomer.Address := CurrAddress
  end;
We can now create associations between Addresses and the Friend, Customer, and Company objects, as well as associations between the Customer and Company objects.
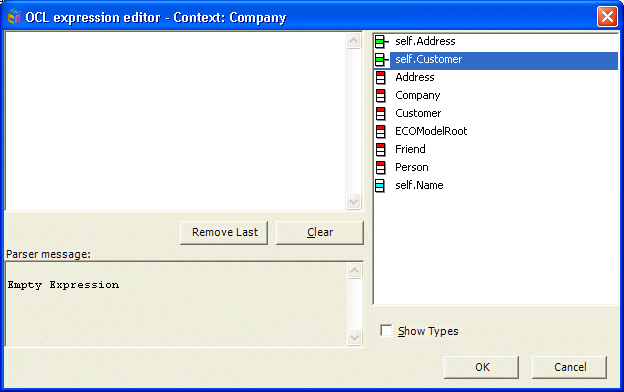
The result of this expression is the list of Customers from the EcoSpace that are associated with the current selected Company. You can add another DataGrid that is connected to this last ExpressionHandler, and you'll see the Customer contents change when you move from one Company object to another.
PersistenceMapperBdp
So far, we've saved the EcoSpace object model in a simple XML file, which is fine for small cases.
But for bigger real-world situations, you may want to store the EcoSpace object model inside a DBMS.
There is a special PersistenceMapperSqlServer that you can use in combination with Microsoft SQL Server.
However, the PersistenceMapperBdp control allows you to use any Borland Data Provider for .NET, including Microsoft SQL Server / MSDE, but also InterBase, IBM DB2, Informix and MS Access.
As a consequence, you may prefer to use the PersistenceMapperBdp control myself.
So, drop a PersistenceMapperBdp control on the ECODemoEcoSpace unit.
SqlDatabaseConfig
There are three steps that you have to perform in order to make use of this component.
First, you need to configure the SqlDatabaseConfig property of the PersistenceMapperBdp, which by default contains an <<EMPTY PERSISTENCE MAPPER CONFIG>> value.
You can specify a correct value by using one of the verbs at the bottom of the Object Inspector.
Since we want to use InterBase as persistence database, you must click on the InterBase dialect 3 setup link.
Clicking on this verb doesn't seem to do much (no dialog is started), but if you look again, you'll notice that the SqlDatabaseConfig property is now assigned a value specifically for the InterBase setup.
BdpConnection
The next step involves a BdpConnection component that maps to the specific InterBase database that we want to use to store our EcoSpace object model in.
It is highly recommended to use an empty InterBase database to start with.
In order to create a new empty InterBase table, go to the C:\Program Files\Borland\InterBase\Bin directory and start isql.exe - the command-line SQL interface to InterBase.
Enter the following command:
CREATE DATABASE 'C:\Data\ECODemo.gdb' PAGE_SIZE 2048;Which will create a new, empty ECODemo.gdb database in the C:\Data directory (obviously, feel free to place this database anywhere else).
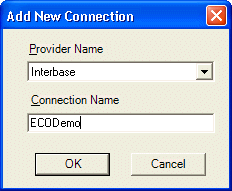
Once the new connection is created, you can right-click on it again to get the Connection Editor dialog, where you need to change the value for the Database property to localhost:C:\Data\ECODemo.gdb (which is the machinename followed by the location of the ECODemo.gdb database file).
Click on the Test button to make sure that you can make a connection to this database!
Now, drag the ECODemo connection from the Data Explorer and drop it onto the EcoSpace module.
This will result in a BdpConnection component that is configured to use the InterBase ECODemo database.
Select the PersistenceMapperBdp component and point its Connection property to the BdpConnection component.
Now, you need to tell your EcoSpace module to use the PersistenceMapperBdp component as its PersistenceMapper, so click on the EcoSpace module, and in the Object Inspector select the PersistenceMapperBdp as the value for the PersistenceMapper property.
Note that you can set this property dynamically at run-time, allowing you to switch from persistence strategy (for example using a stand-alone XML persistence file when not connected to the network and InterBase database - as local briefcase model - and the reconnecting to the InterBase database as persistence method when back in the office).
Generating Database Schema
We're almost done with making the model persistent.
What's missing is the actual link between our EcoSpace object model and the database schema.
In order to automatically create the right database schema (in this case for the InterBase database) we should click on the lower-left button on the EcoSpace module which generates the database schema, telling us which tables need to be recreated (in case their corresponding class definitions have been modified inside the EcoSpace object model) and - in case your database was not empty to start with - which tables can be dropped if you wish to do so, since they are not used by the EcoSpace object model, and hence considered "unnecessary" by the system.
In our case, the ECODemo.gdb file is empty, so we get a dialog with no tables to delete or recreate anyway:
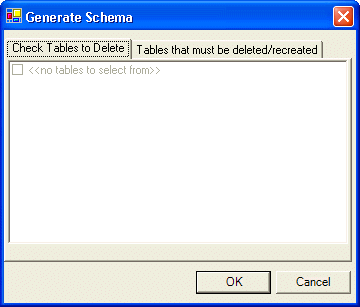
If you ever make changes to the EcoSpace object model, you can recreate the database schema in order to make sure the database tables and EcoSpace object model are back in sync.
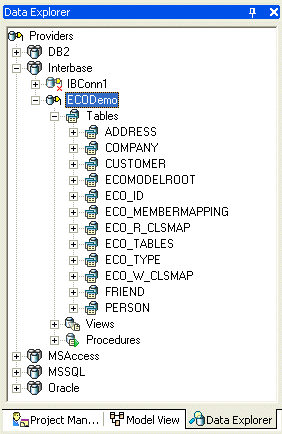
After generating the database schema, the ECODemo.gdb will not only contain tables for the Person, Friend, Customer, Company and Address objects, but also ECO-specific tables named ECOMODELROOT, ECO_ID, ECO_MEMBERMAPPING, ECO_R_CLSMAP, ECO_TABLES, ECO_TYPE, and ECO_W_CLSMAP.
Summary
This completes the paper on Enterprise Core Objects; the Model Driven Architecture and Object Model Persistence functionality in the Architect edition of Delphi 8 for .NET.
In this paper, we have explored the Enterprise Core Objects (ECO) of the Architect edition of Delphi 8 for .NET, covering the EcoSpace Object Model, UML (Unified Modeling Language), Classes, Attributes, Operations, Associations, Generalizations and Implementations, the PersistenceMapperXML, PersistenceMapperBdp, and Database Scripts.
For more information on Enterprise Core Objects, see the ECO Section of my website or my ECO ASP.NET Weblog