
 Dr.Bob's JBuilder Machine: http://www.drbob42.com/JBuilder
|
|
Dr.Bob's JBuilder Machine: http://www.drbob42.com/JBuilder
|
| JBuilder Java BeansExpress |
It's no big secret that I'm a Delphi adict, especially when it comes to VCL Component Building.
However, just like Delphi VCL components (who can also be used in C++Builder) and ActiveX controls, it's crystal clear to me that JavaBeans can truly become the components of the future.
In fact, as long as they're 100% pure java, JavaBeans can be used in any Java development environment and on any Java supporting Virtual Machine (VM).
In this article we'll see how we can create 100% pure java components, and write our own JavaBeans using Borland JBuilder's Java BeansExpress.
JBuilder 2 includes an even more powerful Java BeansExpress (an example of this will be added to this article at a later time).
BeanBox
Before we start to write our first JavaBean, let's first take a look at another basic but useful tool we'll need lateron to test and be able to manipulate JavaBeans without actually having to write a whole new applet or application with them.
For this purpose, Sun has included a Bean manipulation program called "BeanBox" in the Beans Development Kit (BDK), which can be obtained from Sun's website or from the CD-ROM of any serious Java or JavaBean book (Michelle M. Manning's "Teach Yourself Borland JBuilder in 21 Days", published by Sams.net, includes the BDK, for example).
For more information about the BDK, BeanBox and JavaBeans in general, you should check out the official JavaBean specification on Sun's website at http://java.sun.com/beans/spec.html.
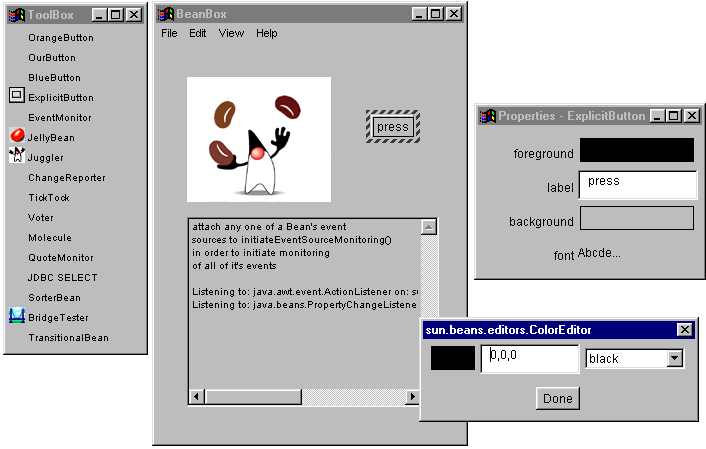
The BeanBox in action - as you can see right above - consists of a ToolBox window, which lists all the JavaBeans loaded (in our toolbox) and available for manipulation.
The BeanBox itself is a window in which to drop and move/resize the JavaBean itself, while a third window lists the Properties for the currently selected JavaBean - in this case the properties for the ExplicitButton bean.
If we click on the value of one of the properties, we may get a Property Editor, in this case for the foreground color.
Of course, this is just a simple example, but it should nevertheless be clear that the BeanBox is a helpful tool for a quick and easy test of new JavaBeans.
JavaBeans
The concept of JavaBeans gives us the ability to create reusable Java software components, that can be used by any Java development environment.
Unlike Delphi and C++Builder VCL components, there is no "Bean" base class from which to inherit a JavaBean from; any java class that confirms to the definition is considered a JavaBean.
The definition is quite simple: a JavaBean is a public class that includes a public default constructor (with no arguments).
A JavaBean can also export properties, events and methods.
The BeanBox, and other Java development environments (such as JBuilder), are able to examine any (unknown) JavaBean and extract information from it to determine the exported properties, methods and events.
This process of obtaining information about members of the class is also called "introspection".
Additionally, a JavaBean can provide an auxiliary BeanInfo class to provide even more information about the internals of the JavaBean.
The BeanBox can in this light be seen as an Object Inspector which uses Property Editors to allow the user to set the values of the properties of a JavaBean.
We'll see the BeanBox in action at the end of this article when we can test and manipulate our first generated JavaBean.
BeansExpress
Before we really start building JavaBeans, first of all a little reminder: using JBuilder we can only add a JavaBean to an open project, so first we need to start an empty project (like a Panel as "underground" for our new JavaBean) or open an existing one.
Then, we must select File | New and go to the BeansExpress page:

As we can see, a number of example JavaBean skeletons and tools are already available here, such as the Ok Cancel Bean which demonstrates how a compound UI component can be structured from existing components and the DB Bean for database UI JavaBeans, with which we can browse a database for example.
Bean Info can be used to create a BeanInfo class to correspond with an existing class in the current project (to provide more information about the internals of a JavaBean, as we saw earlier), and finally New Event Bean can be used to create a new event.
During the session at the conference I may show one or more examples of these JavaBean skeletons as well.
But let's just click on New Bean for now, which results in a new JavaBean component added to our current project.
JBuilder BeansExpress automatically creates the NewBean class that is added to our project.
If we click on the Design tab in the JBuilder IDE, we can drag and drop existing components (beans) on the Panel to create the UI and behaviour that we want the JavaBean to have.
First Example
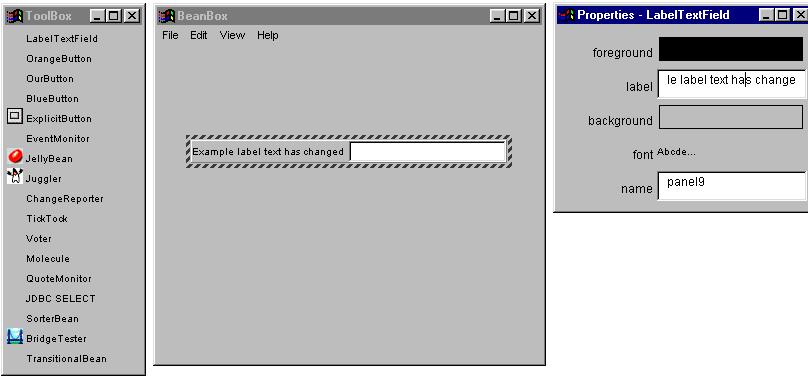
Let's drop a Label (label1) and a TextField (textField1) on the panel, and create a new control that consists of the Label on the left and the TextField on the right.
Such a combination is useful in many situations, and always helpful to have (it avoids having to align the controls manually, for example).
We may want to expose the actual text of the Label as a property to the outside world (i.e. the developer at design-time), so it can be set and changed from within a Java development environment (or the BeanBox, for example).
This means we have to specify a new property.
Fortunately, the Java BeansExpress already provides us with an example property, named "example" of the type String.
All we need to do is change the name from "example" to "label" in order to illustrate that the property is meant to set the text of the (internal) Label bean.
  // Example properties
  private String label = "Example label";

  public void setLabel(String s)
  {
    label = s;
    label1.setText(label);
  }
  public String getLabel()
  {
    return label;
  }
Note that the "label" property is private, but connected to the internal "label1" bean by using a pair of getLabel and setLabel methods.
Test
Now that we've finished coding our first JavaBean, it's time to build the Bean and check and fix our syntax errors.
Select Build | Re&build "NewsBeans.java" .
If you don't get a clean compile, check your JavaBean source code against the following:
package drbob42.bean;

import java.awt.*;
import java.awt.event.*;
import borland.jbcl.layout.*;
import borland.jbcl.control.*;
import borland.jbcl.view.*;
import borland.jbcl.util.BlackBox;

public class LabelTextField extends BeanPanel implements BlackBox {
  BevelPanel bevelPanel1 = new BevelPanel();
  BorderLayout borderLayout1 = new BorderLayout();
  Label label1 = new Label();
  TextField textField1 = new TextField();
  GridLayout gridLayout1 = new GridLayout();

  public LabelTextField()
  {
    try
    {
      jbInit();
    }
    catch (Exception ex)
    {
      e.printStackTrace();
    }
    setLabel("Example label text");
  }

  private void jbInit() throws Exception
  {
    this.setSize(new Dimension(351, 25));
    gridLayout1.setColumns(2);
    bevelPanel1.setLayout(gridLayout1);
    this.setLayout(borderLayout1);
    this.add(bevelPanel1, BorderLayout.CENTER);
    bevelPanel1.add(label1, null);
    bevelPanel1.add(textField1, null);
  }

  // Example properties
  private String label = "Example label";

  public void setLabel(String s)
  {
    label = s;
    label1.setText(label);
  }
  public String getLabel()
  {
    return label;
  }
}
Once we get a clean compile, we can deploy and install our new JavaBean, or test it in the BeanBox for example.
Data-Aware Example
As another example, let's drop a navigatorControl (borland.jbcl.control.NavigatorControl) and a gridControl (borland.jbcl.control.GridControl) on the Panel, and make sure the navigatorControl is on top and the gridControl is right under it.
These two form a new JavaBean combination that might be quite useful to have for quick inspection of the contents of a database.
Of course, at this time, both the navigatorControl and the gridControl have a separate dataSet property.
So, in order to really integrate these JavaBeans into one new JavaBean, we must make one dataSet property with a Get and Set method that internally links to the dataSet property of the navigatorControl and the gridControl.
Fortunately, the JBuilder Java BeansExpress has again created an example property for us, named example (of type String). We can use this example code again, and modify it for our own needs to represent the required dataSet property as follows:
  // new JavaBean property
  private DataSet dataSet;

  public void setDataSet(DataSet s)
  {
    dataSet = s;
    navigatorControl1.setDataSet(s);
    gridControl1.setDataSet(s);
  }
  public DataSet getDataSet()
  {
    return dataSet;
  }
This time, we need to add one more line:
import borland.jbcl.dataset.DataSet;To ensure that we can actually use the jbcl.dataset.DataSet type in our new JavaBean (without compiler errors).
Now that we've finished coding our second JavaBean, it's time to build the Bean again and check and fix our syntax errors. Select Build | Re&build "NewsBeans.java" . Once we get a clean compile again, we can deploy and install our new JavaBean.
JavaBean Deployment
We can optionally decide to deploy our new JavaBean using the Deployment Wizard.
Select Wizards | Deployment Wizard , set the selection to our NewBean.java file and click on Finish (we can exclude the JBCL and JGL classes if we're sure they're already installed on the target machine):

Note that we can create ZIP and JAR files, both normal and compressed (it may take some time to compress them). BTW, the above dialog has changed slightly in JBuilder version 1.01 (I'm still using an old screenshot here).
JavaBeans Palette
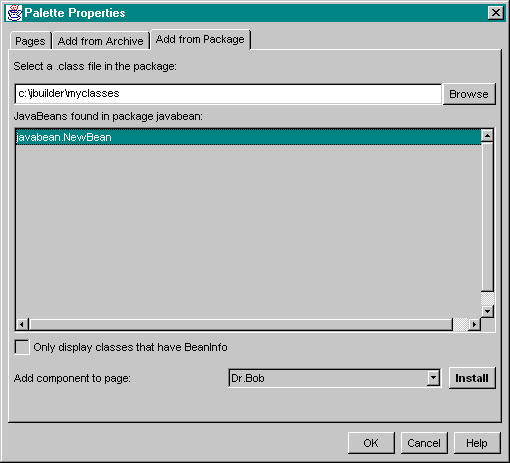
To place our new JavaBean onto JBuilder's Component Palette, we need to select Tools | Configure Palette | Add from Package .
First, we can add a new page (called "Dr.Bob" for example) to place the JavaBean in.
Then, we can either add a JavaBean from a package (Zip or JAR) or from a source package.
In this case, let's just add our javabean.NewBean source package, select this file and click on OK:
... and now we have our new JavaBean on our component Palette:

This JavaBean can be used in a new JBuilder project, most probably to offer a quick browsing option for database tables (note that we would need a JDBC driver or DataGateway for this purpose).
package Beans;

import java.awt.*;
import java.awt.event.*;
import borland.jbcl.layout.*;
import borland.jbcl.control.*;
import borland.jbcl.view.*;
import borland.jbcl.util.BlackBox;
import borland.jbcl.dataset.DataSet;

public class NewBean extends BeanPanel implements BlackBox {
  BevelPanel bevelPanel1 = new BevelPanel();
  BorderLayout borderLayout1 = new BorderLayout();
  NavigatorControl navigatorControl1 = new NavigatorControl();
  GridControl gridControl1 = new GridControl();
  BorderLayout borderLayout2 = new BorderLayout();

  public NewBean()
  {
    try
    {
      jbInit();
    }
    catch (Exception e)
    {
      e.printStackTrace();
    }
  }

  private void jbInit() throws Exception
  {
    bevelPanel1.setLayout(borderLayout2);
    this.setLayout(borderLayout1);
    this.add(bevelPanel1, BorderLayout.CENTER);
    bevelPanel1.add(navigatorControl1, BorderLayout.NORTH);
    bevelPanel1.add(gridControl1, BorderLayout.CENTER);
  }

  // new JavaBean property
  private DataSet dataSet;

  public void setDataSet(DataSet s)
  {
    dataSet = s;
    navigatorControl1.setDataSet(s);
    gridControl1.setDataSet(s);
  }
  public DataSet getDataSet()
  {
    return dataSet;
  }
}