| Delphi Clinic | C++Builder Gate | Training & Consultancy | Delphi Notes Weblog | Dr.Bob's Webshop |
| Delphi Clinic | C++Builder Gate | Training & Consultancy | Delphi Notes Weblog | Dr.Bob's Webshop |
|
A new and handy feature of Delphi 4 - also present in C++Builder 4 by the way - is the TActionList component, found in the "Standard" tab of the component palette.
With an ActionList, we can group and manage "actions" (event handling code) between different components and even re-use them among different applications!
This article shows how to use Actions and ActionLists - without writing a single line of Delphi or C++ code - and contains some nice gotchas too...

Using TActionList
Start a new application, and drop a TActionList component on the Form.
Right-click with the mouse on the ActionList1 component to get the Action List Editor.
The Action List Editor shows the action categories, and for each action category the individual actions that are available for the current application.
We can define new actions, or select a number of existing (standard) actions.
The latter can be done by right-clicking with the mouse in the Action List Editor, and selecting the New Standard Action menu:
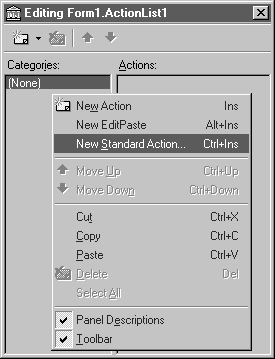
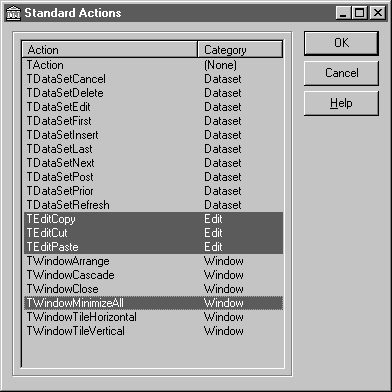
This will give us a new dialog with the (current) list of standard actions. Note that we can select more than one action at the same time by holding down the Ctrl key and clicking on each individual item (see left figure below).
|
|
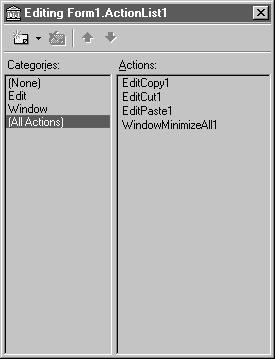
After we click on OK, we return to the Action List Editor which now shows two categories (Edit and Window) and four actions in total (Copy, Cut and Paste for the Edit categories, and MinimizeAll for Windows) - see right figure above.
It's now time to add some controls to the Form and connect them to these actions.
Control Action
Go to the Win32 tab of the component palette, and drop a ToolBar component on the form.
Right-click on it and select "New Button" to add a new button.
Repeat this until you have four buttons next to each other on the toolbar (tip: you may want to insert a separator between the third and fourth button).
Now, click the left button, and set its Action property to EditCopy1.
Set the Action property of the second button to EditCut1, and the third button to EditPaste1.
Finally, set the Action property of the last button to WindowMinimizeAll1.
Before we compile and run this application, let me remind you that we now have four fully functional toolbar buttons without having written a single line of code.
That's because we're using standard behavior that's already been provided to us as "standard" re-usable Actions.
But it gets even better, because we can share these actions with multiple components.
Go back to the Standard tab of the component palette, and drop a TMainMenu component on the Form.
Double-click on it (to get into the Menu Designer).
Right-click on the Menu Designer select "Insert from Template" and pick the Edit menu template.
This gives us a list of 10 menu items, while we only need three (Cut, Copy and Paste), but at least it saves us some typing.
You can easily remove the menu items that you don't need, by the way.
Go to the Cut1 menu item, and set its Action property to EditCut1.
Set the Action property of the Copy1 menu item to EditCopy1, and let Paste1 point to EditPaste1.
We're now almost ready to compile and run our application, but we need one more thing.
Let's drop three normal buttons on the form (again from the Standard tab), and connect them to EditCut1, EditCopy1 and EditPaste1 like we've done twice before already.
Note that the "regular" buttons automatically get captions with "Cut", "Copy" and "Paste", where the speedbuttons on the ToolBar remain empty (their Hint property it set, but not their caption).
A solution to this potential (confusing) problem can be implemented by assigning an ImageList to the ActionList, so each action can get associated with a specific image.
To do this, drop a TImageList (from the Win32 tab) on the Form, and right-click on it to fill it with some images.
Set the Images property of the ActionList a component to ImageList1, and double-click again on the ActionList to get the Action List Editor where we can now specify which image should be used by which individual Action item by setting the ImageIndex for each individual action:
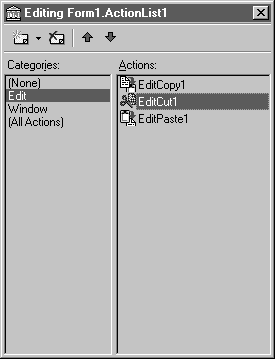
Note that the speedbuttons on the toolbar and the images next to the menu texts still don't show the images from the ImageList1 at design-time.
In order to let them "share" the same images, we must set the Images property of the ToolBar1 component to ImageList1, and do the same with the Images property of the MainMenu1 component.
The ImageIndex properties will now be copied from the index belonging to the Action components, so each action will look the same on a speedbutton or as a menu-item.
The really final thing we need to do is drop a TEdit component on the Form (after all, we would need some Edit control to test the Cut, Copy and Paste actions with, right?).
After that, your application should resemble the following screenshot (at least a little bit, I hope):
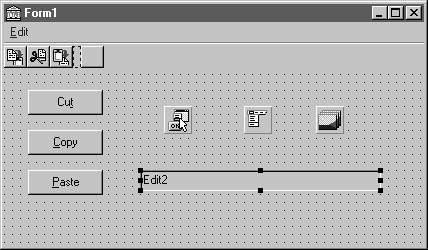
Action!
Now, save your work, compile and run the application.
Initially, all buttons and menu-items will be disabled, meaning that we cannot Cut or Copy text, nor can we Paste any text at this time.
If your clipboard is filled with some text, and you select the editbox, then the Paste buttons and menu-item get enabled automatically (at the same time).
We can then select the Paste menu, for example, and the text from the clipboard will be pasted inside the editbox.
As soon as we select some text from the editbox, the Cut and Copy buttons and menu-items will get enabled as well (we can only Cut and Copy selected text, of course).
We can now click on the Cut or Copy speedbutton in the toolbar to get the effect we want.
Note that each Action items somehow "knows" when it can be executed (in our case: when the current control is an editbox or memo, and - in case of Cut and Copy - whether or not any text is currently selected).
The Action items can enable and disable all controls that are associated with them as soon as something changes that influences them (like selecting text, or moving the focus from the editbox to another control, for example).
Problems?
This all seems to work fine.
However, if you try to Cut, Copy or Paste text inside the editbox using any of the "normal" buttons, then you will find that they do not appear to work.
For some reason, the big Cut button doesn't cut the text, nor does the bit Paste button paste it.
In fact, they only seem to result in de-selecting the text in the editbox (if any text was selected), and moving the focus away...
Strange!
Well, that last piece of information, regarding the focus, should have been a subtle hint: the buttons take away the focus before the Action can be executed. In other words: the Action expects an editbox to have the focus, but by the time the Action it executed, it's the button that has the focus (if not for the Button's Click method that fires the action, the action wouldn't even have been fired, since giving the button the focus means disabling the action and all controls associated with the action).
Of course, the workaround is never to use any controls that can get the focus (like a TButton which has a Windows handle), so the focus will never be list when we click on any Action-bound control again.
This is not something that's documented too well, however, and I must admit that even I fell into this trap (while performing my Delphi 4 Workout in London, by the way), so be aware.