| Delphi Clinic | C++Builder Gate | Training & Consultancy | Delphi Notes Weblog | Dr.Bob's Webshop |
| Delphi Clinic | C++Builder Gate | Training & Consultancy | Delphi Notes Weblog | Dr.Bob's Webshop |
| ||||||

Delphi 7 and IntraWeb 5.1.28
IntraWeb is a visual way to develop web server applications (which can be something more than simply applications that run on a web server).
In this article I start to show how we can use IntraWeb 5.1.28 in combination with Delphi 7 Professional and WebBroker applications to produce web server applications that can work with databases.
The second half of this article will use IntraWeb 5.1.28 in Application Mode with Delphi 7 Enterprise.
The best thing is: although IntraWeb is not written by Borland, it's still included with Delphi 7 in the box (or on the CD), so everybody can play along. Delphi 7 Professional contains IntraWeb 5 Page Mode as well as an evaluation edition of IntraWeb 5 Application Mode (which is more powerful, as we'll see in a follow-up article), while Delphi 7 Enterprise or Architect contains the full IntraWeb 5 Application Mode edition. You can register your version of IntraWeb 5 on the http://www.AtoZedSoftware.com website, and optionally purchase developer support from there. Also, if you're only using Delphi 7 Professional (with IntraWeb 5 Page Mode) you can upgrade to IntraWeb 5 Application Mode. The latest free upgrade (for Delphi 7 developers) is version 5.1.28 of IntraWeb, and can be downloaded from the AtoZedSoftware website. They have also released a version 6, but that's no longer a free upgrade, so in this article I want to focus on the free version - once you've convinced that IntraWeb is for you, then you can always decide to upgrade to version 6. IntraWeb 5.1 is also available if you're still using Delphi 6, Kylix or C++Builder, again in two developer editions: Application Mode and Page Mode, and there is even an IntraWeb for Java available, as well as a .NET edition (in the works).
WebBroker + IntraWeb Page Mode
Let's start with a simple WebBroker application, and extend it with IntraWeb Page Mode.
Start Delphi 7, do File | New - Other, and select the Web Server Application icon from the New tab of the Object Repository.
This will present you with the New Web Server Application dialog in which you can make a selection from the available web server application targets: from ISAPI/NSAPI, CGI stand-alone, Apache 1.x, Apache 2.x and the Web App Debugger:
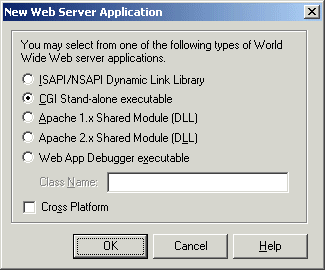
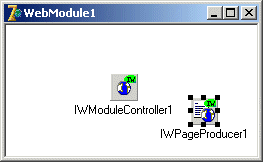
For the simple WebBroker example, select a CGI Stand-alone executable as target, and click on OK. This will generate a new WebBroker web server application as well as an empty web module. Save the web module in file WebMod.pas and the project in file IWB.dpr (resulting in the IWB.exe CGI executable in a moment). Now, from the IW Control tab, drop two IntraWeb components on the empty web module, namely TIWModuleController and TIWPageProducer. The former is used to control all IntraWeb Pages (so you need only one for each web server application), the later is used to produce an IntraWeb Page (you need a IWPageProducer component for each IntraWeb Page Form that you want to use, as you'll see in a moment). The web module should now look as follows:
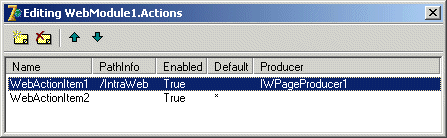
Before you continue, let's now add a Web Action Item to ensure that the IWPageProducer is actually used. Right-click on the Web Module and start the Web Action Editor. In this example, you have no WebActionItems, yet, but you can do the same with existing WebBroker applications that have numerous WebActionItems already defined. Add a new WebActionItem for the IWPageProducer component. Make sure to give it a unique PathInfo value, such as /IntraWeb in this example, and connect its Producer property to the IWPageProducer that you want to use in this case (you can also do the same thing in the OnAction event handler if you want). See the screenshot below for the result on my machine:
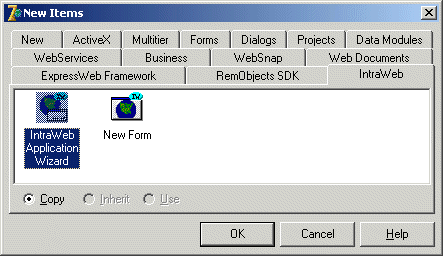
Note that the IWPageProducer isn't doing anything, yet, since it's not connected to an IntraWeb Page Form. That's what you need to do next, so do File | New - Other, go to the IntraWeb tab of the Object Repository. Original IntraWeb 5 users may see something different, with a number of icons. If you've upgraded to IntraWeb 5.1 already, then there are only two icons left in the IntraWeb tab, as can be seen in the following screenshot. Take the New Form icon, and click on OK, which will give you the IntraWeb New Form Wizard.
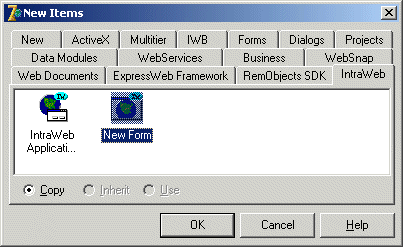
For IntraWeb in Page Mode you're only interested in one icon: the Page Form (IntraWeb 5) or New Form (IntraWeb 5.1). The New Form wizard will offer us a number of options for creating a new IntraWeb Form, as can be seen below:

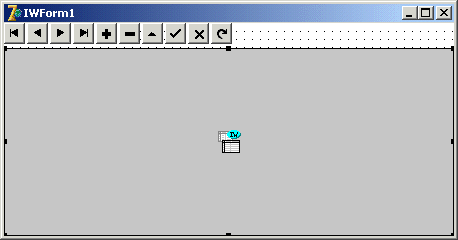
Obviously, when using IntraWeb in Page Mode you should ignore the two Application Form choices. And the difference between a Page Form and Page Form 3.2 is the fact that the later is restricted to HTML 3.2 and offers support for PDA devices (as well as Netscape 4.x), which will be covered next time. For now, just select the Page Form choice and click on OK which will create a new, empty IntraWeb Page Form for us. Use the Object Inspector to set the name property of the TIWForm to IWfrmMain. Save this IntraWeb Page Form in file IWformMain.pas. You can add some specific IntraWeb components to it in a moment. But for now, return to the Web Module.
IntraWeb 5.1 Bug Report #1
Note that after you save this new IntraWeb form in IWfrmMain.pas, the IWB.dpr project file still has a reference to Unit1 inside.
It looks like IntraWeb does some special things by adding units to the project file, and perhaps doesn't completely follow the official Open Tools API rules.
You have to manually rename Unit1 in the IWB.dpr file to IWformMain (twice) to correct things, and you also need to rename the name of the form from IWForm1 to IWfrmMain.
In the Web Module (file WebMod.pas), add unit IWformMain to the uses clause of the implementation section, and then add the IntraWeb units IWApplication and IWPageForm to the uses clause of the interface section.
You can now connect the IWPageProducer to the IntraWeb Page Form in IWformMain.pas that you just made, with the code below for the OnGetForm event of the IWPageProducer component.
  procedure TIntraWeb.IWPageProducer1GetForm(ASender: TIWPageProducer;
    AWebApplication: TIWApplication;
    var VForm: TIWPageForm);
  begin
    VForm := TIWfrmMain.Create(AWebApplication)
  end;
Designing IntraWeb Page Form
You can now add all kinds of IntraWeb components to the new IntraWeb Page Form, and activate it in your WebBroker application (by calling it with the /IntraWeb PathInfo on the URL in the browser).
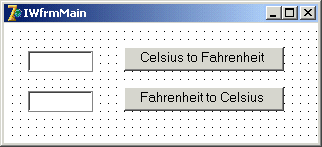
As an example, let's build a very simple Celsius to Fahrenheit (and back) converter.
Drop two TIWEdit components, call them IWEditCelsius and ITEditFahrenheit, and clear their Text property.
Right Next to these two IntraWeb edits, drop two TIWButton components, call them IWButtonCelsiusToFahrenheit and IWButtonFahrenheitToCelsius (watch out for the FriendlyName property, since that one will only be used in error message), and set their caption to "Celsius to Fahrenheit" and "Fahrenheit to Celsius".
The IWfrmMain could now look as shown below:
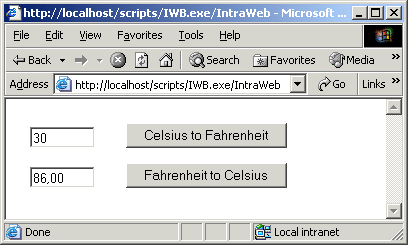
Note that the form looks like a regular Delphi form, with the difference that it has a white background, and that the dots (also called the alignment grid) is not drawn fully at first. You need to resize (or hide and re-show) the IntraWeb form in order to show the grid again. This is due to an issue between the Delphi designer and the IntraWeb form (both the Delphi and IntraWeb developers claim the problem is caused by the other, of course). Apart from the white background and the minor painting problem, this looks just like a regular Delphi application, right? Well, the code behind also doesn't contain many surprises. You can write the following code for the OnClick event handlers of the IWButtonCelsiusToFahrenheit and IWButtonFahrenheitToCelsius, as can be seen below:
  procedure TIWfrmMain.IWButtonCelsiusToFahrenheitClick(Sender: TObject);
  begin
    IWEditFahrenheit.Text := Format('%.2f',
      [StrToFloatDef(IWEditCelsius.Text,0) * 9/5 + 32])
  end;

  procedure TIWfrmMain.IWButtonFahrenheitToCelsiusClick(Sender: TObject);
  begin
    IWEditCelsius.Text := Format('%.2f',
      [(StrToFloatDef(IWEditFahrenheit.Text,0)-32) * 5/9])
  end;
You are now ready to deploy the application in a browser, and calling it from the URL with the /IntraWeb PathInfo.
This means compiling the WebBroker applications, and placing the IWB.exe CGI executable in the scripts directory (or any virtual directory that has the execution rights set for executables).
If you have IIS (Internet Information Server) installed, then the default scripts directory can be found in C:\Inetpub\Scripts, which is the place where you need to copy the IWB.exe application to.
In the browser, you need to to specify http://localhost/scripts/IWB.exe/IntraWeb in the addressbar to get the IntraWeb page.
IntraWeb 5.1 Bug Report #2
So far, you've worked with a WebBroker CGI standalone executable, but if you want to deploy this application in a browser and go to the specific URL (http://localhost/scripts/IWB.exe/IntraWeb in our case) and click on one of the IntraWeb button, then the browser is "sent" to http://localhost/IntraWeb.
It appears IntraWeb is unable to retrieve the correct module name for CGI executables.
In order to "overrule" this (and manually set the form action), you have to specify the full path, name and PathInfo of our CGI executable in the FormAction property of the IntraWeb Page Form.
This will also automatically set the PostToSelf property to False.
After you've fixed the FormAction property, in my case to http://localhost/scripts/IWB.exe/IntraWeb, you can recompile and deploy the application again.
Enter a value in one of the IWEdits and press on the IWButton next to it.
Note in the screenshot below that IWEdits retain their value between button clicks, even inside a CGI executable:
Page Mode and Data Access
As another example usage (on this page or a new page), I will build an IntraWeb page form that connects to the InterBase database.
Make sure that InterBase is running first.
Then, you can drop a TSQLConnection component, set its ConnectionName to the IBLocal database (make sure to supply the User_Name and Password in the Params and then set the LoginPrompt property to False), a TSQLDataSet with the SQLConnection property pointed to the TSQLConnection component, and the CommandType property set to ctQuery and the CommandText property set to "select * from CUSTOMER", and finally a TDataSetProvider, TClientDataSet and TDataSource component connected to each other and ultimately to the TSQLDataSet component so the data can be retrieved.
Note that dbExpress datasets are read-only and unidirectional, which is why you need the DataSetProvider and ClientDataSet components.
It also means that you will need to write some code to explicitly post the changes (edits, inserts/deletes) back to the original InterBase database.
This can be done in the OnAfterPost and OnAfterDelete event handler of the TClientDataSet component as can be seen below:
  procedure TIWfrmMain.ClientDataSet1AfterPost(DataSet: TDataSet);
  begin
    ClientDataSet1.ApplyUpdates(0)
  end;

  procedure TIWfrmMain.ClientDataSet1AfterDelete(DataSet: TDataSet);
  begin
    ClientDataSet1.ApplyUpdates(0)
  end;
You also may want to write some code in the OnReconcileError event handler of the ClientDataSet component, in order to report any problems that have occurred when trying to apply the updates (for example if a record was removed already, or if a record was changed by another user, or if you try to insert a record but a record with the same key value(s) was already inserted by another user, etc.).
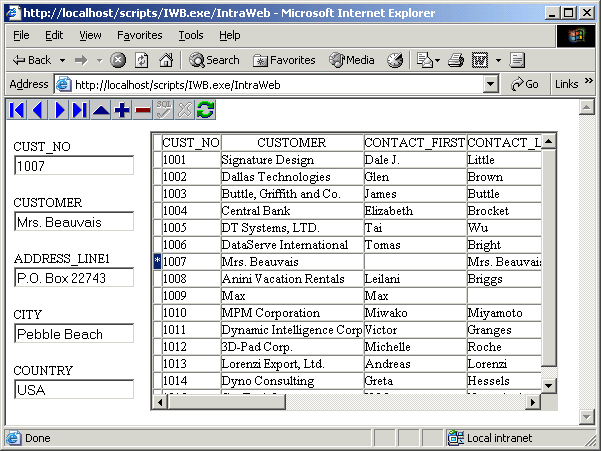
A few TIWDBEdit controls, with TIWLabels just above them, a TIWDBNavigator and finally a TIWDBGrid component complete the picture, as can be seen in here:
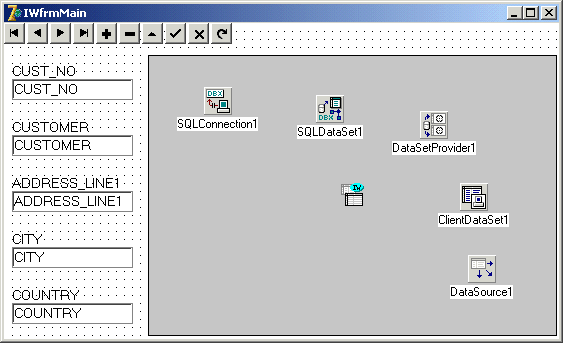
Set the bgIndicator flag of the Options property from the TIWDBGrid component to True to make sure you'll see a little indicator to mark the current record in the grid (can be helpful if you want to know which record you are working on). Also make sure to activate the SQLDataSet component at design-time, or alternately make sure that this is done when the IntraWeb Page Form is created (which is a better idea, since it avoids design-time problems when you cannot connect to the database). Now, save and recompile the application, and deploy it to a scripts or cgi-bin directory. Inside Internet Explorer, the result of the WebBroker/IntraWeb combination can be seen below (note that you need to set the FormAction property in order to be able to navigate to the next record inside a stateless CGI app):
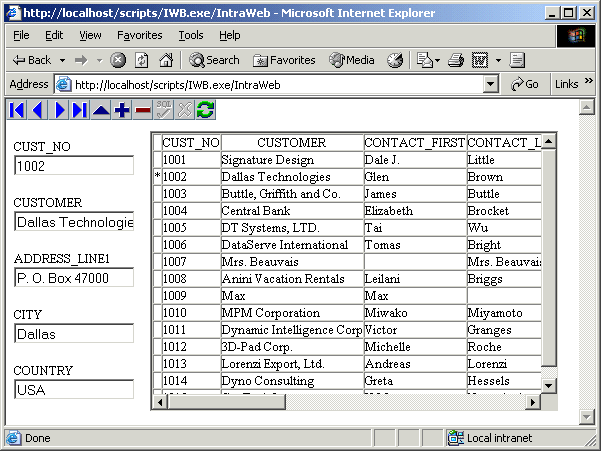
The screenshot on the previous page is the one that you get if you click on the next button (note that you're looking at record 1002 instead of the first one 1001.
IntraWeb 5.1 Bug Report #3
If you combine IntraWeb in Page Mode with database navigation actions, then you can only navigate once before you get an error that says "Key violation", as can be seen in the following screenshot (unless you've still got the "Show friendly HTTP error messages" option enabled in the Internet Explorer Internet Options dialog, in which case you only get a HTTP 500 Internal server error).
This problem occurs with CGI executables as well as ISAPI DLLs that are extended with IntraWeb in Page Mode.

Fortunately, I wound a way to solve this problem with a little work(around).
Data Access Page Mode Fix
If you remove the IWDBEdit controls from the IntraWeb Page Form, then you won't get the key violations anymore, so that's the good news.
The bad news is that the navigation itself doesn't seem to work: just before every action, the ClientDataSet is opened (in the OnCreate event handler of the IntraWeb Page Form), and this positions the cursor at the first record of the ClientDataSet.
The buttons from the IWDBNavigator can only operate on the cursor on the first record, so clicking on Next-Next will still only end up at the second record (and so will a click on Last-Prev-Next).
The reason is obvious: the IntraWeb Page Form is embedded inside a CGI executable, which is loaded (and unloaded) for every incoming request, making it impossible to maintain state.
Unless you maintain the state for yourself, that is.
Remember the events from the IntraWeb Page Form.
There is one event that is used to open the ClientDataSet, namely the OnCreate.
Another event can be used to "report" the current position of the ClientDataSet (after the IWDBNavigator action has been performed), namely the OnRender.
The trick is to report the current record in the OnRender, add it as a hidden field to the IntraWeb Page Form itself, so the next time the user comes back to it (after another click on a IWDBNavigator button for example), the information from the hidden field can be used to correctly reposition the ClientDataSet.
The code for this can be seen below:
  procedure TIWfrmMain.IWPageFormCreate(Sender: TObject);
  var
    CustNo: String;
  begin
    ClientDataSet1.Active := True;
    CustNo := WebApplication.Request.ContentFields.Values['CUST_NO'];
    if CustNo <> '' then
      ClientDataSet1.Locate('CUST_NO', CustNo, [])
  end;

  procedure TIWfrmMain.IWPageFormRender(Sender: TObject);
  begin
    HiddenFields.Add('CUST_NO=' + ClientDataSet1CUST_NO.AsString)
  end;
Note that this only works for a CGI application, since you must be sure that there are no existing hidden fields already present (with values for CUST_NO).
For a CGI executable, we are sure of that, since it will be loaded (and unloaded) for every request, so the IntraWeb Page Form that is rendered will have no hidden fields, and only the hidden fields that you manually add to the HiddenFields property will be shown inside the browser (ready to be posted with the form data when the user clicks on another button in the browser).
You can now put the IWDBEdit controls back on the IntraWeb Page Form, which will now work fine again (no more key violations).
In fact, I can now explain why you got this error message in the first place: since the ClientDataSet was opened in the OnCreate event, and then the action method from the IWDBNavigator was performed, the IntraWeb Page Form checked to see if the data in the IWDBEdits (which was also posted to the CGI application) was similar to the data in the ClientDataSet's current record.
If not, then an edit and post would be performed to change the data in the current record.
When the browser shows record 2, we see the keyfield and all other fields from record 2 in the IWDBEdits.
When the application then gets another navigational event, it will open the ClientDataSet (at record 1), compare the values of the fields to the data it received from the browser (which is not the same, since the browser showed and sent record 2 data), and will edit record 1 in order to make changes to it contains the data from record 2 (that was shown in the browser).
The Post event will fail, however, since the key field of record 1 now contains the key value from record 2 (assuming you displayed the key field inside a IWDBEdit control, of course), and this results in a "Key violation" exception.
Fortunately, using the HiddenFields, passing the current record's key field values will solve this problem, as I've just shown.
The source code (only for the implementation section) of the IntraWeb Page Form IWformMain.pas implementing this self-maintaining state solution in the OnCreate and OnRender event handlers can be seen below:
  implementation
  {$R *.dfm}

  procedure TIWfrmMain.IWPageFormCreate(Sender: TObject);
  var
    CustNo: String;
  begin
    ClientDataSet1.Active := True;
    CustNo := WebApplication.Request.ContentFields.Values['CUST_NO'];
    if CustNo <> '' then
      ClientDataSet1.Locate('CUST_NO', CustNo, [])
  end;

  procedure TIWfrmMain.IWPageFormRender(Sender: TObject);
  begin
    HiddenFields.Add('CUST_NO=' + ClientDataSet1CUST_NO.AsString)
  end;

  procedure TIWfrmMain.ClientDataSet1AfterPost(DataSet: TDataSet);
  begin
    ClientDataSet1.ApplyUpdates(0)
  end;

  procedure TIWfrmMain.ClientDataSet1AfterDelete(DataSet: TDataSet);
  begin
    ClientDataSet1.ApplyUpdates(0)
  end;

  procedure TIWfrmMain.ClientDataSet1ReconcileError(
    DataSet: TCustomClientDataSet; E: EReconcileError;
    UpdateKind: TUpdateKind; var Action: TReconcileAction);
  begin
    WebApplication.ShowMessage(E.Message)
  end;

  end.
Note that this solution is based on the hardcoded fact that you know on beforehand which field(s) is/are the keyfield(s) of the particular table, so you can use this as the hidden data for the locate.
For each table, you need to pass the right key values in order to be able to position the table correctly.
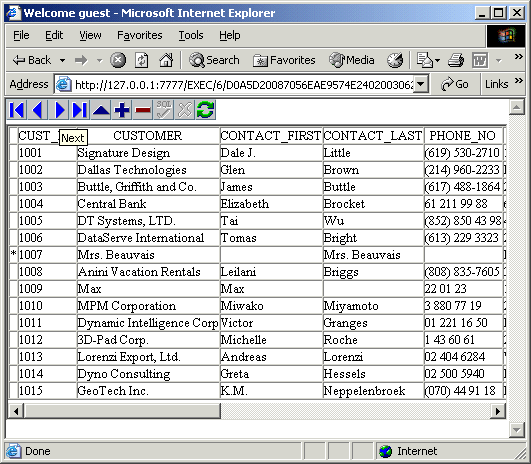
But at least it works just fine, as can be seen in the following screenshot, which shows the CUSTOMER table after I've hit the Next button half a dozen times.
So Why Page Mode?
Just in case you wonder why we didn't use IntraWeb in the full-blown Application Mode already, let me share my personal feeling about this.
IntraWeb in Page Mode may be less powerful than IntraWeb in Application Mode, but that doesn't make it less good.
In my view, a very good reason why people should use IntraWeb in Page Mode is the availability of the CGI standalone executable target (sometimes the only available deployment option if you don't own your own web server space), which is not possible if you're creating an IntraWeb Application Mode project.
Furthermore, Delphi 7 Professional users only have an evaluation edition of IntraWeb Application Mode (but a full edition of IntraWeb in Page Mode), and with this article I hope to have shown them that they can still create powerful database web applications using IntraWeb - in Page Mode.
In the next part, I'll cover IntraWeb in Application Mode, and show some more of the capabilities of the TIWDBGrid control which is a little powerhouse in itself.
IntraWeb 5.1.28 Application Mode and Databases
In this second part of the article I will use IntraWeb 5.1.28 in Application Mode to produce web server applications that work with database, showing how to connect to a database and work with tables, records and fields inside an IntraWeb application and page form.
IntraWeb Application
Start with a new IntraWeb application, so do File | New - Other, and go to the IntraWeb tab of the Object Repository where we can find the two IntraWeb 5.1 wizards, as shown below:
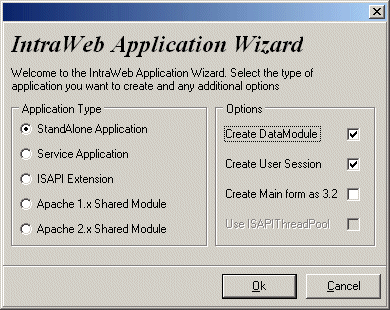
Double-click on the IntraWeb Application Wizard to start the dialog that can be seen below. Apart from a regular standalone IntraWeb application, we also need to use a datamodule, so make sure to check the Create DataModule option.
If you click on OK, then a new IntraWeb standalone application project will be created (but first any open projects in the IDE will be closed), as well as three additional units - one for the Server Controller, one for the Data Module, and one for the IntraWeb Page Form. Do File | Save All in order to save all these files, and place the IntraWeb Page Form in file IWFormMain.pas, the data module in DataModuleUnit.pas (the default name) the Server Controller in ServerController.pas (also the default name) and the project itself in IW42.dpr.
IntraWeb Server Controller
Let's now start to configure the properties of the Server Controller in unit ServerController.pas.
If you take a closer look at the source code in the next listing, you'll see a reference to the data module (type TDataModule1 in DataModuleUnit), which has been added to the TUserSession class.
When a new session is started, then the OnNewSession event handler will make sure that a new TUserSession instance is created, including a new instance of the TDataModule1 (as field in the UserSession).
  unit ServerController;
  interface
  uses
    SysUtils, Classes, IWServerControllerBase,
    IWBaseForm, HTTPApp,
    // For OnNewSession Event
    DataModuleUnit, IWApplication, IWAppForm;

  type
    TIWServerController = class(TIWServerControllerBase)
      procedure IWServerControllerBaseNewSession(
        ASession: TIWApplication;
        var VMainForm: TIWBaseForm);
    private
    public
    end;

    TUserSession = class(TComponent)
    public
      DataModule1: TDataModule1;
      constructor Create(AOwner: TComponent); override;
    end;

    function UserSession: TUserSession;

  implementation
  {$R *.dfm}
  uses
    IWInit;

  function UserSession: TUserSession;
  begin
    Result := TUserSession(WebApplication.Data)
  end;

  procedure TIWServerController.IWServerControllerBaseNewSession(
      ASession: TIWApplication;
      var VMainForm: TIWBaseForm);
  begin
    ASession.Data := TUserSession.Create(nil)
  end;

  constructor TUserSession.Create(AOwner: TComponent);
  begin
    inherited;
    DataModule1 := TDataModule1.Create(Self)
  end;

  initialization
    TIWServerController.SetServerControllerClass
  end.
To configure the ServerController itself, start by giving the AppName property the value IW42.
The AppName must get a unique value if you want to install the IntraWeb application as a Windows service.
I also set the AuthBeforeNewSession property to True, which will save a lot of time and effort in case we ever get visits from unwelcome "guests" who may try to login to the IntraWeb application without a valid username/password combination.
Now that the AuthBeforeNewSession property is set to True, the authentication will happen before the new session is started, so a failed login won't result in a new session (which has to be destroyed after the login fails).
The only downside is that the login routine itself now cannot use any information from the TUserSession object, since that doesn't exist, yet.
The authentication itself can be done using the AuthList property, where we can place a number of username=password lines.
For demonstration purposes, I always include the line guest=guest, so guest visitors can use the application (I'll show you in a moment how we can control and limit the abilities of the guest users, so they won't be able to work on our database like regular users).
Apart from using the AuthList property, we can also use the OnAuthRequest event handler of the Server Controller, for example as follows:
  procedure TIWServerController.IWServerControllerBaseAuthRequest(
    const AUserName, APassword: String;
    var AValid: Boolean);
  begin
    AValid := (AUserName = 'Bob') and (APassword = 'Swart')
  end;
We can use the BoundIP property to specify that the IntraWeb application only listens to a specific IP-address on the machine (handy if you have a web server or machine with multiple network cards, and only want to bind to one of them).
Another property related to this is the Port property, which must be pointing to a unique port number for every IntraWeb application - I've specified 7777 for the current demo.
The ComInitialization property is required if the IntraWeb application works with COM objects, for example when using ADO or DataSnap connection components.
For a dbExpress connection, we don't need COM initialization, so it can stick to ciNone.
The Netscape4As32 property is very important for me (I still use Netscape 4 as browser from time to time), as this property specifies that Netscape 4 will be treated as a HTML 3.2 compatible browser or device (just like PDA's).
So we have to make sure that this property remains set to True, and we also need to set the sub-property brNetscape4 to True in the SupportedBrowsers property, to ensure that Netscape 4 will indeed be supported (as HTML 3.2 browser, that is).
Data Module
Let's now turn our attention to the data module inside the unit DataModuleUnit.pas.
As you can see, this is just a regular data module (but the instance is only available for our session), so we can place any dataset and related components here.
Since the Borland Database Engine (BDE) is "frozen" (and not recommended to use in web server applications anyway), and SQL Links even deprecated, I always use dbExpress as database connectivity layer in web server applications.
Using dbExpress, we can connect to InterBase, Oracle, DB2, Informix, MySQL, MS SQL Server / MSDE and more using third-party drivers.
At home, I work a lot with DB2 and MySQL, on my laptop I work a lot with the InterBase version that ships with Delphi 7.
Regardless of the backend database, however, dbExpress should work the same, so you can use Oracle or Informix while I'll just use InterBase for the remainder of this example.
TSQLConnection
Drop a TSQLConnection component on the data module.
Open the drop-down combobox for the ConnectionName property and select your specific connection (in my case, that's IBLocal).
Click with the right mousebutton on the TSQLConnection component to start the connections editor where we can specify connection parameters like User_Name and Password for example, although you can also enter these in code later.
In any case, remember that the TSQLConnection component should never show a LoginPrompt when used in a web server application (because the prompt will be shown at the server, and not at the client).
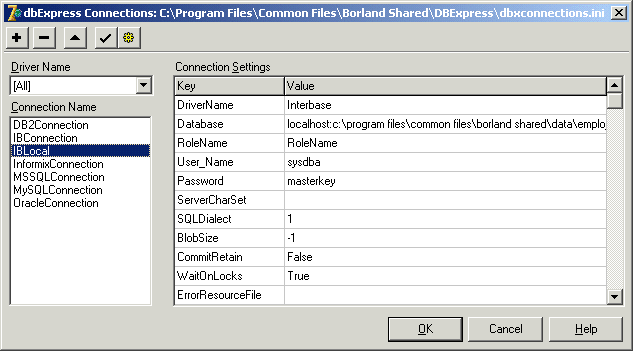
Note that the Database doesn't just point to the location of the employee.gdb file on my machine, but also uses a prefix with the IP-address (or DNS name) of the server itself. This is a requirement of InterBase and allows me to connect to the database even if it's on another machine than the web server itself.
TSQLDataSet
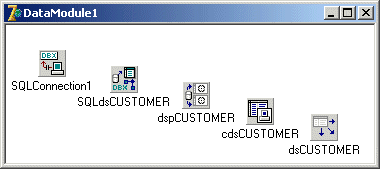
Now, drop a TSQLDataSet component (a hybrid component with TSQLTable, TSQLQuery and TSQLStoredProc functionality), and call it SQLdsCUSTOMER.
Point the SQLConnection property of the SQLdsCUSTOMER TSQLDataSet component to the TSQLConnection component.
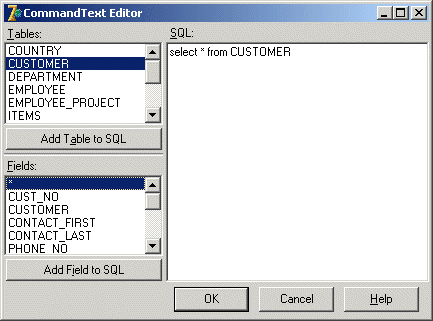
Double-click on the CommandText property of the SQLdsCUSTOMER to start the dbExpress Query CommandText Editor as shown below.
Use this dialog to build a simple SQL query, like select * from CUSTOMER
In order to be able to really use the data from the SQLdsCUSTOMER component, we need to drop three additional components (from the Data Access tab of the Delphi component palette), namely a TDataSetProvider, a TClientDataSet and a TDataSource component. Place all three components on the data module. Give the name property of the TDataSetProvider component the value dspCUSTOMER, set the name property of the TClientDataSet component to dsCUSTOMER, and finally set the name of the TDataSource to dsCUSTOMER. Point the DataSet property of the dspCUSTOMER TDataSetProvider to the SQLdsCUSTOMER TSQLDataSet component, point the ProviderName property of the cdsCUSTOMER TClientDataSet component to the dspCUSTOMER TDataSetProvider component, and finally point the DataSet property of the dsCUSTOMER TDataSource component to the cdsCUSTOMER TClientDataSet component. The data module should now roughly look as follows:
IW Data Tab
Now that we have the data module, it's time to look at our IntraWeb form.
We can look at the components of the IW Data tab from the Delphi Component Palette.
Let's start with a TIWDBNavigator and TIWDBGrid component.
Set the Align property of the TIWLabel (from the previous steps) to alTop, then set the Align property of the TIWNavigator to alTop, and finally set the Align property of the TIWDBGrid to alTop (or alClient if you want).
The Alignment property of TIWLabel can be set to taCenter, although this doesn't really seem to have much effect.
To make a connection with the data module, we need to add the DataModuleUnit to the uses clause (for example using Alt+F11).
After this step, we can connect the DataSource property of the TIWNavigator and the TIWDBGrid to DataModule1.dsCUSTOMER.
Note from the above screenshot that we don't see any data at design-time, like we're used to in Delphi, not even if the datasets are made active. This is something to get used to, but remember that the main purpose of IntraWeb is to produce run-time HTML, not to provide a "live" design-time view as well (it would be nice, but is certainly not necessary in my view). Also note that it's generally not a good idea to actually activate the datasets at design-time, since this may mean that the project gives long delays when you try to open it and the database is unavailable (for example if you open the project on a disconnected client). The best way is to activate the TSQLConnection when the session is started and the data module is created. In fact, if you activate the cdsCUSTOMER then this will set the entire chain in motion, so the only thing we need is the following:
  procedure TIWForm1.IWAppFormCreate(Sender: TObject);
  begin
    UserSession.DataModule1.cdsCUSTOMER.Active := True
  end;
Alternately, you can activate the cdsCUSTOMER when the user session is created (which happens before the main form is created), but this can in theory lead to unnecessary connections - especially if you've accidentally keep the AuthBeforeNewSession property on False.
Go to the TIWDBGrid component, and set the dbIndicator subproperty of the Options property to True, so we can always see the current record in the grid:
Now, compile and run the IntraWeb Application Mode project, which will result in the Iw32 Server dialog, as can be seen below:
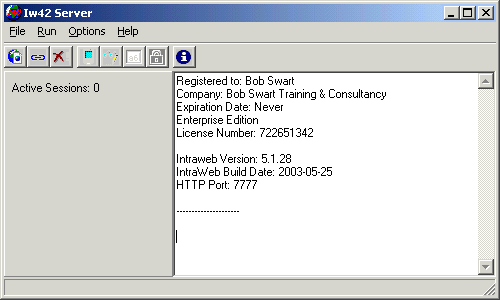
Click on the button in the upper left corner to start the default browser, which will show the IntraWeb page with the navigator and grid. Just as a test, we can click on the navigator half a dozen times to see if this time we won't get into state problems (see last month's article), but of course it works now as can be seen below:
TIWDBGrid
By default, the TIWDBGrid is only suited to present data in a read-only way: there is no direct way to edit the data.
Fortunately, there is an indirect way, which I will demonstrate right now.
But first, let's perform some general TIWDBGrid configuration steps.
We can use the Caption property to set a title on top of the IWDBGrid, and we can use the FooterRowCount property to add additional rows at the bottom of the grid (for summary information for example). After the data has been rendered into the cells the TIWDBGrid will begin rendering the footer rows by starting with negative row counts, counting from -FooterRowCount to -1 for the last row. So, set the FooterRowCount to 1, and implement the OnRenderCell event handler as follows:
  procedure TIWForm1.IWDBGrid1RenderCell(ACell: TIWGridCell;
    const ARow, AColumn: Integer);
  begin
    if ARow = -1 then // Footer
      if AColumn = 0 then
        ACell.Text := 'The footer of the TIWDBGrid'
  end;
We can specify the background color of the grid with the BGColor property (for example to $00FFFFCC).
A nice effect can be obtained by setting the RowAlternateColor property to another value (for example $00CCFFFF), in order to give alternate rows different colors.
Also, the RowCurrentColor can be used to specify the color of the current selected row (for example $00CCCCFF).
Also, if we've set the RollOver property to True, then the row where the mouse is over will be shown with a certain color indicated by the value of RollOverColor (for example $00FFCCFF).
In order to configure the individual columns of the grid, we need to click on the Columns property of the TIWDBGrid component to start the IWDBGridColumns editor.
Using this dialog, we can add explicit columns to the IWDBGrid (which by default will show all fields, but if you add one or more columns it will only show the persistent columns).
For our example, I want to use five columns, so press the
The only downside is that nothing happens if we click on the link for the CUSTOMER column, because we still have to implement the OnClick event handler for the CUSTOMER TIWDBGridColumn.
This can be implemented - hardcoded - as follows:
Controls in the Grid
If you don't like the fact that we still see the original value next to the TIWDBEdit box, then you can write some additional code in the OnRenderCell event handler, for example as follows (note the use of the RowIsCurrent method that I can call to determine if we've in the current row of the grid):
There's one more feature that I want to add: user authentication.
Remember that I added the guest=guest entry in the AuthList property, and also implemented some "real" users in the OnAuthRequest event handler.
I now want to make sure that the TIWDBEdit is only shown and available for real users, which can be done in a number of different ways.
We can assume that a session will not "change user" (if you want to logout and login as a different user, you should start a new session with a new browser window anyway), so when the IntraWeb form is created, we only have to check once to see if we have a "real" user or not.
This can be done by checking the WebApplication.AuthUser value, which gets set to the user that logs in (or is empty in case you don't use authentication).
Like I said, there are three solutions that we can try, although only two will really work:
As final note: you may noteice that the TIWDBNavigator will not activate the cancel button automatically If you use the TIWDBEdit to change the PHONE_NO, since that would require a round-trip back to the server to retrieve the new image.
This is just something to accept, and explain to your endusers if they get confused by the fact that they cannot use the navigator to cancel and edit in progress.
If you want more information on IntraWeb (in Delphi 2007 and later), check out my Delphi for Win32 VCL for the Web (aka IntraWeb) Development manual available as printed paperback from Lulu.com, or from my own webshop in a PDF format (more expensive, since it includes updates and e-mail support about the topics covered in the manual).

  procedure TIWForm1.IWDBGrid1Columns1Click(ASender: TObject;
    const AValue: String);
  begin
    DataModule1.cdsCUSTOMER.Locate('CUST_NO', AValue, [])
  end;
Note that this only works for the first column, since the other columns do not have a LinkField defined, and hence will not be turned into a hyperlink representation.
Apart from the OnClick event handler, the TIWDBGridColumns also have an OnTitleClick event handler.
This one can be user to sort the table on that particular field for example:
  procedure TIWForm1.IWDBGrid1ColumnsTitleClick(Sender: TObject);
  begin
    DataModule1.cdsCUSTOMER.IndexFieldNames := TIWDBGridColumn(Sender).DataField
  end;
It helps if you also specify in the footer on which field the grid is sorted:
  procedure TIWForm1.IWDBGrid1RenderCell(ACell: TIWGridCell;
    const ARow, AColumn: Integer);
  begin
    if ARow = -1 then // Footer
      if AColumn = 0 then
        if DataModule1.cdsCUSTOMER.IndexFieldNames <> ''
        then
          ACell.Text := 'Sorted by ' +
            DataModule1.cdsCUSTOMER.IndexFieldNames
  end;
The result is a grid that can be sorted by column, uses alternating colors, as well as a different color to indicate the current or mouseover rows:
There's one more thing left to do: turn this grid into a way to edit the fields as well, for example the phone number.
For this, we again need to look at the TIWDBGridColumns, and specifically to the Control property.
In case of the PHONE_NO, I want to edit it, so we need a TIWDBEdit component.
Just drop it somewhere on the TIWDBGrid, since it will be "controlled" by the grid.
Make sure to point the DataSource property to the DataModule1.dsCUSTOMER, and the DataField to PHONE_NO.
Now, open up the Columns property editor from the TIWDBGrid again, select the PHONE_NO column, and point its Control property to the TIWDBEdit.
This will result in the editbox being displayed next to the (original) value in the column.
The user can now make changes to the field value, and move to another record or explicitly post the value to the ClientDataSet.
Note by the way that we are using a dbExpress dataset (via the TDataSetProvider and TClientDataSet), so we have to make sure that all Posts done to the TClientDataSet are only done in memory, and still have to be applied to the underlying InterBase database using the ApplyUpdates method of the TClientDataSet.
This is needed in both the OnAfterPost and the OnAfterDelete event handlers of the TClientDataSet, since these are the two methods that can make changes:
  procedure TDataModule1.cdsCUSTOMERAfterPostOrDelete(DataSet: TDataSet);
  begin
    (DataSet as TClientDataSet).ApplyUpdates(0)
  end;
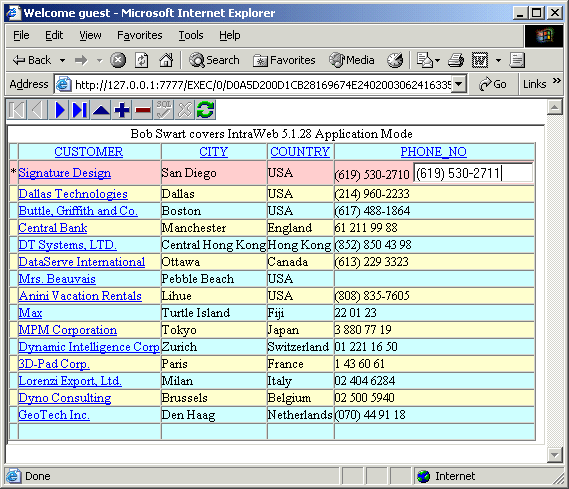
The result is a TIWDBGrid where we can edit the current record, for example to change the PHONE_NO to (619) 530-2711, as can be seen in here:
  procedure TIWForm1.IWDBGrid1RenderCell(ACell: TIWGridCell;
    const ARow, AColumn: Integer);
  begin
    if ARow = -1 then // Footer
    begin
      if AColumn = 0 then
        if DataModule1.cdsCUSTOMER.IndexFieldNames <> ''
        then
          ACell.Text := 'Sorted by ' +
            DataModule1.cdsCUSTOMER.IndexFieldNames
    end
    else
    begin
      if IWDBGrid1.RowIsCurrent then // current row ??
        if AColumn = 3 then // PHONE_NO
          ACell.Text := '' // clear, only show Control
    end
  end;
This will make sure that the column only shows the TIWDBEdit, and no text on the left side of it.
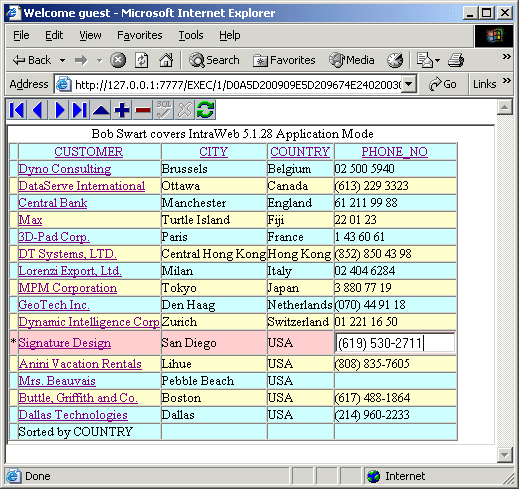
For the final screenshot, I've clicked on the COUNTRY column (so the table is sorted by COUNTRY) and am about to edit the Phone number again.
  procedure TIWForm1.IWAppFormCreate(Sender: TObject);
  begin
    DataModule1.cdsCUSTOMER.Active := True;
    Title := 'Welcome ' + WebApplication.AuthUser;
  // IWDBEdit1.Editable :=
  //   WebApplication.AuthUser <> 'guest';
  // IWDBEdit1.ReadOnly :=
  //   WebApplication.AuthUser = 'guest';
  // IWDBEdit1.Enabled :=
  //   WebApplication.AuthUser <> 'guest';
  end;
Is you set the Editable property of the IWDBEdit, then the edit will turn into a label (or something that looks like that), which will ensure that the user knows that this is not a place to change the value.
If you set the Readonly property on the other hand, then you still get an editbox, but cannot make changes, which might confure the user if he doesn't know why it's not allowed to make any changes.
Finally, if you use the Enabled property, then you will be surprised to learn that the user can make all changes - the TIWDBEdit seems to ignore this property (it's a Delphi VCL property, not an IntraWeb component or HTML property it seems).


