| Delphi Clinic | C++Builder Gate | Training & Consultancy | Delphi Notes Weblog | Dr.Bob's Webshop |
| Delphi Clinic | C++Builder Gate | Training & Consultancy | Delphi Notes Weblog | Dr.Bob's Webshop |
| ||||||

Delphi 8 for .NET and ASP.NET Web Forms
In this article I will use Borland Delphi 8 for the Microsoft .NET Framework to build and deploy ASP.NET Web Form applications.
We'll be using the Borland Data Provider to connect to an InterBase database, and then use the special Borland DB Web controls to work with the data in the web form.
New ASP.NET Application
Start Delphi 8 for .NET, and create a new ASP.NET Web Application.
Save it as WebForm, so the URL to test it on your local development machine will be http://localhost/WebForm.
Note that I've specified Internet Information Server (IIS) as web server option, but you can also use Cassini to test the web form application.
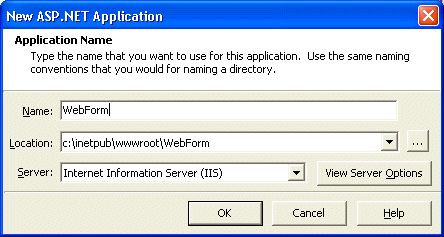
When you click on OK, the new project is created with an empty ASP.NET web form.
State Management
Let's first start with a little demonstration of ASP.NET state and session support.
Add two TextBox controls to the web page, and call them tbGet and tbSet.
Also add two buttons to the web page, and call them btnGet and btnSet (set their Text properties to Get and Set).
Use the Set button to put the contents of tbSet in the Application object, and the Get button to retrieve the contents again and place it in the tbGet TextBox.
This is done with the following code:
  procedure TWebForm1.btnGet_Click(sender: System.Object; e: System.EventArgs);
  begin
    tbGet.Text := String(Session['TextBox'])
  end;

  procedure TWebForm1.btnSet_Click(sender: System.Object; e: System.EventArgs);
  begin
    Session['TextBox'] := tbSet.Text
  end;
Test this application with two different browser windows, and experience the difference between the Application and the Session object.
Hint: use a checkbox called cbSession to switch from using the Session object and the Application object at run-time (without having to stop and restart the application).
  procedure TWebForm1.btnGet_Click(sender: System.Object; e: System.EventArgs);
  begin
    if cbSession.Checked then
      tbGet.Text := String(Session['TextBox'])
    else
      tbGet.Text := String(Application['TextBox'])
  end;

  procedure TWebForm1.btnSet_Click(sender: System.Object; e: System.EventArgs);
  begin
    if cbSession.Checked then
      Session['TextBox'] := tbSet.Text
    else
      Application['TextBox'] := tbSet.Text
  end;
The Session object is shared only within the same browser window, but the Application object is shared among all browser windows, even those on different machines!
Borland Data Provider
Let's now add some database capabilities to the application.
The first thing we need to do is add the connection to the database.
I will use the Borland Data Provider for .NET in this example, which allows us to connect to InterBase, DB2, Oracle, MS Access, or SQL Server/MSDE (depending on the edition of Delphi 8 for .NET that you have).
We'll use InterBase for this example, so from the Data Explorer (in the upper-right corner), open up the InterBase connection node, and select the IBConn1 node.
Right-click on this node in order to configure it.
This results in the Connections Editor.
Here, you need to specify the path to the InterBase database as value of the Database property.
Note that just the path is not enough, since you also need to prefix it with the name of the machine where the InterBase database is located (relative to the ASP.NET web server application that is, which means we can use localhost here).
Without the name of the machine (or IP-address), the connection can still be made at design-time, but will fail at runtime.
Apart from the Database property, you also need to specify the UserName and Password values, which are sysdba and masterkey for the Employee.gdb database.
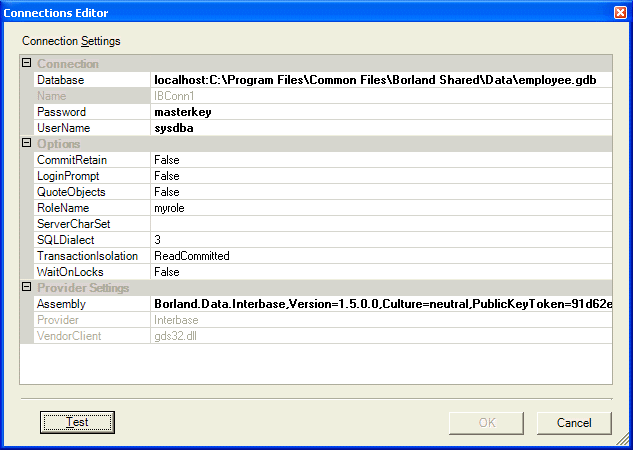
Before you close this dialog, it's a good idea to click on the Test button, you at least you know if you didn't make any mistake with these property values.
Once the connection works, you can close the dialog.
Then, you can open up the IBConn1 node, which shows subnodes for the Tables, Views and (stored) Procedures in the InterBase database.
For our example, we need a table, so open up the Table node.
This will show the eleven tables in the InterBase database, including the EMPLOYEE table.
Now, click on the EMPLOYEE table and drag it to your ASP.NET web form and drop it there.
This will create two new components in the non-visual area of the HTML Designer: BdpConnection1 and BdpDataAdapter1.
Configure Data Adapter
Select the BdpDataAdapter1 component and click on the "Configure Data Adapter" verb at the bottom of the Object Inspector.
This will start the Data Adapter Configuration dialog.
This dialog can be used to examine or modify the configuration of the BdpDataAdapter.
In this example, the BdpDataAdapter was automatically created since we dragged the EMPLOYEE table to the designer area.
So it shouldn't come as a surprise that the BdpDataAdapter is connected to the BdpConnection component (which was also automatically created) and has four predefined SQL Command properties with ready to use SQL statements for SELECT, UPDATE, INSERT and DELETE.
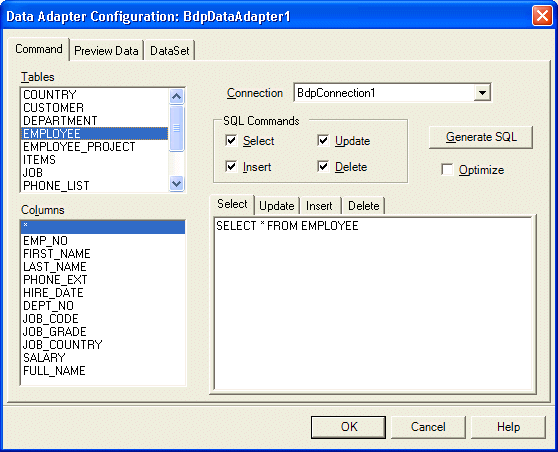
You can still change the SQL Commands here, if you wish.
Once you're happy, you need to go to the last tab (DataSet) to specify that the output of the preconfigured SELECT query should be placed in a new dataset called dataSet1.
Then, click on OK to close this dialog, which will result in a third component in the non-visual area of the designer, namely dataSet1.
Now, set the Active property of the BdpDataAdapter1 component to True to make sure we get live data at design-time (which is a great help to design and test the page without having to guess how the final page will look like in the end).
Designing the Web Form
With the dataset in place, it's time to build the visual part of the data entry form.
Open the DB Web category in the Tool Palette.
But first double-click on the DBWebDataSource component so it will also be placed in the non-visual area of the HTML Designer.
Point the DataSource property of DBWebDataSource to dataSet1 - the .NET dataset that contains the results of the SELECT query on the EMPLOYEE table.
The DBWeb Data Source component will act as a "gateway" between the visual DB Web controls and the .NET dataset.
The other DB Web controls include a DBWebCalendar, DBWebCheckBox, DBWebDropDownList, DBWebGrid, DBWebImage, DBWebLabel, DBWebLabeledTextBox, DBWebListBox, DBWebMemo, DBWebNavigator, DBWebRadioButtonList, and DBWebTextBox.
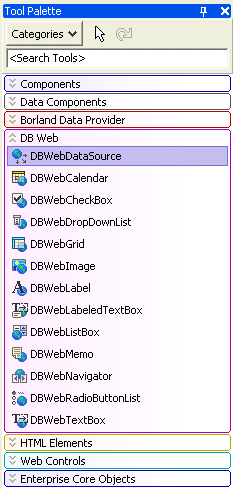
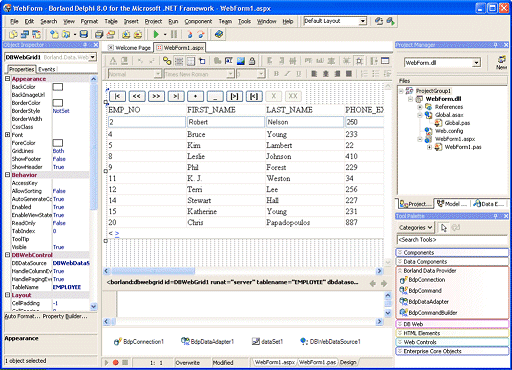
Let's start with the two most powerful controls: the DBWebGrid in combination with the DBWebNavigator.
Double-click on these two controls in the Tool Palette to place them on the HTML Designer.
Select the DBWebNavigator, point its DataSource property to DBWebDataSource1, and its TableName property to EMPLOYEE.
Now, select the DBWebGrid, point its DataSource property to DBWebDataSource1 as well, and its TableName property to EMPLOYEE.
This should give you instant live data at design-time:
The DBWebDataGrid contains built-in support for paging, editing, deleting and updating. Although to be honest, for the last feature we need to write one line of code to actually send the update from the DBWebDataGrid via the BdpDataAdapter and the BdpConnection component to the actual underlying EMPLOYEE table from the InterBase database. That line of code needs to be written in the OnApplyChangeRequest event handler of the DBWebDataSource component, as follows:
  procedure TWebForm1.DBWebDataSource1_OnApplyChangesRequest(sender: System.Object;
    e: Borland.Data.Web.WebControlEventArgs);
  begin
    BdpDataAdapter1.AutoUpdate(dataSet1, 'EMPLOYEE', BdpUpdateMode.All)
  end;
You can now compile and run the application from the Delphi 8 for .NET IDE.
Note that there are two ways to run the application: with or without the debugger, both available in the Run menu (see last month's article for more details).
Deployment
To deploy the ASP.NET Web Form application, take a closer look at your project directory, which is actually the virtual directory itself.
You need to deploy the assembly located in the \bin subdirectory - that's WebForm.dll in our case - as well as the WebForm1.aspx file and optionally the web.config and global.asax files.
We also need to deploy the assembly that contains the DB Web controls; Borland.Data.Web.dll.
And since we're using the Borland Data Provider, we also need to deploy Borland.Data.Provider.dll, Borland.Data.Common.dll, and the InterBase specific Borland.Data.InterBase.dll as well as the InterBase client gds32.dll (visible as Vendor client property in the Connections dialog).
All these files can be placed in the same \bin subdirectory of the virtual directory on the web server, or you can register the assemblies in the GAC (Global Assembly Cache) on the web server, but this usually requires manual assistance from your ISP.
Other Controls
As I've showed earlier, the DBWeb category of the Tool Palette contains more than just the DBWebGrid control.
And not everybody wants to show more than one record at the same time.
Especially when offering a data-entry screen to the endusers.
So, click on the DBWebGrid and remove it from the ASP.NET Web Form.
Instead, add four DBWebTextBox controls, a DBWebLabel and a DBWebCalendar control.
The following table should give a quick and clear overview of which component types you need to drop, in which order, how to call them, and where to connect their properties to.
| New Component | Property | Value | |||||||||
| DBWebLabel | Name | DBWLEMPNO | |||||||||
| DBDataSource | DBWebDataSource1 | ||||||||||
| TableName | EMPLOYEE | ||||||||||
| ColumnName | EMP_NO | ||||||||||
| DBWebTextBox | Name | DBWTBFIRST_NAME | |||||||||
| DBDataSource | DBWebDataSource1 | ||||||||||
| TableName | EMPLOYEE | ||||||||||
| ColumnName | FIRST_NAME | ||||||||||
| DBWebTextBox | Name | DBWTBPHONE_EXT | |||||||||
| DBDataSource | DBWebDataSource1 | ||||||||||
| TableName | EMPLOYEE | ||||||||||
| ColumnName | PHONE_EXT | ||||||||||
| DBWebCalendar | Name | DBWCHIRE_DATE | |||||||||
| DBDataSource | DBWebDataSource1 | ||||||||||
| TableName | EMPLOYEE | ||||||||||
| ColumnName | HIRE_DATE | ||||||||||
| DBWebTextBox | Name | DBWTBJOB_GRADE | |||||||||
| DBDataSource | DBWebDataSource1 | ||||||||||
| TableName | EMPLOYEE | ||||||||||
| ColumnName | JOB_GRADE | ||||||||||
| DBWebTextBox | Name | DBWTBSALARY
| DBDataSource | DBWebDataSource1
| TableName | EMPLOYEE
| ColumnName | SALARY
| | |||
Input Validation
There are two different kinds of validation we can add to the ASP.NET project: server-side validation and client-side validation.
If the enduser enters data in the DBWebTextbox controls and hits the next button on the navigator, then this is equal to clicking on the submit button.
The data will be sent to the web server, and we can now perform server-side data validation on the data that the enduser just entered (or modified).
If the data is invalid, we can respond in kind.
The alternative is that a little section of script code is executed when the enduser clicks on the navigator button.
This scripting code can make a first attempt at checking the validity of the data that is entered in the browser.
This is called client-side validation, and the obvious benefit is that is doesn't need the round-trip to the server in order to validate your data.
Validating using ASP.NET
Using ASP.NET, we can actually use validation server controls that generate client-side script.
This means that the controls run at the server, but the script is executed at the client side in the browser.
ASP.NET contains six built-in validator controls, namely the RequiredFieldValidator, CompareValidator, RangeValidator, RegularExpressionValidator, CustomValidator and ValidationSummary.
They can be found in the "Web Controls" category of the Tool Palette.
RequiredFieldValidator
Let's start with the RequiredFieldValidator.
This control will enforce the fact that the enduser has to specify a value for the given field.
To demonstrate its use, drag one from the Web Controls category on the ASP.NET web form, and place it right next to the DBWTBFIRST_NAME control to enforce the fact that the FIRST_NAME may not be left empty.
Placing the RequiredFieldValidtor next to the DBWTBFIRST_NAME control is not enough, of course, you also have to point the ControlToValidate property of the RequiredFieldValidator to the DBWTBFIRST_NAME.
Apart from that, you may want to change the ErrorMessage property, which by default only says "RequiredFieldValidator".
At runtime, the validator is invisible, but as soon as the DBWTBFIRST_NAME is empty and the cursor leaves the edit control, then the validator is triggered and the error message shown in the browser.
Apart from that, the JavaScript code will ensure that you cannot use the DBWebNavigator to move to another page without solving the validation problem.
CompareValidator
Another ASP.NET validation control is the CompareValidator.
Where the RequiredFieldValidator could only verify whether or not a field is empty, the CompareValidator can compare the contents of a field against a value or data type.
And especially the last one is very handy when it comes to web input, since you want to validate the currency or other numerical input fields before sending them to the server.
The CompareValidator has two properties that you can use to point to the DBWebTextBox to validate: either ControlToCompare or ControlToValidate.
The first one compares the value to a given value, the second one compares the content to a given type.
We'll use the latter now.
You can use the CompareValidator to validate the type of input for the PHONE_EXT field, by setting type to Integer (the phone number consists of numbers only), and the Operator property to DateTypeCheck.
Apart from using the CompareValidator to check if the input is of a specific type, we can also use the CompareValidator to compare a field value against a specified value, using the operator Equal, NotEqual, GreaterThan, GreaterThanEqual, LessThan, or LessThanEqual.
RangeValidator
So far, we've been able to check if a field is empty or not, and if a field contains a value that is within a specified type (or matches a specified value).
Using the RangeValidator, we can take it one step further, and check if a field value is within a specified range.
As an example, we can verify that the SALARY isn't negative or higher than a specified maximum value.
Or that the JOB_GRADE is at least a certain value.
To build these examples, drop a RangeValidator control next to the DBWTBJOB_GRADE control, set the ControlToValidate property to DBWTBJOB_GRADE, the type to Integer, the MinValue to 4, and the MaxValue to 12.
Make sure to set the ErrorMessage property, for example to "Education level must be between 4 and 12".
RegularExpressionValidator
Another validator control - that I will not demonstrate here - is the RegularExpressionValidator.
This validator control works just like the CompareValidator or the RangeValidator, but uses a regular expression to validate the value from the input field.
This can be used for complex values like zip or postal codes.
ValidationSummary
The ValidationSummary control is a special validation control.
Not really a validation control, in fact, but more a control that lists the summary of all validation violations in your page.
We can place it on the web form, and it will automatically display all errors in a (bulleted) list, which can be useful at times.
The summary can be shown in the ValidationSummary control itself, or using a messagebox (or both), based on the value of the ShowSummary and ShowMessageBox properties of the ValidationSummary control.
Validation in Action
With all the validation controls in place, compile and run the application and clear some fields or enter invalid values to test the use of the validator controls:
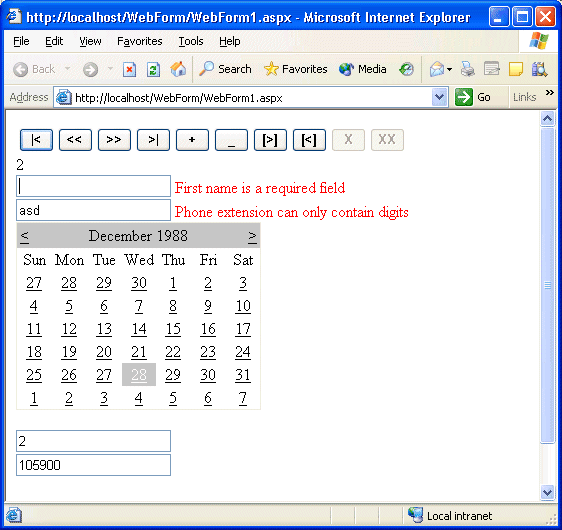
You can click on the DBWebNavigator, but you will not be able to perform any action - navigator or apply data to the database - before the validation errors are solved. Only the undo buttons will work, reverting the input fields to their original record values again.
Summary
In this article I've demonstrated how to build ASP.NET Web Form applications using Borland Delphi 8 for .NET.
I've shown that we can connect to databases like InterBase (or DB2, Oracle, MS Access or SQL Server/MSDE) with the Borland Data Provider, and can use Borland's new DB Web controls to build powerful user interfaces.
Combining the DB Web controls with the ASP.NET input validation controls enable us to build robust data entry pages as web applications.
See also my BorCon 2004 paper: ASP.NET Web Forms and Databases or my Delphi ASP.NET courseware manuals: Delphi 2006 ASP.NET 1.1 Web Development (200 pages) and Advanced Delphi 2006 ASP.NET 1.1 Web Development (now only 99 Euro when you buy it as additional purchase with the first manual).


