| Delphi Clinic | C++Builder Gate | Training & Consultancy | Delphi Notes Weblog | Dr.Bob's Webshop |
| Delphi Clinic | C++Builder Gate | Training & Consultancy | Delphi Notes Weblog | Dr.Bob's Webshop |
| ||||||

Web Service Projects and Sessions
Apart from ASP.NET Web Service solutions using the Web Site target, the Feb 2009 update of Delphi Prism introduced Web Projects that also support ASP.NET Web Services.
Let's use this new way as basis for the next example that demonstrates the use of the EnableSession attribute.
First of all, do File | New, but this time do not select File | New - Web Site, but select File | New - Project instead.
As one of the New Project targets, we can select Web and then pick an ASP.NET Web Application, as can be seen below.
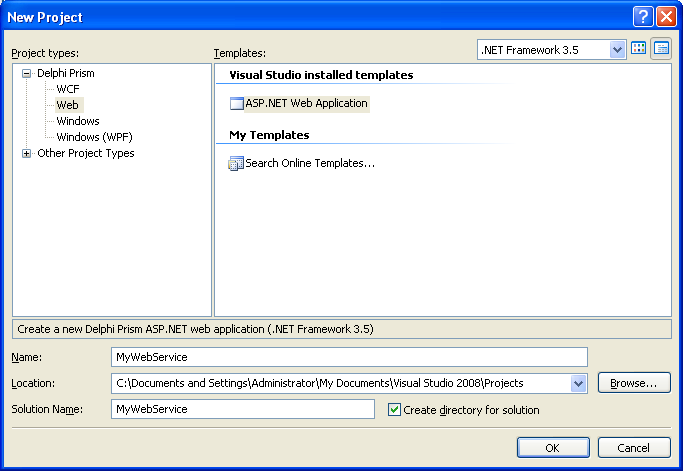
Note that we can select the (minimum) version of the .NET Framework for this project (3.5 in the screenshot above), and unlike the Web Site, we cannot select HTTP as location, but need to specify a normal location for the Web Project.
When we deploy the project, we can select a HTTP location as we'll see later in this section.
For the new example, select MyWebService as Name for the solution as well as the project.
Note that this will produce an ASP.NET Web Application, and not directly an ASP.NET Web Service, but this can be "fixed" after the project is created.
After we click on OK, a new ASP.NET Web Application project called MyWebService is created (in a solution which is also called MyWebService).
The Solution Explorer shows the project with a Default.aspx web page, as well as a Global.asax (for the ASP.NET application object) and a web.config file.
We don't need the Default.aspx and related source files, so open the node in the Solution Explorer, select the three files Default.aspx, Default.aspx.designer.pas as well as Default.aspx.pas, right-click on the nodes and select Remove.
In the dialog that follows, you can click on Delete to permanently delete Default.aspx (and the related .pas files).
Without the Default web page, the project is only ASP.NET and needs another main item.
Right-click on the MyWebService project node, and select "Add - New Item.
In the dialog that follows, we need to go to the Web category and select a Web Service.
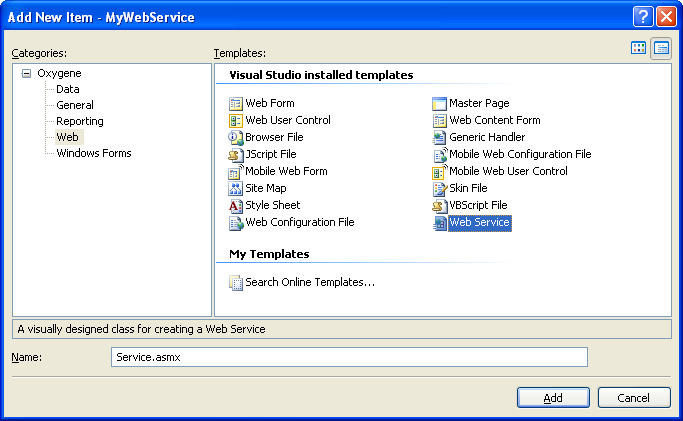
Change the name of the Web Service from WebService1.asmx to Service.asmx and click on Add.
First, modify the namespace attribute again,
  type
    [WebService(&Namespace := 'http://eBob42.org/',
      Description := 'This web service is a new demo Web Service<br>' +
        'generated by <b>Delphi Prism</b> for ASP.NET 2.0 or higher')]
    [WebServiceBinding(ConformsTo := WsiProfiles.BasicProfile1_1)]
    [System.ComponentModel.ToolboxItem(false)]
    // To allow this Web Service to be called from script, using ASP.NET
    // AJAX, uncomment the following line.
    // [System.Web.Script.Services.ScriptService]
    Service = public class(System.Web.Services.WebService)
    public
Note the new comment about the System.Web.Script.Services.ScriptService, to allow the web service to be called from JavaScript, a topic for a future article.
EnableSession
Then, we should remove the demo method HelloWorld, and add four new WebMethods.
All of them with the EnableSession attribute set to true, to enable the use of the ASP.NET session object for these four web methods:
    Service = public class(System.Web.Services.WebService)
    public
      [WebMethod(EnableSession := true)]
      method Remember(const Name,Value: String);
      [WebMethod(EnableSession := true)]
      method Recall(const Name: String): String;
      [WebMethod(EnableSession := true)]
      method Forget(const Name: String);
      [WebMethod(EnableSession := true)]
      method Amnesia; // forget all
    end;
Press Ctrl+Shift+C to generate the skeletons for the four web methods, and implement them as follows:
  method Service.Remember(const Name,Value: String);
  begin
    Session[Name] := Value
  end;

  method Service.Recall(const Name: String): String;
  begin
    if Assigned(Session[Name]) then
      Result := Session[Name].ToString
    else Result := ''
  end;

  method Service.Forget(const Name: String);
  begin
    Session.Remove(Name)
  end;

  method Service.Amnesia;
  begin
    Session.Abandon
  end;
The implementation of the four web methods is relative straightforward, using the ASP.NET Session object to store the name-value combinations, or clear them (or clear everything, by calling the Session.Abandon method).
We can now run the server in a browser using Debug | Start without Debugging. This will start the ASP.NET Deployment Server (at http://localhost:2743 on my machine), showing the web service on our localhost.
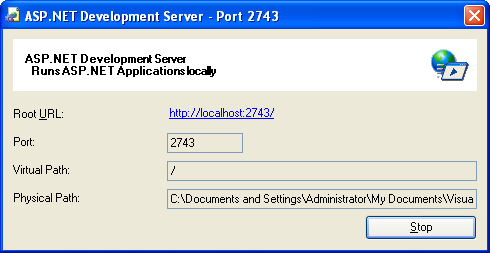
If you didn't selected Service.asmx as Start Page (by right-clicking on it in the Solution Explorer), you may need to manually add Service.asmx to the URL in the browser. Then, you can use the browser to test the web service. For example, you can click and execute the Remember method and make the web service remember a name-value combination, which you can then use to test Recall (or Forget). This should all work just fine, preparing the way for the actual web service client.
Client
Although you may want to deploy the web service before releasing the client, we can already create a client application and allow it to consume the web service part of the same solution.
First, let's create a new Windows Application, call it WindowsClientApplication.

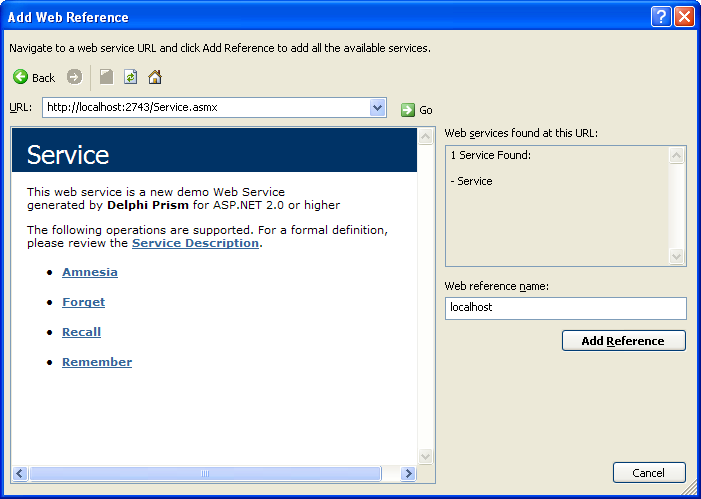
Then, right-click on the References node of the WindowsClientApplication project, and select Add Web Reference. In the dialog that follows, we can specify the URL to a web service, but we can also browse to the "Web services in this solution".
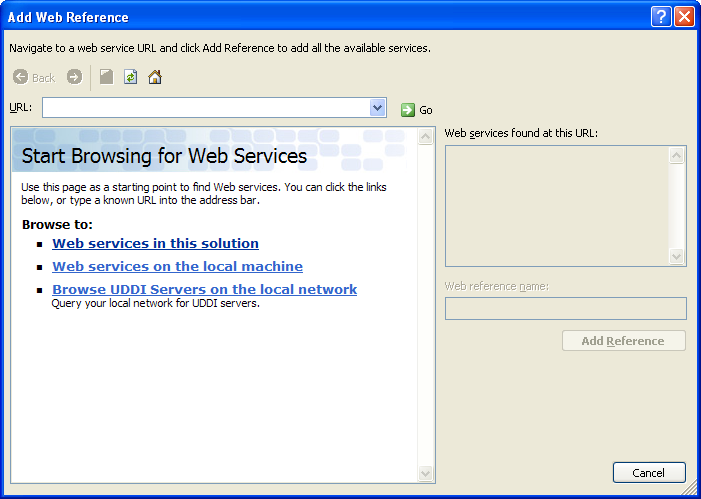
This will show us one web service, called Service, in project MyWebService with URL Service.asmx, as can be seen below:

When we select the Service.asmx link, we'll see the web service just like we've seen it before in the browser. We can now ad the reference to the web service, and use it in the client application.
Remember that the web service we've just consumed is only the test service. Development will work now, but in the final version we should point the client to the actual deployment URL of the web service (something we'll do in the end of this article).
Usage
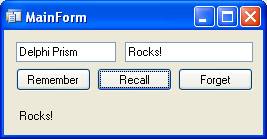
After the web reference is added to the WindowsClientApplication, we can place a number of controls on the main form.
I've added two TextBoxes (tbName and tbValue), a Label (lbMemory) and three buttons: btnRemember, btnRecall and btnForget.
Before we can add some code to call the web methods, however, we should first make sure we "know" the web service, by adding the WindowsClientApplication.localhost namespace to the uses clause.
  namespace WindowsClientApplication;
  interface
  uses
    WindowsClientApplication.localhost,
Then, we can add a field called WS of type Service to a private section of the MainForm, as placeholder for the web service:
  type
    MainForm = partial class(System.Windows.Forms.Form)
    ...
    public
      constructor;
    private
      WS: Service;
    end;
Note the constructor: this is the ideal place to create the instance of our WS field, so open the Construction and Disposition REGION and add two lines of code to the constructor, as follows:
  {$REGION Construction and Disposition}
  constructor MainForm;
  begin
    //
    // Required for Windows Form Designer support
    //
    InitializeComponent();
    WS := new Service();
    WS.CookieContainer := new CookieContainer();
  end;
Note the CookerContainer that we need to create in order to ensure that the session cookie ("connecting" the client application to its session at the server side) is saved and sent with every request from the client to the web service.
With the WS field in place, we can now implement the three Click events of the buttons, which consists of just one line of code for the Remember and Recall methods:
  method MainForm.btnRemember_Click(sender: System.Object; e: System.EventArgs);
  begin
    WS.Remember(tbName.Text, tbValue.Text)
  end;

  method MainForm.btnRecall_Click(sender: System.Object; e: System.EventArgs);
  begin
    lbMemory.Text := WS.Recall(tbName.Text)
  end;
The call to Forget can do two things: if we've specified a name, then we can make sure the session forgets the value that belongs to it, calling the Forget method. However, if no name was specified, I've decided to let the web service forget everything, calling the Amnesia method.
  method MainForm.btnForget_Click(sender: System.Object; e: System.EventArgs);
  begin
    if tbName.Text.Trim.Length > 0 then
      WS.Forget(tbName.Text)
    else WS.Amnesia
  end;
This works fine, but we should remember that using the ASP.NET Session leads to a certain overhead.
The session is kept in memory until there is a timeout, or until we've explicitly called Abandon (which is done by the Amnesia method) to clear the entire session.
Even if you close the client application, the ASP.NET worker process will keep the session in memory (if you didn't abandon it explicitly), which is a waste of resources.
Session Cleanup
A good place to cleanup the session, is the Dispose method of the client application.
Here, we can call WS.Amnesia (if there was nothing to forget, it won't hurt to clear the session anyway).
This will ensure that the session is empty, and no memory is kept after the client application has shut down.
  method MainForm.Dispose(disposing: Boolean);
  begin
    WS.Amnesia;
Now, we can run and test the client, and make it remember and forget things.
When you're satisfied that this all works, it's time to deploy the web service.
Deployment
Deploying ASP.NET Web Projects can be done by doing a right-click on the project node (MyWebService in our case) and selecting the Publish option.
This will show the Publish Web dialog, asking where we want to publish MyWebService:
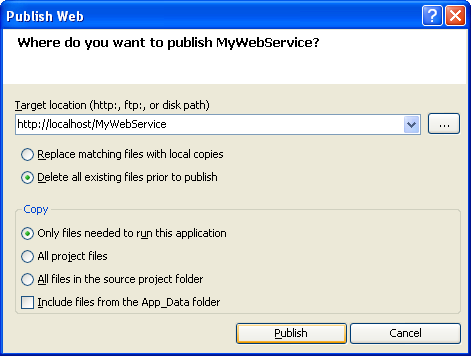
As you can see, I've deployed the project to the http://localhost/MyWebService directory (and then copied it to the DelphiPrismWebServiceProject virtual directory on my www.bobswart.nl server, so you can access it as http://www.bobswart.nl/DelphiPrismWebServiceProject/Service.asmx).
There's one thing left to do after the deployment of the web service: making sure the client talks to the right URL.
For this, we need to amend the code inside the constructor, assigning the right URL to the WS.Url property after the web service has been created:
    WS := new Service();
    WS.Url := 'http://www.bobswart.nl/DelphiPrismWebServiceProject/Service.asmx';
    WS.CookieContainer := new CookieContainer();
And now we can shut down the test web server, and run against the real deployed version of the web service instead.
Summary
In this article, I've demonstrated how we can use Delphi Prism to create, deploy, import and use Web Services that use the ASP.NET Session.
Feel free to create and deploy your own ASP.NET Web Services with Delphi Prism, or consume my test Web Services at my website to play a little with the Session object.
For more information on SOAP and Web Services with Delphi, you can check out my Delphi 2006 XML, SOAP and Web Services on Lulu.com, or my RAD Studio 2007 XML, SOAP and Web Services courseware manual in PDF format (with free updates and e-mail support), or wait for the Delphi Prism Development Essentials manual to become available which will also include ASP.NET Web Service coverage.


