| Delphi Clinic | C++Builder Gate | Training & Consultancy | Delphi Notes Weblog | Dr.Bob's Webshop |
| Delphi Clinic | C++Builder Gate | Training & Consultancy | Delphi Notes Weblog | Dr.Bob's Webshop |
| |||||||
Localising text in Java applications
English is the most used language for text in applications.
But not everywhere people want to use an application with only English messages.
For example in the Netherlands, where I live, people want to have Dutch messages in the application.
So we must remove all hard-coded strings and messages and replace them by a lookup key.
The hard-coded string can then be placed inside a table and with the key we can find the correct value.
This means we must have such a table for every language we want to support.
These tables are extended from the ResourceBundle class.
Before we look at JBuilder 2 and the support for localising the messages in our application, we must take a look at localising support in Java.
Java supports the concepts of a locale.
A locale is a geographic, political, or cultural region.
Most locales are specified by their language, which is represented by a two-letter code in lowercase.
For example English is en and Dutch is nl.
But language sometimes isn't enough to specify a locale by language, so we can add a country code to it.
A country is represented by a two-letter uppercase code.
For example the code for the United States English locale is en_US and for British English is en_GB.
We will use this theory later on to see how we must name our ResourceBundle tables.
Now let's see how JBuilder 2 supports our effort for localising the message in our application.
Suppose we have the following application (I know it is simple, but it is only to demonstrate the localisation support):
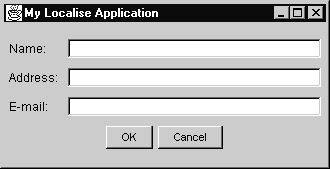
We see five different messages we must localise:
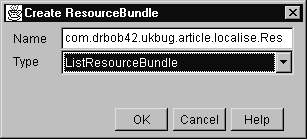
In this dialog we must give a name to the ResourceBundle class, this class contains a table of keys and values for every message we want to localise. We leave the suggested name as is. Secondly we must select a type for the ResourceBundle. We have a choice of two types:
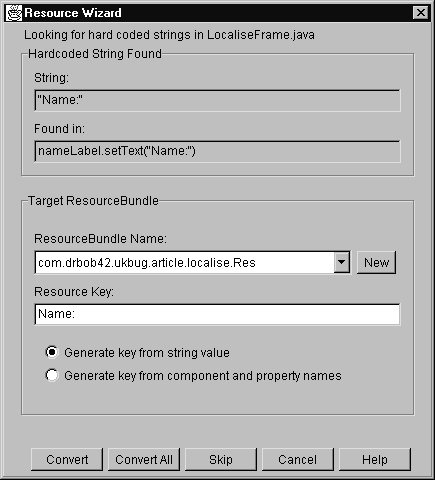
This wizard will guide us through all hard-coded string in our Java source file. If a hard-coded string is found, the text of the string and where it was found are shown in the Hardcoded String Found section. The next section, Target ResourceBundle, let's us determine in which file to store the key and how to name the resource key. The name of the resource key can be generated from the string value of the hard-coded string or from the name of the component it is attached to. It might be wise to generate the key from the component name, so let's select this option. The value of the Resource Key will be changed from Name: to nameLabel.Text, which is the name of the property of the Label component. Now we press the Convert button to convert the hard-code string. The next hard-coded string that is found is shown. If we press the Convert All button, all hard-coded string will be formatted without further questions asked. We can also Skip converting a hard-coded string by pressing the Skip button.
When all string are converted we return to our source code.
Let's take a quick look at what has changed.
First we notice the addition of the following line at the declaration section of the application:
ResourceBundle res = ResourceBundle.getBundle("com.drbob42.ukbug.article.localise.Res");
This will make sure the ResourceBundle class is loaded for our application.
Then if we look at the jbInit() method, where all visual components are set, we notice the following line:
nameLabel.setText(res.getString("nameLabel.Text"));
Here the hard-coded string "Name:" is replaced with a method call, which gets the value from the ResourceBundle and assigns it to the text property of the Label.
If we look further into the source code we see similar lines for every component we have converted the string for.
We have now put all hard-coded string in a separate ResourceBundle file.
Next we must translate the strings to a locale we want to support.
We want to support the Dutch language (of course) for our application.
The quickest way to achieve this is to save the Res source file under the name Res_nl.
The nl is for the Dutch locale.
If we want to support for example United States English we must save the Res file as Res_en_US.
Now we can open the newly saved file, Res_nl.java, in JBuilder and change the values of the keys in the table to Dutch messages.
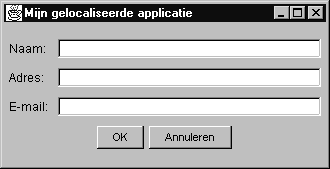
Now if we run the application again, without changing anything in our application source file, we see the Dutch message instead of the English messages!
This works for me because on my computer I have set my default country settings in Windows to the Dutch settings. Java will use these settings for my application. It will look for a resource file which covers the Dutch language (in our case Res_nl) and use it in the application. If Java cannot find such a file it will use the default ResourceBundle file (called Res) and all strings will be in English again.