| Delphi Clinic | C++Builder Gate | Training & Consultancy | Delphi Notes Weblog | Dr.Bob's Webshop |
| Delphi Clinic | C++Builder Gate | Training & Consultancy | Delphi Notes Weblog | Dr.Bob's Webshop |
| |||||||
When an application is started it usually takes a little (or a long) time before the application is really visible. In the startup process properties need to be read and set, a lot of initialization takes place. A user of the application is unaware of what is going on behind the screens, and is only annoyed by the long waiting time. To enlighten the user a bit, and show that something is happening, we can use a splash screen when the application is started. Take for instance JBuilder itself. When we start JBuilder, we first see a nice little splash screen, with a picture and the text JBuilder. Now we still have to wait awhile before the programming is ready, but at least we can see something is happening. And we as users, change our perception about the waiting time, and think it is shorter.
But how to build a splash screen, for our own applications? The splash screen has to be some kind of Window object which will be shown when the application is starting, and must be closed when the application is ready. And finally we must be able to reuse our splash screen in different projects, with different applications.
Creating a splash window
Java provides different Window objects in the java.awt package, like Dialog and Frame.
But these Window objects have got title bar and at least a closing icon, or even minimize and maximize options.
This isn't what we want for our splash screen.
We want a Window without title bar, just a plain Window.
The java.awt.Window class is exactly what we want: it doesn't have a title bar.
So we simply extend a class from java.awt.Window, add user interface elements to it, and we are done.
If we do this, we come across a little problem.
The following screen shot shows what the JBuilder Visual Designer shows when we create a class extended from java.awt.Window:
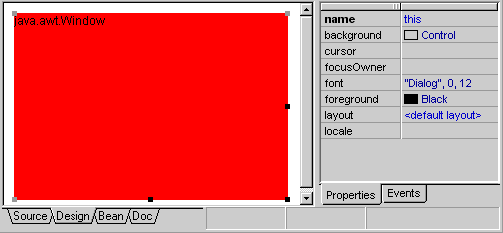
What happened? The java.awt.Window doesn't have a parameter-less constructor, and JBuilder cannot visually design classes without such a constructor. In order to visually design our splash screen, we must extend our splash screen from a class with a parameter-less constructor. We can achieve this by writing a very little wrapper class around the java.awt.Window class. This class extends from the Window, but implements a constructor without parameters, so JBuilder will be able to show this class in the Visual Designer. Here is the code for our wrapper class:
package com.drbob42.splash;

public class WindowWrapper extends java.awt.Window {

  public WindowWrapper() {
    super(new Frame());
  }
}
We invoke the constructor from java.awt.Window with the parameter new Frame(). new Frame() functions as a dummy parameter for the constructor. Compile this class, and we can use it for our splash window.
Now we must create a new class extending this wrapper class, so we can visually design our splash screen. Select File | New and select the New Class icon. In the Extends: field, type the name of the wrapper class: com.drbob42.splash.WindowWrapper. Close this dialog, and new class file is added to our project. Now click on the Design tab at the bottom of the screen, and JBuilder will open the Visual Designer.
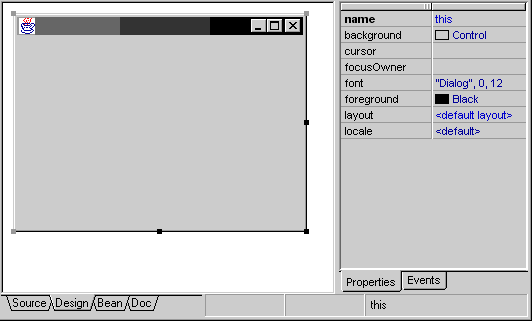
We can now add different user interface controls to this. We don't have to worry about the title bar, which is showing, because it will be gone at runtime. And because this class is a descendant from Window we can put everything we want on this window. We can add panels, progress bars, images, and many more components. For this example we will add a simple image. So add a borland.jbcl.control.ImageControl to the window, and close the Visual Designer.
In the constructor, after jbinit is invoked, we add the following code:
imageControl1.setImageName("splash.gif");
This code adds a image to the ImageControl with the name splash.gif.

We are nearly there. Finally we must add code which will place the splash window at the center of the screen. The following section of code takes care of this. First the dimension of the screen is calculated, then the dimension of the splash window. Using these two dimensions, we are able to calculate the location of the top left corner of the splash window.
  /*
   * Center splash window on screen
   */
  Dimension screenSize = Toolkit.getDefaultToolkit().getScreenSize();
  Dimension splashWindowSize = getSize();
  if (splashWindowSize.height > screenSize.height) {
    splashWindowSize.height = screenSize.height;
  }
  if (splashWindowSize.width > screenSize.width) {
    splashWindowSize.width = screenSize.width;
  }
  setLocation((screenSize.width  - splashWindowSize.width)  / 2,
              (screenSize.height - splashWindowSize.height) / 2);
Here we can find the complete code for the splash window.
Using the splash window
We now have created a splash window, but how to use it in our applications?
Let's build a simple application, and add the appropriate code to use the splash window.
Go to File | New and select a new Application from the New.. dialog. We are using this application as an example, so we leave all options unchanged.
Two new files are added to the project: Application1.java and Frame1.java. When we take a look at Application1.java, we can see in the constructor Frame1 being invoked. And Frame1 is the visible part of our application. So what we want to do is, is to create and show the splash window, while Frame1 is being created. And close the splash window, when Frame1 is shown. Therefore we must add code before the Frame1 frame = new Frame1(); statement, to show the splash window. And add code before the frame.setVisible(true); statement in the Application1 constructor, to close the splash window.
Here is the resulting code:
  public Application1() {
    /*
     * Show splash window
     */
    SplashWindow splash = new SplashWindow();
    splash.setVisible(true);

    /*
     * Create main frame (generated by JBuilder)
     */
    Frame1 frame = new Frame1();
    //Validate frames that have preset sizes
    //Pack frames that have useful preferred size info, e.g. from their layout
    if (packFrame)
      frame.pack();
    else
      frame.validate();

    /*
     * Close, hide splash window
     */
    splash.setVisible(false);

    /*
     * Show main frame (generated by JBuilder)
     */
    frame.setVisible(true);
  }
When we build the application and run it, we shortly see the splash window. Because the creation of Frame1 doesn't take very long in this case, the splash window only is visible for a short time. But when an application takes a long time to initialize, the splash screen will be visible longer. We can simulate this by invoking the Thread.sleep method. If we insert the following code, before the splash window is closed, the splash window will be shown for 5 seconds.
    try {
      Thread.sleep(5 * 1000);  /* wait for 5000 ms (= 5 seconds) */
    } catch (InterruptedException iex) {
      /* do nothing */
    }
Make the splash window reusable
Now we created the splash window by using File | New, and choosing the Class icon.
But wouldn't it by more useful if we could add a code snippet to an existing application, which takes care of these steps.
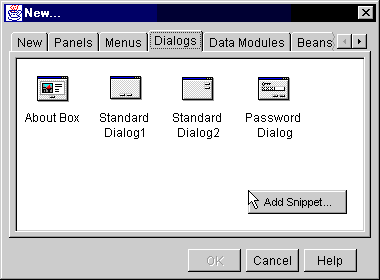
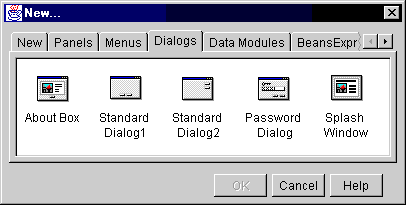
So instead of using the New Class wizard, we want to go to File | New and select Splash Window from the available options.
And this action must insert a new source file to our project with the code available, to visually design a splash window.
Luckily for us, this kind of functionality isn't too hard to achieve in JBuilder 2.
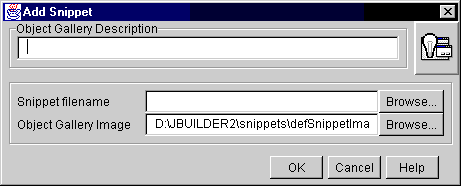
We can add our own code snippets - little pieces of code - to the New... dialog in JBuilder. To see the different options available for parameterizing the code snippets, we can open the Snippets project file, located in the JBuilder\snippets folder. This project contains examples of code snippets, and the ExampleSnippet.snippet file, showing all available parameters. Take a look at this file, and see what is possible. We will use some of these parameters for our splash window code snippet.
Here are the steps to transform our splash window to a reusable code snippet:
Now we must add code snippet parameters, to the source.
We are now ready to add our code snippet to the New... dialog.
And we are done!
Now we can add the code snippet to any application, right from the New... dialog. We must keep in mind, we need the WindowWrapper in the classpath of the application, because else the splash window will not work.
Download
Here are the complete code snippet and icon for download convenience:


