| Delphi Clinic | C++Builder Gate | Training & Consultancy | Delphi Notes Weblog | Dr.Bob's Webshop |
| Delphi Clinic | C++Builder Gate | Training & Consultancy | Delphi Notes Weblog | Dr.Bob's Webshop |
| |||||||
This tutorial will cover Bean basics and more. First, JavaBeans will be introduced: the importance of components, other component technologies and the structure of JavaBeans. A simple JavaBean will be made to show the possibilities of Beans. Next we will look at JBuilder and JavaBeans. JBuilder has rich set of beans packaged in the borland.jbcl package (the JavaBeans Component Library), which incorporate the model-view component architecture. We will then use the JBuilder BeansExpress wizard to create both a visual and a nonvisual JavaBean. After the development and testing of the Bean, you'll learn how to deploy it, so other developers can reuse your Bean. Finally, we'll look at the connection of JavaBeans to other component technologies such as AcitveX (i.e., the ActiveX bridge of JavaSoft).
Component technology
Suppose we want to build our own car. A car is made up of many components.
For example the chassis, the motor block, and interior.
And each of these components is made up of many more components.
The interior consists of chairs, steering wheel, speed meter,
air conditioning, the exterior of wheels, tail lights and we can go on and on. When we build the car
we have the following choice for each component we use: build
the component from scratch on our own or buy the component from
a manufacturer. The choice for building or buying will be decided
on a couple of parameters. A few examples of parameters are: availability,
money, time, personal choice. We can imagine that building a component
on our own will take more time, than buying a component. But at
the same time, if we have plenty of time, because of our retirement,
this wouldn't be a problem, and we can save money by building
it for ourselves. If the component is something never build before,
we don't have a choice: we have to build it on our own. We conclude
that there are good reasons for both buying and building components.
Building your own car is common enough but you will probably never hear of someone building their own home elevator. In that case the only questions are what models are the safest and most reliable and, of course, what is the cost of a residential elevator?
Now replace the car with a software program. The software program can also be divided into several components. For example a word processor, can be divided into a text component, spelling and grammatical components, formatting components, and many more. And if we want to build our own word processor we can ask ourselves the same questions for each component as we did when we wanted to build a car: buy or build. We can buy a spelling component, so our word processor will be able to check the spelling of a document. But we can also build the spelling component and use it in our word processor. And we can sell our spelling component to other application builders.
As a developer of applications we don't need to know everything,
and we can focus on problems we can control, and use components
on problems already solved by other developers. This can save
a lot of time, and money.
These examples show that components are easy to re-use. But before
a component is easy to re-use, standards need to be defined, to
which the component needs to apply. A component seller could sell
a lot more components if it applies to a software standard that
a lot of component users use for their applications. ActiveX,
formerly OCX, is a component standard on the Microsoft Windows
platform. Microsoft has defined certain rules that everybody needs
to follow. And because of these standards, there are a lot of
ActiveX components available to buy and use in the application
building process.
Borland Delphi developers are very familiar with the concept
of software components, because the Visual Component Library (VCL)
is a great example of a library of components.
The Java platform didn't have this kind of software component model. We could re-use our previous written classes in our own application building process. But interchanging our components with our developers, wasn't that easy, because of the missing standards. And this is where the JavaBeans APIs comes in.
The JavaBeans APIs define a software component model for Java. This way developers can create Java components, sell Java components, and compose Java components together into applications. So at last we can do what the Delphi developers already could: create and use software components.
What is a Bean?
Now we know that the JavaBeans APIs define a component standard,
to which Bean developers need to obey. But what is a Java Bean?
The JavaBeans specification contains the following definition
of a Java Bean:
We have seen in the previous section what a reusable software component is, but what about the visual manipulation in a builder tool. What is a builder tool?
Builder tools or application builders provide the environment to use the beans and manipulate them. Borland JBuilder is a good example of a builder tool, Borland Delphi is another builder tool. A builder tool is able to connect different beans together in a visual manner. So without writing any code, we should be able to manipulate a bean. Most builder tools contain a palette of components from which a developer can drag-and-drop components onto a form. A form can be a Java panel, window or canvas.
The functionality a bean supports will be different for every bean, but there are some features that distinguish a Java Bean as a bean:
We now know the features of a Java Bean, but how do we make a Java class to a bean? Is there perhaps a super Java Bean class we need to inherit from? The answer is no! A bean is not required to inherit from a particular class or to implement a specific interface. So to build a bean all we have to do is to write a Java class, and obey certain rules. Here are the main rules:
So almost every Java class is a Java Bean? Basically, yes. But there is more. The Java Beans framework introduces a lot of conventions and design patterns. The conventions and design patterns are all optional, we don't have to use them. But by using the conventions, we will create really useful beans, that can be used within a builder tool. A builder tool, like JBuilder, depends on these conventions and design patterns to introspect a bean. This way JBuilder is able to look for properties and events for example. But before we take a close look to the introspection mechanism, we first look at bean behavior during design time and run-time.
Design time vs. Run-time
Each Java Bean has to be able to run in two different environments.
First of all the bean needs to be capable of running inside a
builder tool. This is often referred to as the design environment.
The bean must be able to provide the builder tool with design
information. The user must be able to customize the bean visually
in the builder tool. For this customization process a lot of extra
baggage is carried around by the bean. Metadata, property editors,
customizers, icons all need to be included with the Java Bean.
The bean must also be able to be used during run-time within a
generated application. During run-time there is much less need
for customization of the behavior and appearance of the Java Bean.
And therefore a run-time bean carries much less baggage around.
Non-visual beans
Most of the time a Java Bean will have a GUI representation
of itself. For example a button or calendar bean, must have a
GUI representation to be useful. But there are also beans that
don't need a GUI representation. For example a spelling bean,
that only will check a word for spelling errors, doesn't need
a GUI representation. We will call these type of beans non-visual
beans.
But the invisibility only applies to the run-time representation of the bean. The bean stills needs to be customized from within the builder tool. So the bean can show itself inside the builder tool. We can change properties, look at events, and do more, visually within the builder tool, but at run-time, the bean will not be seen by the end-user.
The visible bean is visible within both the builder tool as in the run-time application.
Introspection
We saw earlier that JBuilder, as a builder tool, is able to
look inside a bean. JBuilder "knowns", through a process called introspection, which
properties, events, and methods a bean contains. JBuilder uses
the Reflection API, for this purpose. We as bean builders can
use the Java Beans design patterns or naming conventions to help
JBuilder determine the characteristics of our bean. We can also
get around these conventions by supplying our bean with a BeanInfo
class. The class contains the information about the bean, we want
the builder tool to be able to see. In this class we ourselves
can decide what properties, events and methods to show to the
outside world. Later on we will take a closer look at this BeanInfo
class. For now we will focus on using the naming conventions.
The following table shows the naming conventions for properties,
events, and methods. These will be explained in the following
sections.
| Simple property |
public void setPropertyName(PropertyType
value); |
| Boolean property |
public void setPropertyName(boolean value);
|
| Indexed property |
public void setPropertyName(int index, PropertyType
value); |
| Multicast events |
public void addEventListenerType(EventListenerType
l); |
| Unicast events |
public void addEventListenerType(EventListenerType
l) throws TooManyListenersException; |
| Methods |
public methods |
Properties
A property is an attribute of the Java Bean that can affect
its appearance or behavior. For example a button can have a property
named enabled, which represents if the state of the button
is enabled or disabled. A property can be read/write, read-only,
or write-only. The read/write state of a property is determined
by the availability of accessor methods. A property is read/write,
if the property has both a get and a set method. A property is
read-only, if only a get method for the property is defined. And
for a write-only property, only the set method is defined.
The name of the property is derived from the accessor methods names. For example, the methods getInprise and setInprise indicate a property named Inprise.
Simple properties
A simple property represent a single value. By using an isPropertyName()
getter method we flag to the introspector a single-valued boolean
property.
// member used to store property value
//
private String internalString;
// set and get method for property named String
//
public void setString(String newValue) { internalString = newValue; }
public String getString() { return internalString; }
// member used to store property value
//
private boolean connect;
// set and get method for boolean property name connected
//
public void setConnected(boolean newValue) { connect = newValue; }
public boolean isConnected(} { return connect; }
|
Indexed properties
An indexed property represent a array of values. And we can
use additional get and set methods for an indexed property. This
get and set method take an integer index parameter. This index
parameter indicates the place in the array where the new property
value has to be put. If for example we want the first value from
the indexed property we would use a get method like this: getPropertyName(1).
// member to store indexed property
//
private int[] numbers = {1, 2, 3, 4};
// set and get method for complete array
//
public void setNumbers(int[] newValue) { numbers = newValue; }
public int[] getNumbers() { return numbers; }
// set and get method with index to set one element of array
//
public void setNumbers(int index, int newValue) { numbers[index] = newValue; }
public int getNumbers(int index) { return numbers[index]; }
|
Bound properties
A bound property is a property that notifies other objects
when its values changes. When the value changes a PropertyChangeEvent
is fired. This event contains the property name, the old, and
the new value. Other beans or objects can register themselves
as listeners to this event. These objects will then receive the
PropertyChangeEvent when it is fired from the bean.
// declare a property change object and instantiate it
//
private PropertyChangeSupport changes = new PropertyChangesSupport(this);
// member used to store property value
//
private String internalString;
// set and get method for property named String
//
public void setString(String newValue) {
  // save current value of property
  String oldValue = internalString;
  // assign new value of property
  internalString  = newValue;
  // send change event to listeners, because the property has changed
  changes.firePropertyChangeEvent("string", oldValue, newValue);
}
public String getString() { return internalString; }
// implement methods to add and remove listeners
//
public void addPropertyChangeListener(PropertyChangeListener l) {
  changes.addPropertyChangeListener(l);
}
public void removePropertyChangeListener(PropertyChangeListener l) {
  changes.removePropertyChangeListener(l);
}
|
Constrained properties
The last type of property is the constrained property. When
the value of the property changes a VetoableChangeEvent is fired.
Listeners of this event can veto the change of the property value.
A listeners vetoes the change by throwing a PropertyVetoException.
So the following happens when a constrained properties value is
changed:
// declare a property change object and instantiate it
//
private PropertyChangeSupport changes = new PropertyChangesSupport(this);
// declare a vetoable change object and instantiate it
//
private VetoableChangeSupport vetos = new VetoableChangeSupport(this);
// member used to store property value
//
private String internalString;
// set and get method for property named String
// The set method throws PropertyVetoException
//
public void setString(String newValue) throws PropertyVetoException {
  // save current value of property
  String oldValue = internalString;
  // tell interested vetoable change listener about the change
  vetos.fireVetoableChange("string", oldValue, newValue);
  // assign new value of property
  internalString  = newValue;
  // send change event to listeners, because the property has changed
  changes.firePropertyChangeEvent("string", oldValue, newValue);
}
public String getString() { return internalString; }
// implement methods to add and remove listeners for vetoable change events
//
public void addVetoableChangeListener(VetoableChangeListener l) {
  changes.addVetoableChangeListener(l);
}
public void removeVetoableChangeListener(VetoableChangeListener l) {
  changes.removeVetoableChangeListener(l);
}
// implement methods to add and remove listeners for property change events
//
public void addPropertyChangeListener(PropertyChangeListener l) {
  changes.addPropertyChangeListener(l);
}
public void removePropertyChangeListener(PropertyChangeListener l) {
  changes.removePropertyChangeListener(l);
}
|
Events
Java Beans support the Java 1.1 event model. The 1.1 event
handling model is based on the concept of an event listener. An
object interested in receiving events is an event listener. An
object that generates events is called an event source. In this
case our bean is an event source and the application implementing
the bean is an event listener. The event source maintains a list
of listeners and provides the methods to add and remove interested
listeners to and off the list. So we need to add methods to add
and remove interested listeners to our bean.
When the specific event happens the event source notifies all
registered listeners. The event source notifies the listeners
by invoking a method on it and passing it an event object. This
event object is a subclass of the java.util.EventObject class.
So we need to create our own Event class. For this scheme to work
all listeners must implement the required method. This is achieved
by requiring all listeners to implement the corresponding interface
to an event. An event listener interface is implemented by extending
the java.util.EventListener interface. This interface is contains
no methods and is only a marker, to clearly identify the interface
as such.
These are the steps:
Most of the time we want our bean to sent a event to all registered listeners. But sometimes we just want to connect to one listener only. This can be achieved by throwing a TooManyListenersException at the addXXXListener method. When a listener is already connected to the bean, another listener trying to connect will be denied.
Step 1.
// our event named OurEvent
//
public class OurEventObject extends java.util.EventObject {
  // only implementation of simple constructor
  //
  public OurEventObject(Object source) {
    super(source);
  }
}
Step 2.
// event listener interface for OurEvent, so it is named OurEventListener
//
public interface OurEventListener extends java.util.EventListener {
  // method that the listener needs to provide with a body
  //
  eventRaised(OurEventObject e);
}
Step 3.
// maintains list of objects which have registered to receive our event // private Vector listeners = new Vector(); |
Step 4.
// method to add listeners to the bean
// this method is synchronized because multiple listeners can call this
// method at the same time
//
public synchronized addOurEventListener(OurEventListener l) {
  listeners.addElement(l);
}
// method to remove listeners from the bean
//
public synchronized removeOurEventListener(OurEventListener l) {
  listeners.removeElement(l);
}
|
Step 5.
// method that will notify all listeners of OurEvent
//
public void fireOurEvent() {
  Vector l;
  // make a workable copy of available listeners
  //
  synchronized (this) { l = (Vector)listeners.clone(); }
  // loop until all listeners have been reached and invoke the method
  // defined in OurEventListener interface
  //
  for (int i=0; i < l.size(); i++) {
    OurEventListener listener = (OurEventListener) l.elementAt(i);
    listener.eventRaised(new OurEventObject(this));
  }
}
|
Methods
By simply declaring a method public in our bean, the builder
tool will know about the method.
// by simply declaring a method public in a bean,
// will the method be exposed to the builder tool
// by way of introspection
//
public void myMethod() {  /* empty, do nothing */ }
|
Persistent storage
To make a Java Bean persistent, the bean simply needs to implement
the java.io.Serializable interface. By implementing this interface
the fields of a bean will automatically be saved. We don't have
to do anything else! To prevent certain fields of being saved
we can use the keywords transient or static. A transient or static
property is not saved.
// implementing the java.io.Serializable interface makes a bean persistent
//
public class MyBean
  extends java.lang.Object
  implements java.io.Serializable {
}
|
Customization
The appearance and behavior of a bean within the builder tool
can be changed by the use of a customizer and property editors.
Property editor
A property editor let's the user change the value of a property
through a special editor. For example a property that only contains
values from a specific array, like the alignment property of a
LayoutManager. The alignment property usually only allows a constant
integer as FlowLayout.LEFT. By assigning a property editor to
this property the user will only be shown the valid values for
this property.
The property editor implements the java.beans.PropertyEditor interface.
Customizer
A customizer let's the user change many properties of the bean.
A customizer extends a visual component like java.awt.Panel. And
implements the java.beans.Customizer interface, so the builder
tool will recognize the customizer as such.
BeanInfo
A bean class may also have an additional BeanInfo class. This
class will be used by the builder tool to derive properties, events,
names to display, property editors, icons and more. The name of
the BeanInfo class is the name of the bean followed by BeanInfo.
If the builder tool can't find a BeanInfo class with a bean, the
builder tool will use the introspection mechanism based on the
naming conventions.
Deploying
Distribution of Java Beans is done through JAR files. A JAR
file is a ZIP like file with Java class files, and other resources
stored in it. A JAR file may have a MANIFEST file. This MANIFEST
file describes the contents of the JAR file. When we omit a MANIFEST
file, the JAR file will treat all Java class inside the JAR as
beans. By supplying a MANIFEST file we can tell the JAR file,
which classes are Java Beans and which aren't. We need to add
the "Java-Bean: True" line in the MANIFEST file.
Example of line in a MANIFEST file, that will denote a KnowledgeBean
class as a Java Bean:
Name: com/bolesian/beans/KnowledgeBean
Java-bean: true
JBuilder and beans
We know a lot about Java Beans by now. It is time to see some
in action. And it is time to see what JBuilder and Java Beans
have in common. So first we will take a look at JBuilder as a
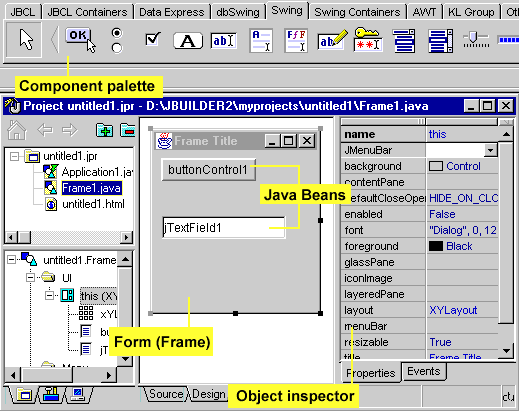
builder tool to visually manipulate Java Beans.
Visual manipulation
When we open a new application in JBuilder and switch to the
Design tab of the AppBrowser, we see what JBuilder means with
visually manipulating. In the center we see our "Form"
where we can put our beans. These beans can be found on the Component
Palette at the top of the screen. This Component Palette contains
a lot of GUI components that can be used in our applications.
At the right of the screen we see the Object Inspector. And as
the name suggest, the Object Inspector shows us all the properties
and events it will find inside the bean through introspection.
BeanInsight wizard
JBuilder contains a BeanInsight wizard that makes it possible
to introspect a specific Java Bean without first dropping it on
our "Form". We can find the BeanInsight Wizard in the
Wizard menu.
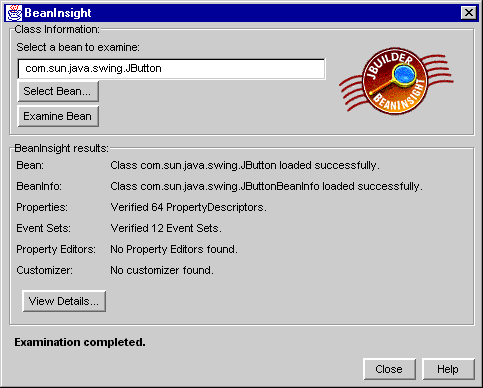
In the dialog we can choose a Java Bean. When the bean is loaded JBuilder will introspect the bean via the BeanInfo class if it is available. If there isn't a BeanInfo class JBuilder will use reflection and the Java Beans naming conventions to analyze the bean. Once it has analyzed the bean, we can look at the results. The first page shows a summary of the results, but when we click on the View Details.. button, we get a separate page for each result category.
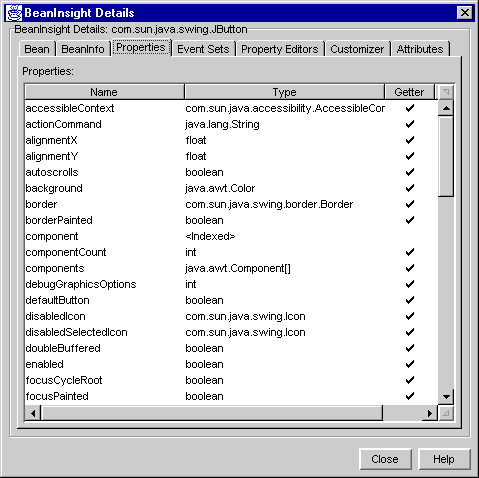
We will use this BeanInsight wizard further on in the tutorial.
BeansExpress
We have seen how JBuilder is a builder tool to manipulate beans.
But maybe even more important is the support of JBuilder for creating
Java Beans. We are developers and want to know how JBuilder makes
it easy to build Java Beans. Here we will see a short description
of each of the options. Each of these topics will be further explained
in the rest of the tutorial.
The most important help to get us started is the BeansExpress Wizard. This wizard creates a code snippet, that gets us right on the way.
Closely related to the BeansExpress wizard is the Bean tab in the AppBrowser. This tab is divided into 5 other tabs. We can toggle the serialization of the bean, add or remove properties, make a BeanInfo class, add or remove events, and add property editors.
First we will build a simple bean, not using the special JBuilder BeansExpress. This is to make sure, we understand what JBuilder does when it generates a lot of the source code for us, when we use a BeansExpress wizard.
We will build a bean that contains a number, a method to get the bean fired up by passing a new number to the bean and event that will be fired when the passed number is within a range of 5 of the number property of the bean. This way we will encounter properties, methods and events in one bean.
First we need to start a New Project in JBuilder. Then we need to add a simple class to the project. Type in the following source code:
public class SampleBean extends java.lang.Object {
  public SampleBean() {
    // do nothing
  }
}
|
And voilà ! Our first bean is ready. We defined a class
named SampleBean and added a constructor that takes no parameters.
It doesn't do anything but at least it is a bean.
Let's add a property to this bean. We define the number as a property
to this bean. Here is where the JavaBeans API comes in. In order
to confirm to the JavaBean framework, we need to add for every
property in a bean that needs read/write access a set and get
method.
So for example if we add a property named number of the int
type, the get and set accessor methods would be called getNumber()
return an int and setNumber(int newNumber).
Here is the source code when the property is added to the bean:
  1: public class SampleBean extends java.lang.Object {
  2:
  3:   private int number;
  4:
  5:   public void setNumber(int newNumber) {
  6:     number = newNumber;
  7:   }
  8:
  9:   public int getNumber() {
 10:     return number;
 11:   }
 12:
 13:   public SampleBean() {
 14:     setNumber(0);
 15:   }
 16: }
|
We will now take a closer look at the code. We notice in line 3 the declaration of the property number. We also notice the use of the private modifier. This means that this property cannot be seen by the outside world and can only be accessed from within this class. It is beyond the scope of this tutorial to explain all the different modifiers that Java knows. But is good to know that the private modifier keeps it in the class and the public modifier publishes the property or method outside the class. To be able to change the value of this property we added the setNumber and getNumber methods in lines 5-11. We can see these methods have a public modifier so the user of the bean can access these methods. And finally the constructor has a statement initializing the value of the property with the value 0 (line14).
Next we add a method to this bean, that will take an int as a parameter and will fire an event in case this int is within the range of plus and minus 5 of the number property. To make sure this method can be called by developers we need to define at as public.
Here is the source code of this method:
  1:   public void rangeCheck(int compareTo) {
  2:     if ((compareTo <= number + 5) && (compareTo >= number - 5)) {
  3:       // Fire event
  4:     }
  5:   }
|
The only logic is in line 2. Here we compare the input parameter compareTo to the number property of the bean. And when the parameter is within range we need to fire an event that we need to create, therefore only a comment is enclosed.
So far everything has been straightforward. For events it isn't any different, but we need to add a lot more code to make it happen.
Earlier when we look at events, we had to follow certain steps to use event. Here are the steps repeated we need to take to add our own custom event to the SampleBean:
Step 1.
To create a custom event class we need to subclass the java.util.EventObject
class. We need to add a constructor to this class with as parameter
the event source object. This constructor will call the constructor
of the java.util.EventObject class. In this example bean we could
just as well used the EventObject itself to notify the system
of an event, but this way we can see that an event is nothing
more than a simple extension to the EventObject class. We can
also add properties to this event, to give our events more information
and detail.
Because this is a new class, we need to add a new Java source file to our project in JBuilder. Name this class InRangeEvent. This results in the following code:
  1: public class InRangeEvent extends java.util.EventObject {
  2:   public InRangeEvent(Object eventSource) {
  3:     super(eventSource);
  4:   }
  5: }
|
Step 2.
We will now make the glue between the event source and the
event listeners: the event listener interface. We will call it
InRangeListener to confirm to the bean naming conventions. This
interface will only contain the method signature for the method
that needs to be implemented by every event listener. We will
call this method inRange. Add a new Java source file to our project.
Here is the source code for the interface:
public interface InRangeListener extends java.util.EventListener {
  public void inRange(InRangeEvent event);
}
|
Step 3.
To make sure we have a property that will hold all the listener
objects we add a property of type java.util.Vector. This class
will store any Object. So add the following line to our source:
private java.util.Vector listeners = new java.util.Vector(); |
Step 4.
Add the addXXXListener and removeXXXListener methods. We will
call our event InRange, so the name will be addInRangeListener
and removeInRangeListener. The only thing these method need to
do is to add and remove a listener object from the list. The Vector
object provides the following two methods for this: addElement
and removeElement. This results in the following source code:
  public synchronized void addInRangeListener(InRangeListener listener) {
    listeners.addElement(listener);
  }
  public synchronized void removeInRangeListener(InRangeListener listener) {
    listeners.removeElement(listener);
  }
|
Step 5.
And the last step is to add a method to our bean that will
notify all listeners. For this purpose we will add a fireEvent
method. This method will take the custom event, InRangeEvent,
as parameter. Here is the source for this method:
  1:   private void fireEvent(InRangeEvent event) {
  2:     // Make a copy of the list and use this list to fire events.
  3:     // This way listeners can be added and removed to and from
  4:     // the original list in response to this event.
  5:     //
  6:     java.util.Vector list;
  7:     synchronized(this) { list = (java.util.Vector)listeners.clone(); }
  8:
  9:     for (int i=0; i < list.size(); i++) {
 10:       // Get the next listener and cast the object to right
 11:       // listener type.
 12:       //
 13:       InRangeListener listener = (InRangeListener) list.elementAt(i);
 14:       // Make a call to the method implemented by the listeners
 15:       // and defined in the listener interface object.
 16:       //
 17:       listener.inRange(event);
 18:     }
 19:   }
|
In line 6 and 7 we make a copy of the list of listeners, we avoid clashing problems within the listener objects. Line 9 starts a for loop that will loop through the copy of the list. It creates a listener object through the casting of the element from the list. The method inRange in the InRangeListener interface is called upon with the event object as parameter. This makes sure the methods inside each listener object is executed.
Finally we need to add a call to this fireEvent method in our bean. Remember we created the rangeCheck method. Inside the if statement we will add a statement that will call the fireEvent method. This results in the following code:
  1:   public void rangeCheck(int compareTo) {
  2:     if ((compareTo <= number + 5) && (compareTo >= number - 5)) {
  3:       // Fire event
  4:       fireEvent(new InRangeEvent(this));
  5:     }
  6:   }
|
Line 4 contains the call to the fireEvent method.
That was a lot of typing, but now we have a Java Bean that has
not only properties and methods, but also fires its own custom
events.
Testing
Now it is time to compile our project. If everything goes well,
we now have three new classes: InRangeEvent, InRangeListener and
SampleBean. To test this bean, we need to write a simple application
that will use the bean. Therefore we write a very simple console
application in JBuilder. Add a new file to our project and name
it TestBeanApp.java. Instantiate the bean and do some tests by
invoking the rangeCheck method with different values for the parameter.
When executed the application will show the following output:
Value of number: 100 Calling checkRange with value 110 Calling checkRange with value 102 Caught event. Event source: SampleBean@1cc756 Calling checkRange with value 96 Caught event. Event source: SampleBean@1cc756 |
As we can see the events are only propagated to the listener when the value is in range with the number property.
Well, we made a Java Bean, and we even used JBuilder to do it. But we didn't use the full potential of JBuilder. Because JBuilder has the BeansExpress to make bean creating much easier. The BeansExpress consists of a set of wizards, visual designers, and code samples that help us build Java Beans rapidly and easily. Once we have a Java Bean, we can use BeansExpress to make changes to it. We can find the BeansExpress wizards on the tabs in the File | New dialog. So let's select File | New in JBuilder. The following dialog is shown:
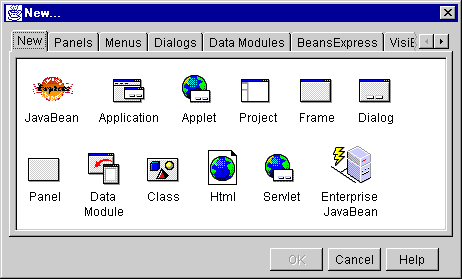
On the first tab we can see the JavaBean icon, it is the first icon in the list. At the end of the list we can see the Enterprise JavaBean icon. We will take a look at the Enterprise JavaBean later on. By clicking on the JavaBean icon the BeansExpress wizard will be started. Aside the JavaBean icon, is there a separate BeansExpress tab in this dialog. By clicking on this tab, we get the following icons:
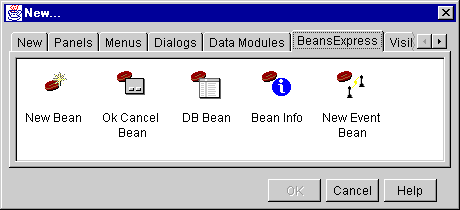
Let's take a look at every icon on this page:
These code snippets are an inheritance from the previous JBuilder version. Because of the new BeansExpress wizard, these snippets are not very useful anymore.
And before we start the new BeansExpress wizard, we first must
think of a bean to make. The previous bean we build, was an invisible
bean. The bean didn't have a GUI representation. This time we
will create a visual bean, with its own GUI. The bean will be
made of a label and a textfield. The label will be placed above
the textfield. The alignment of the label may have to be changed
to left, center, or right during design time. And when during
run-time the user presses Enter in the textfield an event should
be generated. This event must contain the value of the textfield.
Wizard
Click on the JavaBean icon on the New page in the File | New
dialog. JBuilder will show the following dialog:
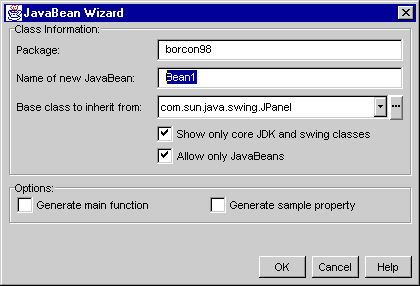
Here we can provide the wizard with information, that will be used in the generation process of the Java Bean by JBuilder. The dialog is divided into two sections: Class Information and Options. The first field of the Class Information section contains the name of the package the bean is placed in. The second field contains the name of our bean. We change this to a more descriptive name: LabelTextFieldControl.
Next we can choose the class to inherit our bean from. JBuilder has already selected the com.sun.java.swing.JPanel class for us. But if we don't like this, we can easily change this by selecting a different class from the combobox, or by clicking on the button with the three dots to select a class from the package browser. The contents of the combobox is defined by the state of the checkbox under the combobox: Show only core JDK and swing classes. If this checkbox is checked the combobox will contain only "real" JDK and swing classes. If the checkbox is unchecked, two borland classes will be added to the combobox:
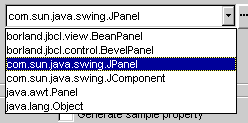
The borland.jbcl.view.BeanPanel is a transparent, lightweight visual Swing/JBCL JavaBean container with extra code for event dispatching, texture mapping, and focus handling. The borland.jbcl.control.BevelPanel is a BeanPanel with beveled edges. The other classes are the standard JDK and swing classes. We choose the BeanPanel for our bean.
If checked, the next checkbox tells JBuilder to warn us if we want to extend a non valid Java Bean class. We leave it checked.
Finally we can let JBuilder generate a main function, so the bean can be run on its own. We don't want to do that here, so we leave it unchecked. And the last checkbox tells JBuilder to generate a sample property in the bean. Check this checkbox for our bean.
Click on the OK button. JBuilder generates code for our new bean and adds it to our project. Let's take a close look at the code generated by JBuilder:
  1: package borcon98;
  2:
  3: import java.awt.*;
  4: import borland.jbcl.view.BeanPanel;
  5:
  6: public class LabelTextFieldControl extends BeanPanel {
  7:   BorderLayout borderLayout1;
  8:   private String sample = "Sample";
  9:
 10:
 11:   public LabelTextFieldControl() {
 12:     try  {
 13:       jbInit();
 14:     }
 15:     catch (Exception ex) {
 16:       ex.printStackTrace();
 17:     }
 18:   }
 19:
 20:   private void jbInit() throws Exception {
 21:     this.setLayout(borderLayout1);
 22:   }
 23:
 24:   public String getSample() {
 25:     return sample;
 26:   }
 27:
 28:   public void setExample(String newSample) {
 29:     sample = newSample;
 30:   }
 31: }
|
The first line contains the name of the package. Lines 3 and 4 contain the import statement necessary for this bean. And if we go down, we see the class declaration in line 6. Line 8 contains the holder variable for the property name Sample. The get and set methods for this property can be found at lines 24-30. Lines 11-18 contain the constructor. In this constructor the jbInit method is invoked. This method is declared in lines 20-22 and is used to layout the bean.
Well, this isn't too much different from our code for the previous bean. The only main difference is the extra code to handle the user interface or visual part of the bean. And because our previous bean was a non-visual bean that is understandable.
Click on the Bean tab in the AppBrowser to see what happened there. The only interesting change has happened on the Properties page:
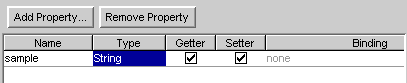
Here we can see the sample property shown, and all its features.
User interface
We have got the skeleton for our bean, let's add some functionality
to it. Select the bean in the Navigation Pane of our project browser.
Click on the Design tab in the Content Pane to open the Visual
Designer of JBuilder. Here we can see the visual representation
of the bean. I wanted to make a bean with a label and a textfield,
so let's add both a TextFieldControl and a LabelControl from the
Control tab on the Component Palette to the bean.
To make sure the component will be as flexible as possible when being resized, we need to use the standard Java AWT layoutmanagers. By using these layoutmanagers we can be sure that our bean will be platform independent and it doesn't show wrong on different platforms. Change the layout property of "this" to GridBagLayout. And change the constraint for both controls, so both have a horizontal fill, a x-weight of 1, a West anchor, and a grid position height and width of 1. TextControl1 should have y-position of 0, and textFieldControl1 a y-position of 1. And after a resize this is the result:

Finally we can set the text property of textFieldControl1 to an empty string value, and the text property of textControl1 to the text "Label:".
Event
Next we add an event to our bean. Because we already have a
TextFieldControl in our bean we can use the actionPerformed event
of this component. Whenever this event is called, our LabelTextFieldControl
makes sure that this event will be shown to outside world as its
own event. To achieve this we must register the bean as listener
to the actionPerformed event of the TextFieldControl class. But
JBuilder makes it very easy for us, to perform this task.
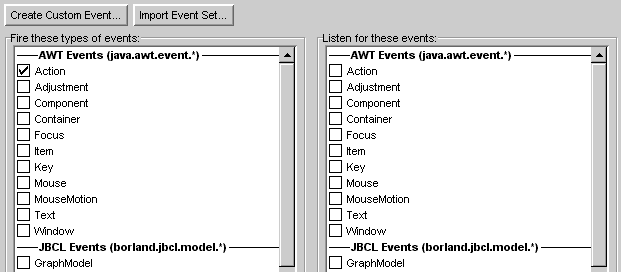
Go to the Bean tab, and select the Events page. On the left we can see the type of events that can be fired. Select the first event: Action. JBuilder will now add the appropriate code to our bean, so this event can be fired.
Now we need to call the generated fireActionPerformed method from within the event handler of the TextFieldControl.
| fireActionPerformed(e); |
This will execute the fireActionPerformed method, and this will in turn notify all event listeners for this event source.
Adding a new property
Now we have defined our own event, it is time to add some properties
to this bean. Let's start with an alignment property for the text
of the label on this bean.
And if we go back to the source of our bean, we can see the change reflected in the source code.
Next we add a new label property. This label property contains the text for the label of the TextControl. On the properties page we click on the Add property page. JBuilder shows the following dialog:
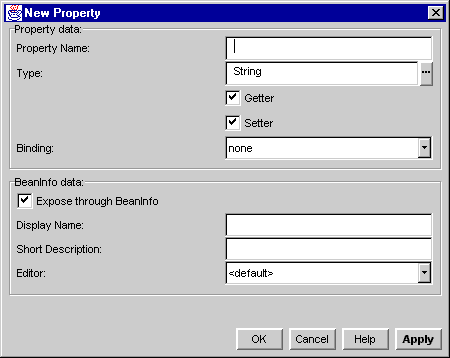
Here we can give information about the property in two main sections: Property data and BeanInfo data. Everything we fill in in the Property data section will be generated to source code. The data in the BeanInfo data section will be used to generate a BeanInfo class. We fill in label Property name. We leave the type to String. We also want to have getter and setter method for this property. Next we can assign a binding to this property. This means we can make the property bound or constrained. JBuilder will then insert the additional code necessary for firing the appropriate events. For now we leave this to none.
The checkbox Expose through BeanInfo class let's us choose if we want this property to be shown in the BeanInfo class. Next we can fill in a display name. This name is used in the Object Inspector. The Short description is used for the text in the tooltip of the property in the Object Inspector. And finally we can assign a property editor to this property. We leave that to default. Click on the OK button to let JBuilder generate the source.
And finally we need to implement a method that will reflect changes in these properties in the GUI of the bean. So if someone changes the name of the label, the label will change visually in the bean. We create an updateLabel method that will be called by both set methods. The updateLabel method will look like this:
  private void updateLabel() {
    textControl1.setAlignment(labelAlignment);
    textControl1.setText(label);
  }
|
And there we have it, a completely functioning visual Java Bean written with very little code.
Testing the bean
We can first check the bean in the BeanInsight Wizard. Click
on the Wizards menu and select the BeanInsight option. Our current
bean is already filled in. Al we have to do now is to click on
the Examine Bean button. The results are shown in the dialog.
For more detail we can click on the View Details&ldots; button.
Now that we have made the bean, it is time to test and use it in a sample application. But before we make a new application let's make sure the bean is available in the Component Palette of JBuilder. Make sure the LabelTextFieldControl bean is compiled and we know where to find the class files. We will now use a rather quick and dirty way of adding our bean to the Component Palette. We will look at a more sophisticated way of deploying our beans later on.
First open the properties dialog of the Component Palette by right-clicking on the palette and choosing the Properties... option from the popup menu. This will open the Properties dialog:
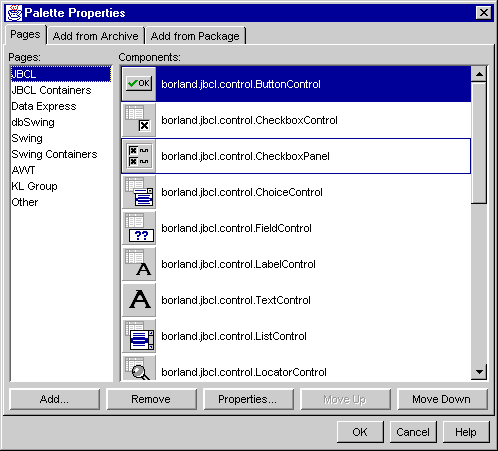
We can see three tabs named Pages, Add from Archive and Add from Package. The Pages tab shows all the available tabs on the Component Palette. We can add a new tab and add components to it, or add components to an existing tab. We will add a new tab for our self-developed beans. Click on the Add.. button. A dialog will show up asking for the name of the new page. Type in My Beans for the name of the page and click the OK button. Now we need to add our LabelTextFieldControl bean to this page.
Select the Add from Package tab. Here we can go to the folder containing the bean's class files and install the bean to the palette. Click on the Browse... button and select the folder where the bean class files are. The myclasses folder in the JBuilder folder is probably where we should look. JBuilder will show in the big list box all beans it can find. Select the BeanExpress.LabelTextFieldControl bean and select the Install button. And we are done. Click on OK to close the dialog.
If we take a look at the Component Palette we can see a new tab has been added named My Beans, and on this tab is single icon, indicating our bean. If we move our mouse over it, JBuilder will show the name of the bean in a tooltip: borcon98.LabelTextFieldControl. We can now drop the bean from the Palette onto a new frame.
Create a new application with the New Application Wizard of JBuilder. Go to the design mode of the frame of this application and add the LabelTextFieldControl to the frame. Select the control and look at the Object Inspector for this control. We can notice two things. First, the Object Inspector shows much more properties than we have added to this component and second, we notice our own properties label, and labelAlignment in the list of properties. Why does the Object Inspector show more properties than we added? That is because we have subclassed the BeanPanel to create our bean and all these properties belong the BeanPanel class. And our bean inherited all these properties.
Now look at the events tab of the Object Inspector. At the top we can see our ActionEvent, actionPerformed. The other events are all inherited from the BeanPanel class. Play with the different properties and events to see that our bean has the same behavior in the JBuilder IDE as any other bean.
Deploying
As I mentioned earlier, we used a quick and dirty way of adding
our bean to the Component Palette. If we want to distribute our
bean to other people, so they can use it, we need to pack our
bean in a JAR file. A JAR file is Java archive file and can contain
many classes and auxiliary files. Fortunately JBuilder comes with
a handy Deployment Wizard that makes live easy when it comes to
deploying applications, applets or beans.
Select the Deployment Wizard from the Wizard menu. This will open a dialog with a couple of options.
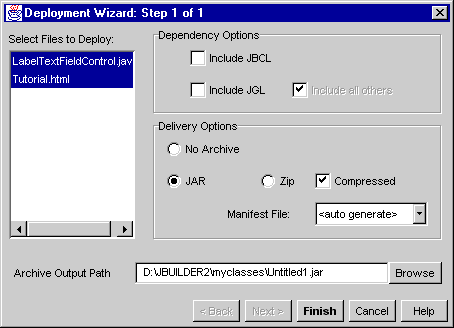
On the left we can see a list of files that can be archived in the JAR file. Make sure we only select the LabelTextFieldControl.java file from the list. If we want to distribute our bean to someone who hasn't got JBuilder, but uses an other Java IDE, we need to check both the Include JBCL and Include JGL checkboxes in the dependencies groupbox. Leave the options in the Delivery Options group unchanged. And finally change the name of the Archive Output Path to a more proper name like LabelTextFieldControl.jar. Click on the Finish button to let JBuilder generate the proper JAR file.
Now we have the JAR file with the bean class inside we can
use another way to add it to the Component Palette. Open the Properties
dialog of the Component Palette again. And instead of choosing
the Add from Package tab as we did before, we now select the Add
from Archive tab. Select the JAR file we have just created and
install it on the My Beans palette tab.
We can add the component in the same manner to our test application
and it will work.
Adding a new event
Let's say we have been working with this component for quit
awhile now. And we like to add a new event to it, because we seem
to need it. For example an event that will be fired when the value
of the label changes, a LabelChangedEvent. We can achieve this
functionality of course by making the label property bound. But
here we use a separate event. We have seen before, that to achieve
this we need to subclass the EventObject class and create an EventListener
interface. JBuilder's BeansExpress comes with a New event set
Wizard that will do most of the work (if not all).
Go to the Bean tab and select the Events tab. At the top of the screen we see a button named Create Custom Event&ldots; Click on this button. We now see the following dialog:
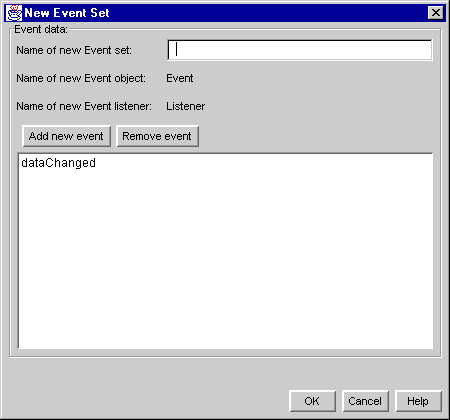
We wanted to make a LabelChangedEvent, so we fill in LabelChanged in the Name of new Event set input field. The name of Event object and Event listener fields cannot be adjusted, but are changed accordingly to the name we type in.
In the bottom half of this dialog we can add and remove events. What we fill in here are the names of the methods that will be declared in the EventListener interface, and therefore need to be implemented by any listeners to this event. Remove the dataChanged event, and add two events named empty and otherwise. If the label property is empty, the empty method will be called, and if the label isn't empty the otherwise method will be called.
Click on the OK button. JBuilder now does a lot of work behind the scenes. And when JBuilder is finished we notice the addition of two extra Java source files in our project: LabelChangedEvent.java and LabelChangedListener.java. But before we take a look at these source files, we first must check the checkbox for the LabelChangedEvent in the event list. Now JBuilder will add the appropriate listeners and other code:
  public synchronized void removeLabelChangedListener(LabelChangedListener l) {
    if (labelChangedListeners != null && labelChangedListeners.contains(l)) {
      Vector v = (Vector) labelChangedListeners.clone();
      v.removeElement(l);
      labelChangedListeners = v;
    }
  }
  public synchronized void addLabelChangedListener(LabelChangedListener l) {
    Vector v = labelChangedListeners == null ? new Vector(2) : (Vector) labelChangedListeners.clone();
    if (!v.contains(l)) {
      v.addElement(l);
      labelChangedListeners = v;
    }
  }
  protected void fireEmpty(LabelChangedEvent e) {
    if (labelChangedListeners != null) {
      Vector listeners = labelChangedListeners;
      int count = listeners.size();
      for (int i = 0; i < count; i++)
        ((LabelChangedListener) listeners.elementAt(i)).empty(e);
    }
  }
  protected void fireOtherwise(LabelChangedEvent e) {
    if (labelChangedListeners != null) {
      Vector listeners = labelChangedListeners;
      int count = listeners.size();
      for (int i = 0; i < count; i++)
        ((LabelChangedListener) listeners.elementAt(i)).otherwise(e);
    }
  }
|
We notice the appearance of the add and remove listener methods.
And two additional methods: fireEmpty and fireOtherwise. Each
one is responsible for sending the appropriate event to the registered
listeners and invoking the appropriate method.
Now look at respectively the extension of the EventObject class
and the EventListener class. What a difference with our first
attempt with events, when we coded all this by hand. When we take
a closer look at the LabelChangedEvent class, we see that it is
very basic. It only extends the EventObject and provides a constructor.
To give more meaning to this new event, we add some code. This
code will give the event a state. We add an id property that will
contain a value to indicate an empty string or non-empty string.
So we can differentiate between these two choices. This code needs
to be added:
  // Constants to indicate different state
  //
  public static final int EMPTY     = 0;
  public static final int OTHERWISE = 1;
  // Private property named id, contains state
  //
  private int id = 0;
  // New constructor that will take the id as a parameter
  //
  public LabelChangedEvent(Object source, int id) {
    // Call super constructor
    //
    super(source);
    // Assign id parameter to id property
    //
    this.id = id;
  }
|
When we open the LabelChangedEventListener source file, we
see the declaration of the empty and otherwise method.
And finally we must write some code that will fire this new event.
The best place to add this code in the setLabel method, because
only in this method will the value of the label change. We must
write a routine that will check if the label is empty and if it
is, call the fireEmpty method with a new LabelChangedEvent object
that has an id of LabelChangedEvent.EMPTY. If the label isn't
empty, we have to call the fireOtherwise method with a LabelChangedEvent
object that has an id of LabelChanged.OTHERWISE. This is the code
that will take care of this:
    if (label.equals(""))
      fireEmpty(new LabelChangedEvent(this, LabelChangedEvent.EMPTY));
    else
      fireOtherwise(new LabelChangedEvent(this, LabelChangedEvent.OTHERWISE));
|
We are able to experiment and use this event in our test application.
BeanInfo
As explained earlier JBuilder discovers the properties, methods
and events of a bean through introspection based on the JavaBeans
API. If we want to provide more information about a bean, or want
to refine the information available through introspection, we
should define a class that implement the BeanInfo interface. A
BeanInfo class typically subclasses the SimpleBeanInfo class,
that is a no-op implementation of the BeanInfo interface. When
we want to override only one or two methods in the BeanInfo interface
it is easier to subclass SimpleBeanInfo then to implement BeanInfo
directly. In order for JBuilder to be able to find the corresponding
BeanInfo class to a bean, there is a naming convention to be followed:
a BeanInfo class should have the same name as the bean with the
string BeanInfo appended.
A BeanInfo class specifies a number of pieces of information for our bean:
The rule of priority is that BeanInfo classes will be used before the introspection mechanisms come into play. So by adding a BeanInfo class to our bean, we can even hide properties we don't want to be shown in the Object Inspector, that otherwise would always be shown.
But we don't have to write this information ourselves, we let JBuilder do this task. If we go the BeanInfo page on the Bean tab, we get the following screen:
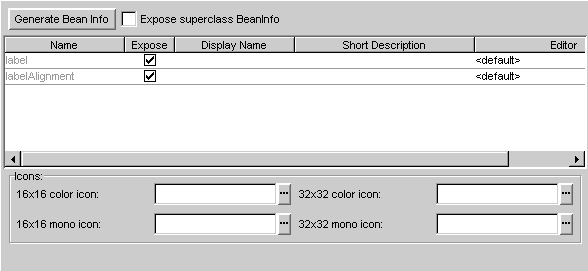
At the top we notice a Generate Bean Info button. By clicking on this button the BeanInfo class will be generated for us. Next to the button is a checkbox Expose superclass BeanInfo. If we check this checkbox, bean information contained in the BeanInfo class of our parent class, will be included in the BeanInfo class. So if we check this option, all properties exposed through the BeanInfo class of BeanPanel will also be exposed through our BeanInfo class. We leave this option unchecked.
Next there is a list of properties we add to our bean: label and labelAlignment. For every property we can choose to expose it through BeanInfo or not. We can supply a display name for the property. This name will be used by the Object Inspector. This is quite useful for internationalization issues. Here we can define a name, that will replace by a local specific one, if there is any. The value we fill in at short description will be shown in the tooltip in the Object Inspector. If we hover our mouse over the name of the property a tooltip will be shown, and it will contain the value entered here. And finally we can assign a Property Editor to the property.
At the bottom of the screen, we can assign images for icons. These icons will be used by JBuilder to be shown in the Component Palette. We can select existing icons, or build our own. We have to make sure to include the icon images in the JAR file when we deploy the Java Bean.
Now we can click on the Generate Bean Info button. A BeanInfo source file is added to the project. And when we take a look with BeanInsight we can see for example the icons.
Persistence
Persistence is the ability of a bean to save itself. This is
achieved by implement the Serialization interface. This interface
contains two methods: writeObject and readObject. When we implement
this interface, we must provide code for these two methods. But
most of the time, we don't need to, because the class we are inheriting
from, is already serializable. And this goes also for the BeanPanel,
we derived from to build our bean.
If this isn't the case, we can always check the Support Serialization checkbox on the General page of the Bean tab. This will implement the interface and add two empty methods writeObject and readObject.
Property editor
We have talked about property editors, but we didn't make one.
So the time has come to dive into the subject of property editors.
We know that by assigning a property editor to a property, this
property's value can be changed with the help of the property
editor. The borland JBCL beans contains a lot of property with
their own property editor. For example to locate a file on our
system, or to choose a color for a label. A property editor can
be a simple as an input field, but can also be a combobox or a
separate dialog window.
We can use property editors for our properties as well. By using a proper property editor already defined by JBuilder or by building our own property editor. To make sure the Object Inspector knows which property editor to show during design time, we can define the editor in the BeanInfo class of the specific bean on the BeanInfo page.
Let's try to add a property editor to our bean. The labelAlignment property is a good candidate for its own property editor. And we are in luck, because JBuilder already defined a property editor to change the value of the alignment of our label, borland.jbcl.editors.AlignmentEditor. In fact the borland.jbcl.editors package contains a lot of property editors we can use. To assign this editor to our labelAlignment property we must first go to the Property Editors page on the Bean tab, and select the Import Property Editor.. button. In the dialog we can type in the name of a class or search one by clicking on the button with three dots. By clicking on OK the editor will be shown in the list. Once it is in the list, we can assign it to the labelAlignment property on the BeanInfo page.
Well that wasn't too difficult. We can deploy the bean again
and see in our test application how it turns out.
But besides using existing property editors, we want to use our
own. Let's create a property editor for our bean. This property
editor shows a combobox of strings, from which the user can choose.
The choosen string will be displayed in the textfield part of
our bean.
So let's return to the Property Editors page and select the Create Custom Editor.. button. JBuilder shows the following dialog:

We can provide the name of the editor. The name of the editor should be same as the name of the property it is intended for, with the word Editor appended. So for our (yet to create text property), we will fill in as name TextEditor.
The next field gives us a choice of editor types. There are four choices:
Our bean will be using the String List Editor, so we choice this option from the list. At the detail section we can add and remove entries. These entries will be shown in the Object Inspector. Add some string entries, it doesn't matter what for strings. Click on the OK button and we will see the TextEditor in the property editor list. Now we must add the text property and assign the TextEditor to it. This can be done on the Properties page. We have seen this before, so we don't need any more explanation. We mustn't forget to add the following line of code to the setText method:
textFieldControl1.setText(text); |
Or else the bean wouldn't reflect a change in the property value.
And when we test the bean again, we will notice the text property and the TextEditor in the Object Inspector.
Customizer
Maybe we want to provide the user of our bean with some way
to customize the properties other than one at a time. We need
to write a class that will implement the Customizer interface.
By registering the customizer class with the BeanDescriptor object
within the BeanInfo class, JBuilder should be aware of this customizer.
For JBuilder to be able to show the Customizer the class needs
to be derived from the Component class, because JBuilder will
try to show the Customizer in a dialog box with a OK en Cancel
button. And here we see that JBuilder will not use its Object
Inspector to show the customizer. Because of the independency
of a customizer related to the builder tool, the state of a bean
after it has been customized, isn't saved. We need to serialize
the bean to save the changes made. There is a big analogy to the
property editors mentioned earlier, but instead of a editor for
every property, we define a property editor for the whole class.
We can even write a complete wizard to set up properties for the
bean. Up until now JBuilder's BeansExpress doesn't support the
development of Customizer classes.
But doesn't stop us. We build our own customizer. The name of the customizer must be the name of the bean it will customize, appended with the word Customizer. So our customizer will be named LabelTextFieldControlCustomizer.
Select File | New, and select Panel from the New dialog. Fill in the name LabelTextFieldControlCustomizer into the name field. We derive our panel form JPanel. By clicking on OK, JBuilder will generate the source code. We go to the Screen Designer and add two textfields, a button, and two groupboxes, until our screen looks something like this:
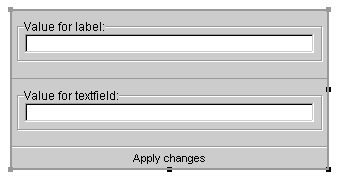
The two textfields represent the values of the label and text properties of the bean class.
Next we must implement the Customizer interface. We use the Interface Wizard in the Wizard menu for this task. JBuilder will automatically insert the methods that need to be written.
When we take a look at the source we can see the setObject method, that we must write. But not the addPropertyChangeListener or removePropertyChangeListener methods, because JPanel inherits those methods from JComponent. This method will set the bean that this customizer is used for. So we add a member named bean to our customizer and write the setObject method:
  LabelTextFieldControl bean;
  public void setObject(Object bean) {
    this.bean = (LabelTextFieldControl) bean;
    jText.setText(this.bean.getText());
    jLabel.setText(this.bean.getLabel());
  }
|
In this method we will connect to the bean, and use the values from the label and text property to set the textfields in our customizer class.
When the user click on the Apply changes button, the customizer must set the label and text property of the bean. After setting these properties a PropertyChangedEvent must be fired for every property. The code to handle this is in the applyButton_actionPerformed method defined:
  void applyButton_actionPerformed(ActionEvent e) {
    String t_oldValue = bean.getText();
    String t_newValue = jText.getText();
    bean.setText(t_newValue);
    firePropertyChange("text", t_oldValue, t_newValue);
    String l_oldValue = bean.getLabel();
    String l_newValue = jLabel.getText();
    bean.setLabel(l_newValue);
    firePropertyChange("label", l_oldValue, l_newValue);
  }
|
First the old value of the property needs to be get, then the new value can be set, and the PropertyChangedEvent can be fired, by calling the firePropertyChange method of JComponent. And this finishes our customizer. But before JBuilder knows it is there we need to add some code to the BeanInfo source. And because JBuilder hasn't got a nice wizard to do this, we need to do it by hand. But luckily it isn't difficult. We add a member to the BeanInfo class, named customizerClass of type Class, and the getBeanDescriptor method. JBuilder will use this method to determine the customizer class for a particular bean. Here is the code:
  Class customizerClass = LabelTextFieldControlCustomizer.class;
  public BeanDescriptor getBeanDescriptor() {
    return new BeanDescriptor(beanClass, customizerClass);
  }
|
When we compile everything we can take a look at BeanInsight for our bean. And we notice that the BeanInsight signals the presence of the customizer class. When we go to our test application, we can go to the Screen Designer. And clicking with the right mouse button, on our bean, shows a popup menu, with a option name Customizer&ldots; Selecting this option opens our customizer class. We can change the values for label and text here and by clicking on the Apply changes button, the changes are reflected in the Screen Designer.
Conclusion
And this ends our use of the BeansExpress of JBuilder. The
BeansExpress, consisting of different wizards, is a very useful
tool to build Java Beans. It let's the developer focus on problems
we want to solve with the bean, and creates a buffer to the Java
Beans API. So we can concentrate on the interior of the bean,
and not on how it is supposed to present itself to be a good bean.
Because of using the BeansExpress wizard, the code that is generated follows the naming conventions of the Java Beans framework. And therefore are good designed beans. The wizards lessen the number of type errors, because there is less to type.
The BeansExpress wizards are focused on Java Bean builder, but JBuilder is also an excellent builder tool, to use Java Beans. The support of serialization, property editors, and customizers in the IDE is outstanding.
The beans we have seen so far are all "user" specific beans. The environment in which the bean is run, is when a user uses the application that contains the bean. Most of the time that is on a single computer. In December 1997 JavaSoft released the Enterprise JavaBeans (EJB) specification. The EJB specification defines a server component model for JavaBeans. An Enterprise Java Bean is non-visible and runs on a server. An EJB can be manipulated the same way in a builder tool, multiple beans can make an application. This section will introduce Enterprise Java Beans, and we will take a look at the Enterprise Java Bean wizard provided within JBuilder 2.0.
An EJB runs in a EJB container on the server. This containers manages all the different beans that are running. Most of the run-time attributes of an EJB can be administered and set with visual tools.
The framework defines a set of interfaces a bean must expose so it can be used by different server container vendors. Another name for such a server-side container is a Object Transaction Monitor (OTM). In short we can say that a server-side container or OTM is for an enterprise bean, what the application is for a "normal" bean.
What is a scenario of what happens in real life? A client will search for a EJB container and connect to it. It will invoke a create method on the EJB and the bean will instantiated. And then the client can invoke methods on the EJB. This all very similar to RMI (Remote Method Invocation) and CORBA (Common Object Request Broker Architecture).
Session and Entity beans
Beans can be either persistent (entity bean) or transient (session
bean). This mean that an entity bean is able to save its state
to disk, and load the state from disk. The lifetime of an entity
bean doesn't depend on the environment. If the environment goes
down, the bean can save itself, rollback current transaction.
Later we can reconnect to the bean, without loss of data. The
bean has a unique ID that pointer to their state. Through this
unique key is the container able to load the bean back into memory.
A session bean has the following characteristics:
An entity bean has the following characteristics:
An EJB container must support session beans. The support for entity beans is optional, for now. But when version 2.0 EJB is available the container must support both kinds of beans. And here we see a problem, because the supply of EJB containers isn't very big. It still is very young technology, and it will take some time, before real world EJB will be build and used.
Enterprise Bean wizard
JBuilder provides us with a wizard that will generate a source
code template for EJBs. If we activate the wizard we will get
the following dialog:
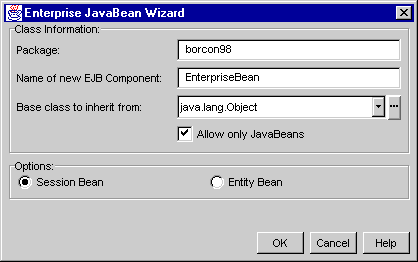
Here we can give a name to the EJB component, type the package name, and select a base class to inherit form. And finally we can choose if we want JBuilder to generate a Session Bean or an Entity Bean. The Session bean will implement the SessionBean interface and the Entity bean will implement the EntityBean interface. The generated source code contains all method declaration of the interface, with empty bodies.
Because this technology is so new and the availability of EJB containers and servers isn't big, we just leave it at this.
In the beginning of the tutorial, when we were looking at component technology in general, we stumbled across ActiveX. And we saw that ActiveX is the component technology of Microsoft for (mainly) the Windows platform. We now know that Java Beans are platform independent. If a Java VM is available, a Java Bean will work.
But what if we are a component developers, and have built quit a lot of ActiveX controls. And we want to turn to the bean framework. Should we built everything from scratch? Or is it possible to use a bean as an ActiveX control in our builder tool, like Borland Delphi. This section will take a quick look at the different options we as developers got.
JavaBeans Migration Assistant for ActiveX
IBM and Taligent, its object oriented technology subsidiary,
with support from JavaSoft, are developing a set of conversion
conventions, a porting guide and tool that will allow developers
to easily convert their Windows ActiveX components into JavaBeans.
The migration tool will build a Java source code skeleton, from
information provided by an installed ActiveX control. We need
to add the functionality of the control ourselves.
The migration tool lets us choose properties, and events to be generated in the skeleton code. And when we have access to for example the C++ code of a control, the translation to Java language can be quit easy.
The tool is shipped with the Bean Development Kit (BDK) of JavaSoft.
JavaBeans Bridge for ActiveX
JavaSoft also has a product that will allow Java Bean to act
as if the bean was an ActiveX control. This way beans can be used
in all ActiveX containers, like MS Word, Internet Explorer, and
many more.
We can assign a bean, and the bridge will write a ActiveX wrapper for the bean. And by registering this wrapper in the registry, will the Java Bean be available in many applications.