| Delphi Clinic | C++Builder Gate | Training & Consultancy | Delphi Notes Weblog | Dr.Bob's Webshop |
| Delphi Clinic | C++Builder Gate | Training & Consultancy | Delphi Notes Weblog | Dr.Bob's Webshop |
| |||||||
Jar files contain a set of related files for a specific application. These can be class files, images, resource files and other files. Creating a jar file, must be done using the command-line utility jar. The jar utility is part of the JDK. We can learn all the correct options to create a Jar file, but with JBuilder 4 we don't have to. In JBuilder 4 we now have the Archive Builder Wizard. In this article we will see how the wizard works to create archive file for an application.
Since Java 2 we can create a Jar file, which can be executed by the java interpreter. If we execute the following command:
java -jar app.jarand the file app.jar contains the correct settings, then the application in the Jar file is executed. In order to achieve this we must add a manifest file to the application Jar file. The manifest file must contain a line Main-Class: followed by the application class filename. So if we have created a Java application, which is called com.drbob42.TestApp, we must create a manifest file which looks like this:
  Manifest-Version: 1.0
  Main-Class: com.drbob42.TestApp
We will see how we can create the application Jar file using the Archive Builder Wizard.
We create a new project and then start the application wizard from the File|New... menu. We create a simple application with a menubar and center the frame on the screen. We place a JdbLabel (which is on the dbSwing component palette) on the frame. We only place this label on the frame to make sure we will need an extra library, dbSwing, for our application. JBuilder will automatically add the dbSwing library to our project settings. We can check this to go to Project|Project properties... and look at the Libraries tab page. We now have the following source files: application and application frame
We want to package the application into a single Jar file, because it easier to distribute to users. We can create a Jar file with only the two compiled class files: Application.class and AppFrame.class. But then the user must have the necessary library files, which make up the dbSwing library, in the class path settings. The dbSwing library has one required library: DataExpress. The dbSwing and DataExpress libraries include the following Jar files: dbswing.jar, dx.jar and beandt.jar. The user of the application must have these files added to the user's class path before the user can run our application. This is not very practical. For this example we will create a single Jar file with all dependent libraries and classes included in the Jar file. Now the user only needs this single Jar file to be able to execute our application.
Go to Wizards|Archive Builder... or select the Archive Builder option from the File|New Object Gallery. This will start the Archive Builder Wizard:
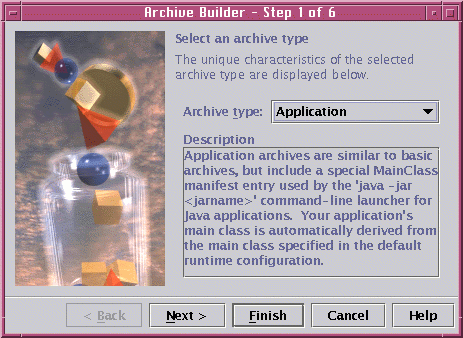
We have different archive types to choose from:
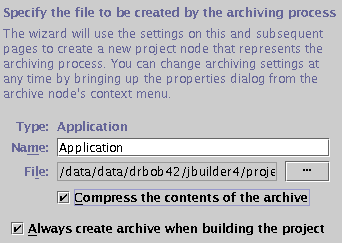
Next we must fill in a name for the archive builder settings.
When we have finished the wizard we will have a new node on our project with the name we fill in here.
We leave the default name Application.
We also can assign a filename for the Jar file to be generated.
Here we fill in SimpleApp.jar.
If we want the contents of the Jar file to be compressed we must check the option Compress the contents of the archive.
Uncompressed Jar files will execute faster, because the contents doesn't need to uncompressed first before the application can be run.
We will leave the option unchecked for our example application.
Finally we can indicate if we want the Jar file to be generated every time we compile our project.
If we leave this option unchecked we can always regenerate the Jar file, by selecting the node in our project and select Make or Rebuild:
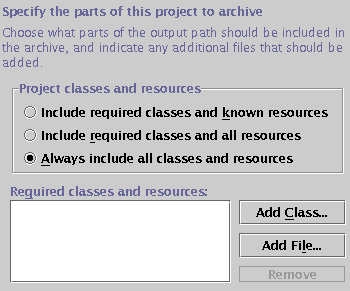
The next step of the wizard let's us define the contents of the Jar file. The option Always include all classes and resources will include our compiled application class files. We can also add additional resources to the Jar file with the buttons Add class... and Add file.... For example we could have resourced all hard-coded strings in the application into a external properties file. Here we could add the properties file to the Jar file:
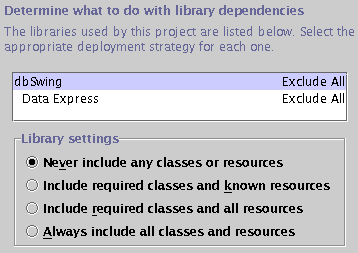
If we click the Next button we enter the page of the wizard, which we use to indicate the inclusion of libraries. By default all libraries of our project are excluded from the Jar file. This means we have to deploy the necessary Jar files with our application Jar file. In our example we want to generate just one archive file with all classes necessary to run the application. Therefore we select the second option Included required classes and known resources for both libraries. We can multiple select the libraries in the list box and the check the second option. The wizard will search through the libraries and only include those classes from the libraries, which are really used by our application classes. If we want to include all classes in a library and all resources we must check the last option:
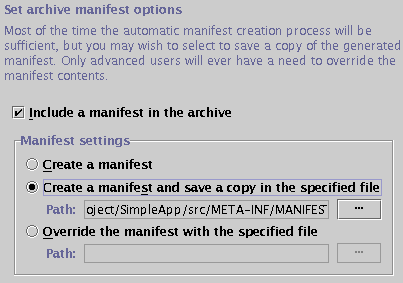
We click on the Next button to go the manifest settings page. Here we specify if we want an automatically generated manifest file or if we want to use a manifest file we have created ourselves. We can choose to save the automatically generated manifest file to disk, so we can use it is a basis for our own manifest file. It is a good idea to let the wizard generate a copy, because it will contain the correct settings for a next deployment, without the need of regenerating the manifest file. Because we have specified the Application archive type at the beginning of the wizard, our manifest file will contain a line which states the application class file with the main method:
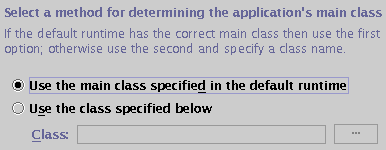
The last page of the wizard let's us specify the class file with the main method, which is the class to start our application. In this case we must select the class com.drbob42.simpleapp.Application. This class is used for the entry in the manifest file. In our example we only have one class with a main method and therefore can leave the option Use the main class specified in the default runtime checked. If our project would contain multiple classes with a main method (and want to use another one than the default runtime class) then we could check the second option and use the class browser to point to the correct Java class:
Now we can press the Finish button to close the wizard. In our project we have a new node called Application. If we open this node we have one item: the Jar file SimpleApp.jar. We can open the Jar file by double clicking it or right-clicking with the mouse and select the Open option. In the structure pane beneath the project pane we see the contents of the Jar file. We can open the manifest file to see the contents of the generated Jar file. To deploy our application we only have to distribute this single Jar file and tell the user to execute the following command:
java -jar SimpleApp.jarTo create the archive file again we can simply right-click on the Application node and select Make or Rebuild. This will regenarate the Jar file. If we want to make changes to the settings for the archive file, we right-click on the Application node in our project and select Properties... from the popup menu. This will open the properties of the Jar file as we used in the wizard. We can make changes here and rebuild the Jar file with these new settings.
We end this article with a small tip. We have now create a single Jar file with all dependent classes of the libraries included in the archive. But we could also have deployed the Jar files, which make up the libaries, with our application Jar file. So we not include the dependent classes into the archive, but we have to make sure the library Jar files are included in the user's class path. As we remember the following archive files need to deployed: dbswing.jar, dx.jar and beandt.jar. We could tell the user to execute the following command to run our application:
java -cp dbswing.jar;dx.jar;beandt.jar -jar SimpleApp.jarBut there is another and easier method to make sure the correct Jar files are loaded in the class path and the user only has to use the java -jar SimpleApp.jar command.
Class-path: dbswing.jar dx.jar beandt.jarMake sure the Jar files are separated by spaces. The path to the archives is relative to the application archive file. So if we deploy the application we must make sure all Jar files are in the same folder. This line must also be after the line with the Main-Class entry.
A JBuilder project can contain multiple archives. It is very easy to create an archive node for every possible deployment. All settings for a specific deployment will be saved with the project, so it is very easy to redeploy using the same settings. The Archive Builder wizard together with the support for opening archive files in JBuilder really is an improvement in this new version of JBuilder.