| Delphi Clinic | C++Builder Gate | Training & Consultancy | Delphi Notes Weblog | Dr.Bob's Webshop |
| Delphi Clinic | C++Builder Gate | Training & Consultancy | Delphi Notes Weblog | Dr.Bob's Webshop |
| |||||||
Servlets are bringing Java to the server-side. After applets and applications made it to the client desktop, it is time to bring Java to the server-side.
You might wonder what servlets are. Servlets are the server-side version of an applet.
It is a Java program loaded by the Web server and deals with client requests.
This kind of functionality is much like CGI.
But servlets are platform independent, persistent, more secure and can use all of the Java features, and are much easier to integrate with applets.
The Java servlet API is available in the Java Servlet Development Kit (JSDK) from JavaSoft, and will be standard included in the JDK 1.2.
A downside to this glorious story is the availability of web servers that support servlets. Not every web server will support servlets. A real Java web server is build by JavaSoft and support servlets. There are also extensions to web server software from Microsoft and Netscape so that these web servers will support servlets. A very good extension is from Live Software, which can be found at http://www.livesoftware.com/products/jrun/.
JBuilder provides a Servlet Wizard that makes it very easy to create servlets. The wizard makes a class that extends the HttpServlet class and can be used to built servlets. The wizard will also generate an example HTML page that will call the servlet. So let's start and make a servlet.
Go to File | New to open the New.. dialog. You can see an icon for the Servlet wizard:

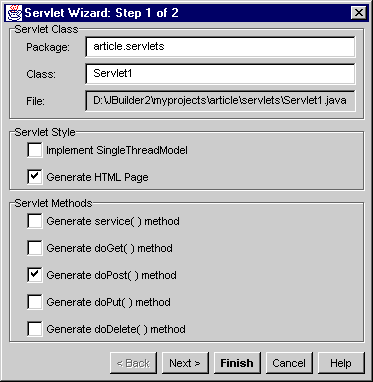
The first section is concerned with the name of your servlet and the package you want to built it in.
Now let's take a look at the second section, named Servlet style.
If the first option Implement SingleThreadModel is checked, JBuilder adds code to your servlet, that will instruct the web server to load only one servlet at a time.
So when a user requests the servlet and some other user is still using it, the requesting user will have to wait until the other user is finished.
In the real world you probably don't use this option much.
We leave it unchecked.
The next checkbox asks us if JBuilder needs to generate a example HTML page that will call our servlet.
Check this box so we can take a look at what JBuilder generates.
The third section of the first wizard screen is labeled Servlet methods.
Here we can tell JBuilder what methods we want to override from the extended HttpServlet class.
The doXXX() methods are used to customize the behaviour of the servlet according to the corresponding HTTP command: GET, POST, PUT or DELETE.
When you want to use data from a HTML form command, you need to override doPost().
And that is what we want to do right now, so check this checkbox.
The service() is a more generic method to override. You can use this method to see what HTTP command is used and act accordingly. This method is always executed when the servlet is called. When you check this option, JBuilder will generate a different example HTML page, than when you have checked one of the other options. This HTML page has an .shtml extension. And the servlet is called by a <SERVLET> tag, instead of a HTML form. The extension tells the web server it needs to look for the <SERVLET> tag inside this HTML page, and replace this tag with the output of the servlet. This way you can build HTML template files with <SERVLET> tags that are dynamically changed when the user requests the page.
Click on Next to go to the second screen of the wizard:
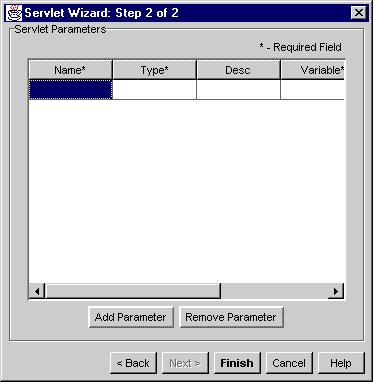
On this screen we can add servlet parameters. If we haven't checked the service() method on the previous page, adding parameters on this screen will result in JBuilder adding parameters to our form in the HTML page, and code in the servlet to handle these parameters. Let's add a parameter that asks the user his of hers name in the HTML page. Insert the following values for the fields:
If you have checked the service() method checkbox on the previous page, JBuilder will insert a <PARAM> tag with the correct values to the HTML page with extension .shtml.We are now ready with the Wizard and by clicking on Finish we let JBuilder build the HTML page and the servlet source code. At the end of this process we have the following two files added to our project: Servlet1.html and Servlet1.java.
If we open the Servlet1.java file we can see what JBuilder already has done for us. You notice the inclusion of all necessary import statements at the top, the fact that Servlet1 extends HttpServlet, and three methods:
The init method is called only once in the lifetime of a servlet: when it is loaded by the web server. This method is very convenient to initialize variables that require a lot of resources or time. For example, the connection to a database can be best defined in the init method, to reduce connection time by every request. The default implementation of this method calls the init from the HttpServlet class.
The doPost method is the method where it all happens.
This method is called every time a user submits the form that will activate the servlet.
The parameters of this method, request and response, are the handles to the server variables, form parameters and the output to the web browser.
The request object has a lot of very useful methods to read server variables, like protocol, version and much more.
This object also contains all the data that came with a request by the user.
The response object let's you set the content-type of your return message, error codes and more.
You can see that JBuilder already added code that will read in the parameter Name from the form and assign it to the variable pmUserName.
The next line sets the content-type of the response, so the browser will know it is getting HTML back.
Next an output stream to the browser is opened.
We can use this stream to write to the browser window.
JBuilder already added the following five lines that will show an empty HTML page in the browser with the title Servlet1.
And finally there is the inevitable getServletInfo method. This method will return information about your servlet, that you will have to provide. You can customize this information by returning a string of your own. This method can be invoked by your web server so it is easier to administer the different servlets.
You have seen that a servlet is very straight forward and isn't that difficult to grasp. Now it is time to add some functionality of our own to this servlet. We want to add a property to the servlet that will count the number of connections to the servlet, return a HTML page with the number of connections, the contents of the userName variable, the servlet information and a little static information.
To add the connection counter variable go to the first line after your class definition and insert the following line:
private int connectionCounter;Next add the following line to the init method:
connectionCounter = 0;
This will set the counter to 0 when the servlet is loaded by the web server.
return "Example servlet by Hubert A. Klein Ikkink for drbob42.com";You can change this off course into anything you want as long it is a string.
out.println("<body>");
Press Enter to insert a new line and add the following code:
  out.println("<H1>Example servlet</H1>");
    // HTML Heading1 format
  out.println("Your IP address: " + request.getRemoteAddr() + "<BR>");
  out.println("Your user name (value of form field): " + pmUserName + "<BR>");
    // pmUserName variable
  connectionCounter++;
    // raise counter with 1
  out.println("# connections: " + String.valueOf(connectionCounter));
    // Return counter value
  out.println("<HR>");
    // HTML horizontal rule
  out.println("<I>Output generated by: " + getServletInfo() + "</I>");
    // Servlet info
And we are ready! You can compile the code and if everything went well there are no errors. If you get errors that tell you JBuilder can't find the javax.servlet packages, you need to add these packages to your classpath of your project in the project properties. There are two ways to achieve this:
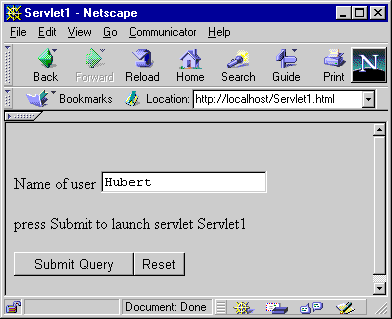
  <FORM Action=http://localhost/servlet/article.servlets.Servlet1 Method=POST>
  ...
  </FORM>
Copy the HTML page to your web server. You can now open a browser and enter the URL of the HTML page. Clicking on the submit button will activate the servlet and you will see the output in your browser:
Output from servlet
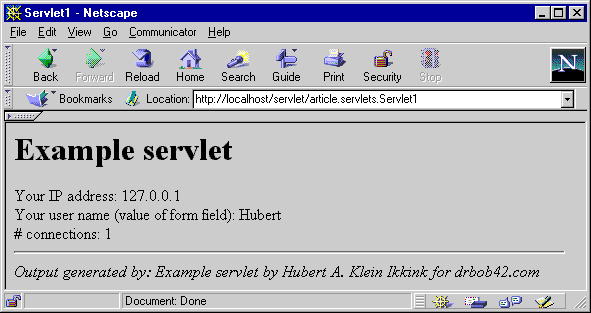
You will notice that if you return to the HTML page and submit another value, the counter will be increased. This shows that the servlet isn't closed down when the output is returned, but stays in memory.
As soon as the web server where this article is residing supports servlets, you can see this servlet live, but for so long you have to build and run it on your own to see how it works. Have fun!
Here is the complete source code and the HTML file to activate the servlet.